| Series |
|---|
HDR & More Immersive Sound Is Our Future
A year ago, I sat in one of the mix suites of my sister company Ott House Audio (we share space), looking up at the ceiling watching one of the mixers – Jeremy Guyre installing one of four overhead speakers to complete the 7.2.4 Dolby Atmos setup in the room. I thought to myself ‘ehh, what’s the big deal?’
An hour or two and several amazing demos later, I was convinced that the immersive sound of Dolby Atmos was a big deal!

Sitting across from me was my close collaborator, and owner of Ott House Audio Cheryl Ottenritter, who noticing the grin on my face, asked ‘So Rob, when are you going to get a Dolby Vision setup?’
Flash forward 12 months and my company DC Color, Ott House Audio and our friends from Dolby are hosting an open house event for 150 network executives, producers, DPs, and editors showing off Dolby Atmos & Dolby Vision.
Clearly, I accepted Cheryl’s challenge! Today we’re the only facility in the Mid-Atlantic to offer Dolby Atmos and Dolby Vision mastering services under one roof.
As longtime Mixing Light members know, I like sharing my experiences of diving into cutting-edge workflows like ACES and now, Dolby Vision HDR. That’s why Ill continue sharing my experiences in setting up Dolby Vision grading, explaining how all the pieces work together, exploring grading techniques, and the outputting and mastering of Dolby Vision projects.
Along the way, I’ll share my mistakes, tips and tricks that I’ve learned, and things I’d like to see improved in the Dolby Vision workflow. If you’re reading this article you probably know HDR means High Dynamic Range, but throughout this series when I mention SDR or Standard Dynamic Range, I’m referring to traditional 100-nit gamma 2.4 monitors that we’ve been using our entire careers.
The Alphabet Soup Of Terms
Over the course of this series, we’re using what may be some new terms to you, and at the very least, a truckload of acronyms – P.Q. HDR10, P3, Rec. 2020, SDR, Dynamic Metadata, CMU, etc.

I thought about making the first part of this series a deep dive on those terms, but seeing how Patrick has been perfecting a presentation on all these new terms & acronyms over the past year, we decided that it’d be best to keep this series focused on the Dolby Vision workflow and not litter it with definitions.
Patrick will publish an Insight demystifying a lot of the new vocabulary associated with HDR and Dolby Vision workflows. Once available, I’ll be sure to link back to that information.
What is Dolby Vision?
That’s a pretty detailed question!
To start, I’ve embedded a fantastic presentation by Tom Graham from Dolby.
Mixing Light contributor Joey D’Anna and I recently spent a full day with Tom at my facility when he was in for our open house featuring Dolby Atmos & Dolby Vision. Tom is an amazing guy and representative of Dolby, and both Joey and I learned a lot from him.
Be sure to watch this entire video at some point – it’s jam-packed with great info!
How I Think About Dolby Vision
Try to think about Dolby Vision as a funnel. The HDR grade is the wide end of the funnel: a high dynamic range (HDR), large color gamut, and possibly high resolution and frame rate moving image.
The Dolby Vision process analyzes your HDR grade (in the grading software), creates some metadata, and a Dolby Content Mapping Unit (CMU) reads the metadata produced by the analysis process. The metadata is embedded over SDI and in real-time the CMU creates a Standard Dynamic Range (SDR) version of the project.
Think of this SDR version (television as we see it today) as the smaller end of the funnel.
Unlike HDR10 (another HDR standard) where mapping from HDR to SDR is passive and applied over the entirety of the program, Dolby Vision allows for frame by frame or shot by shot SDR mapping. Meaning that the colorist, DP and director can provide creative input on the final look of the images in the SDR side of the ‘funnel’ by using of ‘trim’ controls within the grading software.
Trims can happen on a frame by frame or shot by shot basis so that that the SDR version of the project matches as closely as possible to the original intent of the HDR grade.
I know this is going to sound funny, but by starting with the HDR grade and deriving an SDR grade from that through the Dolby Vision process, I feel like I’m getting better SDR grades than I would have if I did the SDR version alone.
What’s more? Instead of having to do two separate grades, the trim process on most projects usually only adds a few hours of time, which is way more efficient than two separate grades.
After The Grade
Once you’re done with HDR master grade, and happy with the trims on the SDR version, a master file is exported from the grading software (usually 16bit TIFF) and a Dolby Vision XML is also exported, which contains all the metadata about the process – including information about the mastering monitor, and the trim pass information.
From there, the Tiff output and the XML are married up with software that Dolby calls the ‘Mezzinator’. This tool creates an MXF 12-Bit RGB JPEG2000 file plus an XML – together, they are known as the Content Master. It’s at this stage where most postproduction facilities are ‘done’ with the Dolby Vision process, but there are a few more steps before the content can be streamed.
At the end of the Dolby Vision process, the Content Master is then run through a (very expensive) Dolby Vision Encoder creating the final encoded file that’s streamed.
I know it sounds a bit complicated, and some parts of the workflow are, but throughout this series, I’ll do my best to explain and provide my take on a Dolby Vision workflow.
Nuts and Bolts – The PQ Curve and HDR signals
While Tom explains this in the video linked to above, and Patrick will further explain in his upcoming article(s) on HDR (and other new video terms) it’s worth explaining one important thing about Dolby Vision (and HDR10) workflow – PQ.
Both Dolby Vision and HDR10 are based on the SMPTE 2084 standard, which was developed by Dolby and then ratified as a SMPTE standard for HDR signals. SMPTE 2084 describes what is called an Electro-Optical transfer function (or EOTF) – and Dolby calls it the PQ (or Perceptual Quantizer) curve. I know it sounds like a lot – but what it boils down to is 3 things:
- The PQ Curve Replaces Traditional Gamma Curves – The gamma curve of conventional SDR TV hasn’t changed since the 1930s, and was based on the characteristics of CRT TVs. It can’t hold a large amount of dynamic range, and limits the amount of contrast we can represent in the image.
- The PQ Curve Represents Actual Light Values – An EOTF maps numeric code values in the digital video signal to the light output of the display. However, unlike conventional gamma – the PQ curve explicitly defines light values in nits, and can represent physical brightness values from black all the way up to 10,000 nits. This allows PQ (and standards that use PQ) to be forward compatible with future, brighter displays.
- PQ Is Based On How We See – Unlike traditional gamma, PQ is logarithmic, just like human vision. It dedicates more code values to areas of luminance we see the most detail in, assigning less code values to the brightest highlights, not wasting any of the signal. The curve was engineered based on feedback from actual viewers and is designed around the characteristics of human vision – not those of CRT electron-guns from the ’30s.
PQ, in my opinion, represents a sea change in how ‘brightness’ is handled. Put simply PQ is awesome. Footage processed in PQ takes on an intuitive response that looks great.
Why I Invested In Dolby Vision & Why I Did It Now
Once I was pretty sure that I was going to invest in a Dolby Vision setup, I asked a few colleagues what they thought about doing so. Almost universally, the response was something like ‘Really? Are you being asked by clients to do a lot of HDR, specifically Dolby Vision?’
While I’ve done a dozen+ HDR grades over the past 18 months, my colleagues were right — clients weren’t banging on the door begging for HDR/Dolby Vision grades & deliverables. And while I occasionally allowed myself to daydream about grading a huge budget original Netflix series, that probably wasn’t going to be a reality anytime soon!
In addition to some new gear I had to purchase/lease, I also had to consider the yearly Dolby Vision Mastering & Playback Service Agreement paid to Dolby enabling the use of the CMU (more on that in a bit) and other Dolby software tools.
I was starting to convince myself that the idea of investing in a Dolby Vision workflow was purely speculative – and I’ve been around long enough in postproduction to realize that being speculative (build it and they will come) is usually a bad idea.
However, one night over some after work beers with my colleagues Cheryl and Jeremy, I was reminded that I had the same feelings about building a remote grading workflow, and over the years investing in computers, controls surfaces and other bits of gear.
What I mean is that to a certain degree, every investment I’ve made in my business has been a little speculative.

When I factored in that I already owned or leased much of the gear needed for a Dolby Vision workflow, I started to feel more confident.
With my nervousness quelled, I started to think ‘ok, if I’m going to do this, who am I going to sell Dolby Vision HDR services to?’
- The Known Quantity – The obvious choice was the production companies and networks that I already worked with. Networks like National Geographic, Discovery, Smithsonian, plus all the sister networks under those network umbrellas have been making a big push into streaming OTT services for years. After some meetings and phone calls, it was clear these groups were definitely interested in HDR and Dolby Vision for their OTT offerings.
- The Indie Film Maker – So-called ‘indie’ filmmaking is not what it used to be! Many short and feature-length films I’ve graded over the past few years have been beautiful and shot using future forward workflows i.e. RAW, UHD/4k. So, if I could upsell these productions to a Dolby Vision workflow, not only would they get a stunning HDR grade but ultimately an awesome generic HDR version (HDR10), and an SDR version as well — thanks to the Dolby Vision final encoding process (discussed in later installments in this series).
- The Skittish – Investing in cutting-edge technology and workflows always come with the concern of ‘are people going to be able to see/hear it?’ In the case of Dolby Vision, support is broad and growing. Apple, Vizio, LG, TCL, Sony, & Philips all support Dolby Vision. You can even watch Dolby Vision on a new iPhone 8 or X and the newest iPadPro! This adoption, in my opinion, will make Dolby Vision mastering a viable option for productions that have traditionally been conservative with how they approach new technology.
With my confidence high about offering Dolby Vision mastering services, the last thing I considered was a competitive advantage in my market.
As I mentioned, our sister company Ott House Audio had invested in Dolby Atmos abilities and as the first Atmos nearfield suite outside of L.A. or New York has been thriving on Atmos work. No other company in my market was offering Dolby Vision HDR mastering, so being first in the market was the last thing that sold me on investing in Dolby Vision.
I’ve made the investment, so now it’s time to learn how it all works.
Necessary Gear In A Dolby Vision Workflow
There is no way to sugar coat this – getting set up in a Dolby Vision workflow is expensive. Like any cutting edge postproduction workflow, this expense comes mainly from the gear that you’ll need, which tends to be cutting edge (read: expensive) itself.
As HDR grading, in general, becomes more mainstream, I expect over the next few years the cost of gear necessary in HDR & Dolby Vision workflows to decrease. Like any major investment, be sure to really analyze the ROI of purchasing or leasing the gear you’ll need.
With that disclaimer out of the way, let’s talk about the gear you’ll need.
Color Correction Software With Support For Dolby Vision
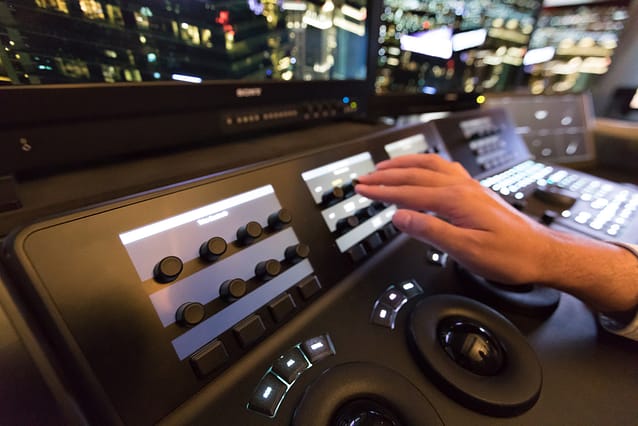
For me, and probably for many of you, this means DaVinci Resolve. But Dolby Vision is also supported in Lustre, Film Master & Baselight. I’ve heard that Mistika support is also coming soon. By default, Dolby tools are not enabled in any of these applications. You need a separate Dolby Vision Mastering & Playback Service Agreement in place which you get from Dolby directly.
The software and video I/O hardware must also process and output 444 RGB Full Range 12bit signals in either HD or UHD. Furthermore, the color correction software is where analysis of your HDR color graded images takes place and where the metadata is produced. The image and metadata are sent to the CMU (over SDI) for mapping to SDR. Your grading software also contains the Dolby ‘trim’ controls to fine tune SDR mapping on a frame by frame or shot by shot basis. So what is this CMU I keep mentioning?
Dolby Content Mapping Unit (CMU)
The Content Mapping Unit or CMU for short is hardware [NAB 2018 update: It looks like software CMUs are on the way]. The CMU is a 1RU rackmount computer that you must purchase from a Dolby Authorized System Integrator. This computer runs the CMU software, which is responsible for mapping HDR content to SDR. In other words, the CMU takes an incoming HDR signal (that also contains the metadata generated in the grading software) and maps it to a chosen SDR target and outputs the mapped signal to a SDR reference monitor in real-time.
Your color correction software communicates with the CMU via a standard Ethernet network, and the Dolby Vision metadata (generated by the color correction software) is embedded in the SDI signal.The CMU contains either one or two AJA Kona 3G I/O cards – one card for HD SDR workflows or two cards for UHD (quad 3G) workflows plus an NVIDIA GPU.
The CMU can run headless (no monitor or keyboard/mouse), but for the initial setup, you need a VGA monitor and a USB mouse/keyboard. After the initial setup (logging into the server and configuring a static IP), the CMU functions are controlled via webpage hosted on the CMU and then can run headless.

Dolby Vision Mastering Monitor
This is the HDR monitor in the setup. Dolby dictates this monitor must have a minimum peak luminance of 1,000 nits, a minimum contrast ratio of 200,000:1, support for 100% of the P3 color gamut, support for Rec2020 and for the SMPTE 2084 EOTF. These specs limit your monitor choices (currently) to the Sony BVM-X300, Canon DP-V2420 and Dolby’s experimental 4000nit monitor known as the Pulsar. Joining this elite group is the soon to be released 3,000 nit FSI XM310K.
SDR Target Reference Monitor
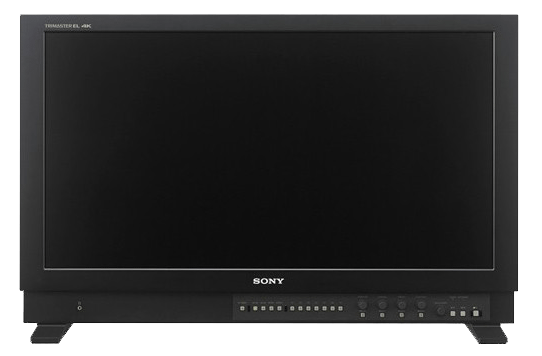
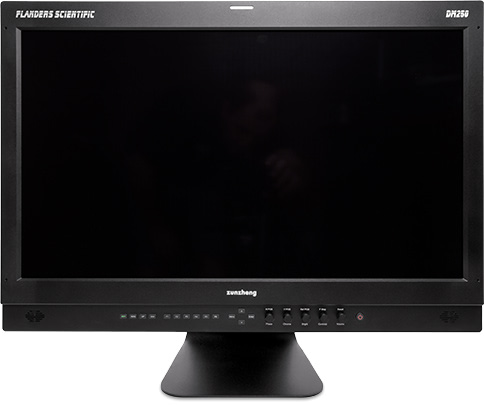
A Dolby Vision setup also requires an SDR reference monitor. This monitor is being fed the mapped SDR output of the CMU. This monitor must be able to hit 100-nit peak luminance, have a 2000:1 contrast ratio, support 100% of the Rec 709 color gamut and support gamma 2.4. The choices for this monitor are plentiful. While some facilities use calibrated ‘client’ monitors for the target SDR monitor, I think it wise to use a true SDR reference display. In my setup, I use an FSI DM 250 OLED.
Video DA/Router
Because the output of your grading system feeds the HDR mastering monitor, CMU and SDR reference monitor all at the same time, you need to invest in video distribution amp like those from Blackmagic or AJA, or for more full-featured capabilities a dedicated SDI router. I’m currently using the Blackmagic Smart Video Hub 20×20, which is a 6G router. For reasons having to do with using the CMU for UHD, a 12G router may be a better option and something I’m thinking of investing in. I’ll discuss this issue in slightly more detail below.

Network Connectivity
Your grading system must be on the same wired network as the CMU so that the grading software can communicate with the CMU and allowing access to the CMU’s configuration options. This network can be a regular public network at your facility. While DHCP can be used, you’ll have the easiest time setting things up by using a static IP for your grading system and the CMU.
Putting It All Together
So how does all this gear connect? Pretty easily actually – especially if you’re using an SDI router. The output of the grading system is routed to the HDR Mastering monitor as well as the input of the CMU. The output of the CMU is routed to the SDR Target Monitor. The grading system after analyzing the HDR grade embeds Dolby Vision metadata on a frame by frame or shot by shot basis in the SDI stream to the CMU.
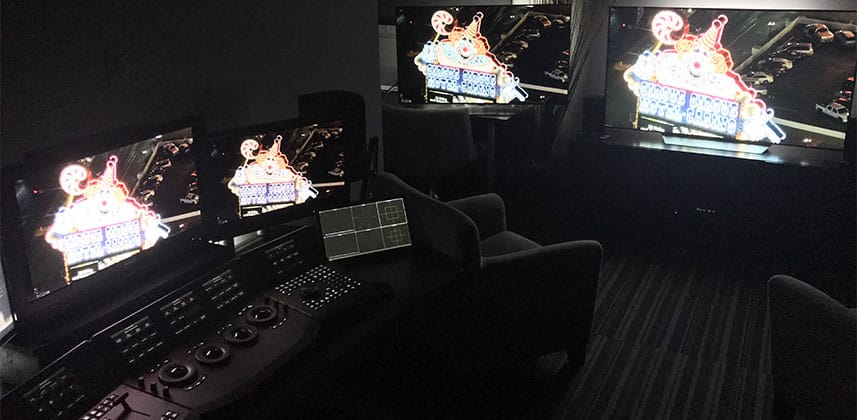
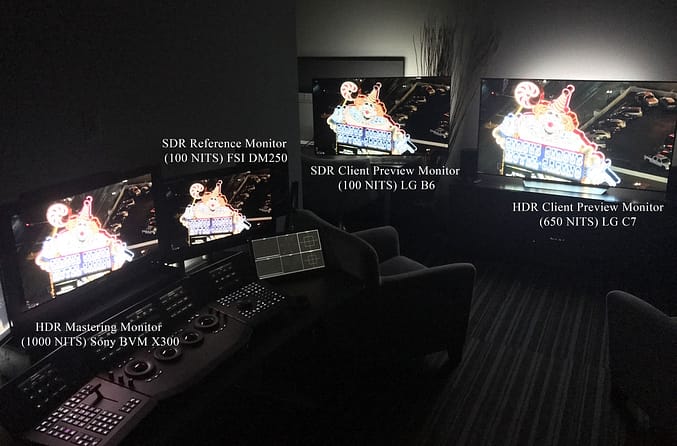
Here’s an image of my suite and simple diagram to visualize the connectivity:
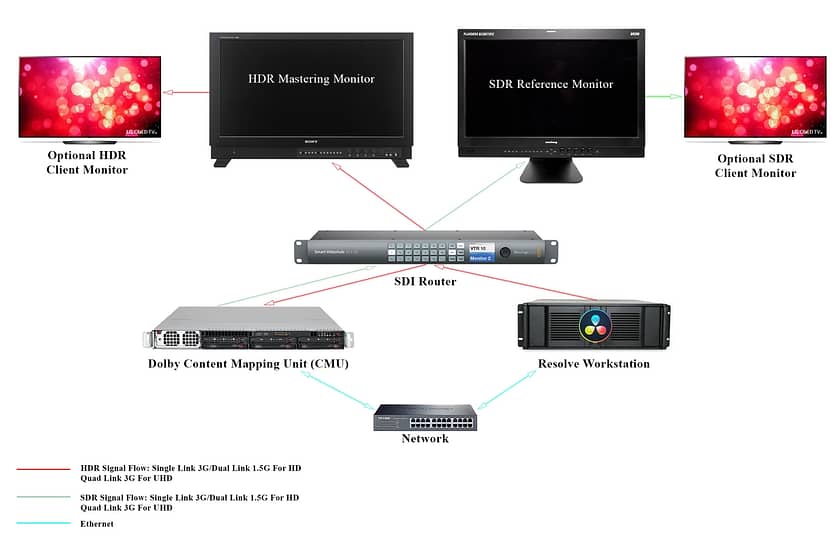
In HD, a single 3G or dual 1.5G connection is all that’s needed for SDI connectivity between all the devices. In UHD, things in my setup get a little messy cable-wise. Currently, the CMU only supports UHD input/output as quad 3G – yep, that’s 4 cables in and out of every device!
The only thing you can convert quad 3G to is 12G, which is simple with an inexpensive converter from AJA or BMD. The FSI XM310K, which I plan on investing in next year is also 12G and I currently have a 12G Decklink card. However, my SDI router is 6G so to complete the dream of UHD, 444 single cable connectivity for everything, I will need to wait until BMD releases a smaller 12G router – the current 40×40 is too big for my needs.
Ok, once you’re sure everything is wired correctly, the next steps are to verify the CMU is working and active, enabling Dolby Vision tools in Resolve and setting up a project correctly.
Verifying The CMU Is Active
After initially logging into the CMU and configuring a static IP with a VGA monitor & USB mouse/keyboard connected, the CMU is run headless. Everything you need to do with the CMU in a Dolby Vision workflow can be accomplished by accessing a web page hosted on the CMU, which is accomplished by typing the IP you configured for the CMU into a web browser (bookmark the page!).
The interface of the CMU is pretty simple and intuitive.
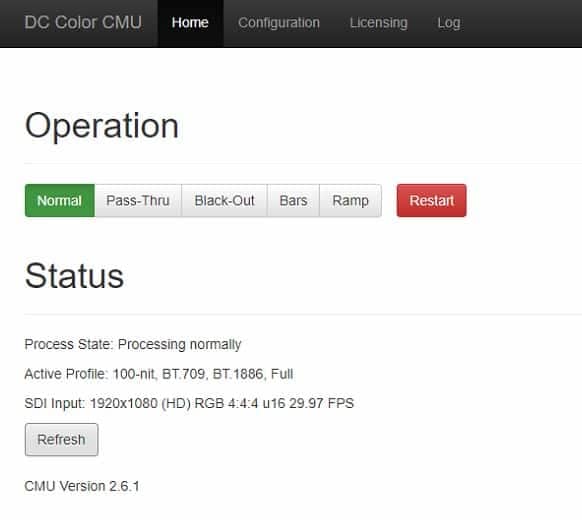
The CMU needs to have an active license installed to work properly. So, your first stop should be the Licensing Tab on the top menu bar of the CMU web page. A CMU license is obtained from Dolby after you supply Dolby with the Host ID of the CMU machine, which is also displayed on this page.
Back on the top menu bar, clicking on the home page option shows you the current operational status of the CMU, as well as allows you to change how the CMU is operating. You can choose between normal operation (the CMU is mapping incoming signal) pass-thru (no mapping is happening) or outputting various test signals. You can also restart the installed Kona card(s) if things are acting up.
Also, the home page displays the current process state, information about the incoming signal and what current target the CMU is mapping content to, i.e. 100 nit Rec709 Full Range (set in your color correction software). You can also find the installed version number of the CMU software – Dolby updates the software from time to time.
Finally, clicking on the configuration tab of the top menu bar allows you to configure a name for the CMU (useful if you have more than one) as well as configure the SDI connectivity to and from the CMU.
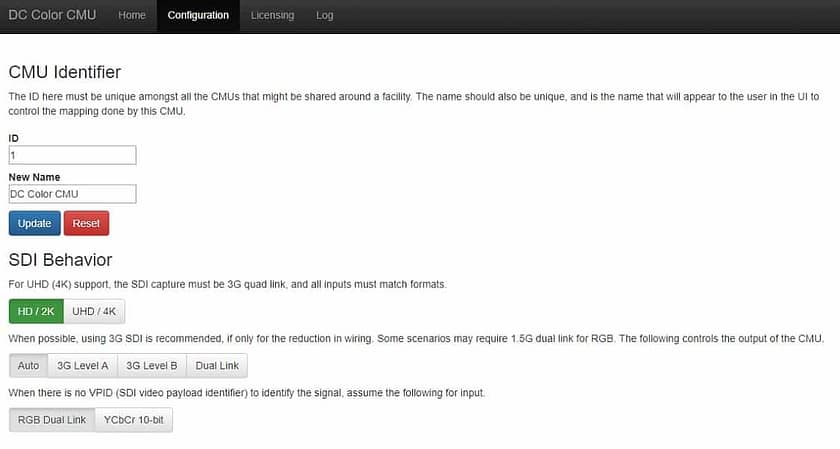
With the CMU in good shape, you next need to enable Dobly Vision capabilities in your grading software.
Activating Dolby Vision in DaVinci Resolve
[NAB 2018 Note: This process I describe below is changing in 2018. I’ll do a follow-up Insight on the changes, once the new software-based workflows are locked down.]
I’m a Resolve colorist, so I’m going to detail the steps for enabling Dolby Vision in Resolve. With other supported systems, the setup will be different – but the concepts are similar.
In Resolve, open up a blank project the choose DaVinci Resolve > Preferences.
Make sure the tab for configuring System preferences is selected and click on the Advanced category on the left-hand side of the window. As part of your Dolby Vision Mastering & Playback Service Agreement, Dolby provides you with three lines of code that get pasted into this window.

- The first is a unique string for your agreement that activates the Dolby Vision tools in Resolve. I’ve blurred it out here as it’s unique to my machine.
- The second string is the IP of your Resolve system. Again, a static IP works best.
- Finally, the 3rd String defines the UDP Port that Resolve and the CMU will communicate on over your network.
Once you’ve inputted these strings, save your preferences and restart Resolve.
After Resolve launches again, start a new project and conform a project, or just add some media to a new timeline and then open up Project settings (shift + 9). If the previous steps were done correctly, there’s a new settings category named Dolby Vision.
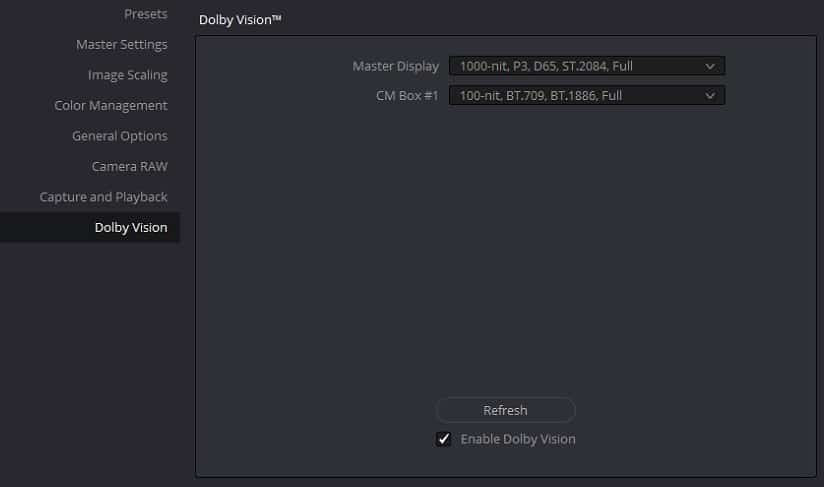
Clicking into this category allows you to enable Dolby Vision for the project (Dolby Vision is enabled on per project basis) and choose your Dolby Vision Master Display and CMU target. In my case, as the screenshot below shows, my Master display is set to 1000-nit, P3, D65 ST 2084 Full Range (using the Sony X300) and I’ve configured the CMU to target a 100-nit, Rec 709 display.
While you can target other displays, the 100-nit option is generally the best bet. By defining a 1000-nit mastering display and a 100-nit target monitor at the end of the Dolby Vision process when your content is encoded and streamed, the Dolby Vision chip in a TV can figure out how to best display content for that particular TV inside of that range.
By no means do you have to limit your target choice to just a 100-nit display. Dolby Vision supports multiple simultaneous targets. So, if you know that a 600-nit LG OLED is going be an important monitor for your audience, you could also target that display and make specific trims for it alongside trims for standard 100-nit displays.
Setting Up A Resolve Project For Dolby Vision
Setting up a Resolve project for a Dolby Vision workflow is simple, but at first, it can be a little hard to get your head around.
Before we dive into the specific setup let’s talk about media for one moment.
Dolby Vision (and all HDR) is all about the highest fidelity footage possible. As such, to get best results your footage needs to be at minimum 10-bits. Raw files and lightly compressed log encoded footage are ideal. Because of the way PQ works, 8-bit sources are likely to have issues with banding.
With the Projects Settings Window still open, navigate over to the Master Project Settings tab. You can configure the Timeline format options as you normally would but in the video monitoring section there a few things to configure.
- Dolby Vision only supports progressive scanning, so configure the Video Format pulldown to an HD/UHD progressive choice that matches the frame rate you need.
- Check the option for 4:4:4 SDI right below the video format pull down.
- In the SDI configuration area, if you’re working on an HD project, choose Single Link (3G) or Dual Link (Dual 1.5G) connectivity based on how your system is configured. If you’re working on a UHD project, because the CMU only operates in quad 3G for UHD projects, you’ll need to choose the Quad Link Option.
- For Data levels choose Full. Dolby Vision is always full-range.
- Finally, for Video Bit Depth choose 12bit.
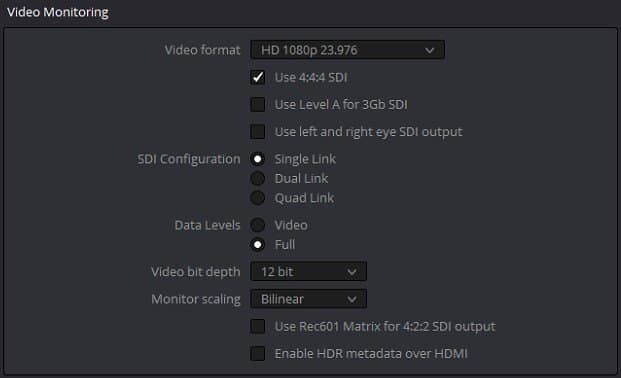
If some of these options aren’t available or don’t seem to work, then it’s likely that your BMD I/O device is older or doesn’t support them.
HDR projects are easiest when you setup Resolve to use either Resolve Color Management or ACES. For simplicity, the steps below are for RCM. I may cover using ACES in a Dolby Vision/HDR workflow in a later Insight.
- Click on the Color Management tab in Project settings.
- Change the Color Science pull down to DaVinci YRGB Color Managed.
- For the Input Color Space, I generally set this to bypass in Project Settings & assign an Input Color Space to clips manually – or as is the case with Raw footage, those transforms happen automatically.
- Set the Output Color Space to ST2084 at a nit level that matches the Dolby Vision HDR mastering monitor you’re using – in my case, that’s 1000 nits.
- Setting up the Timeline Color Space is an interesting discussion and one that I’ll continue in the next part of this series, but before you make a choice click the option for ‘Use Separate Color Space And Gamma’.
- When you check this option, the Output Color Space is configured as using Rec2020 for the Gamut and ST2084 (PQ) 1000nit. This is correct and matches how the HDR mastering monitor is configured.
- Is Rec2020 really the correction option for the Output Color Space? The problem is no direct view monitor can produce anywhere close to 100% of Rec2020 and quite often HDR spec sheets will request the P3-D65 gamut within a Rec2020 container. What this means is that you must deliver a master that is set to Rec2020 but your actual working gamut shouldn’t exceed P3-D65. I know it’s confusing!
- In the Timeline Color Space pulldowns choose P3-D65 for the color space, and in the gamma pulldown choose ST2084 1000nit. Because of the way Resolve Color Management works, this option effectively limits your grading to the P3 Gamut yet transforms that into the Rec2020 container for output.
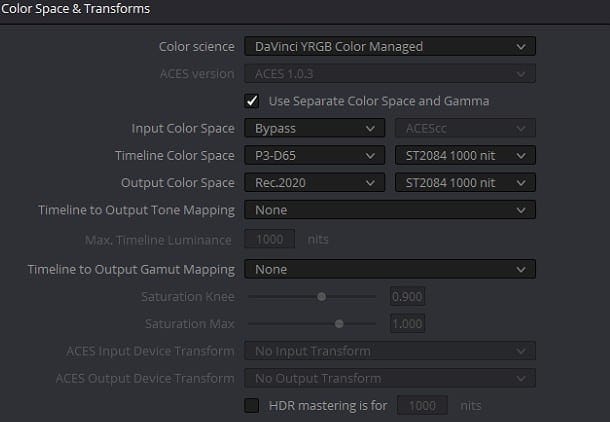
After you’re done configuring the project, press save to update the project. From here, if you’re working with non-raw media you can assign Input Color Spaces to your clips and begin grading in glorious ST 2084 PQ goodness!
Oh! One more thing! HDR Scopes
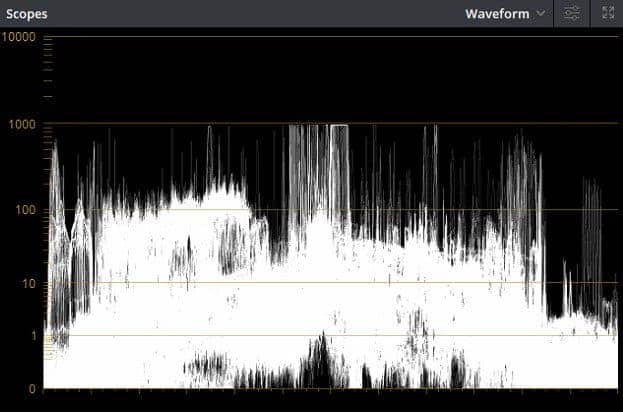
As I explained much earlier in this article, because the PQ curve is matched to actual light output and code values – the traditional way that we view waveform and parade scopes needs to change to match the PQ curve.
Fortunately, DaVinci Resolve has an HDR scope mode that allows you to measure footage using SMPTE 2084 PQ.

- In Resolve choose Preferences > User Tab > Color
- At the top of the available options, you’ll find one labeled ‘Enable HDR Scopes For ST.2084. Check this option.
- Enabling HDR scopes in Resolve shows code values mapped to their exact NIT value on the Waveform and RGB Parade.
- After this option is enabled if you activate the video scopes inside of Resolve and switch to the Waveform or RGB Parade then instead of the traditional 10-Bit scale you’ll see a 0-10,000 code value scale. This represents the current range of PQ code values possible in an HDR image.
While it might seem that setting up a project for Dolby HDR grading is tedious, after you do it once, saving (and exporting it for later use) a Resolve configuration is a great way to handle the multiple setup steps.
Coming Up In Part 2: Shot Analysis, The Dolby Vision Palette & More!
There is one more interface change you see after configuring your system for Dolby Vision – A new Resolve palette to the right of the Motion Effects palette.
This palette contains the Dolby Vision trim controls and it’s where after analyzing a frame, a shot or entire timeline, you make creative decisions (trims) about the look of SDR content mapped by the CMU.
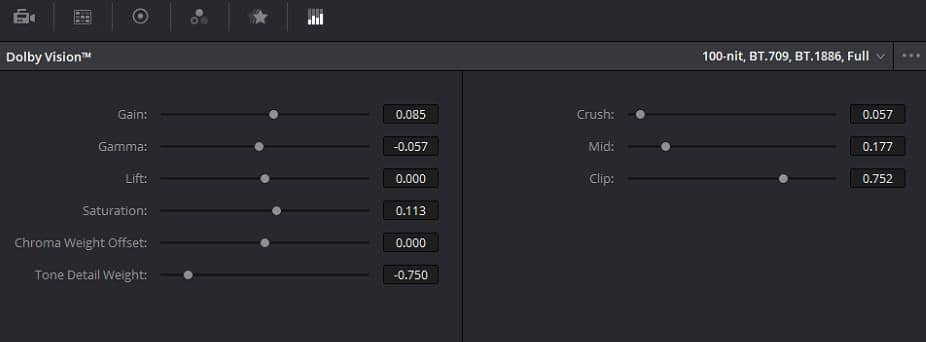
In Part two of this series, we’ll dive into the details of analyzing shots and using the Dolby Vision trim controls to finesse the SDR version of a project. You’ll learn how those trim controls operate and more about setting up your suite for optimal Dolby Vision workflow.
As always if you have questions or something to add to the conversation please use the comments below!
-Robbie
Learn More About How to Create HDR and Dolby Vision
- What Is HDR and Dolby Vision and How Do You Create It? : This Flight Path Guide shows you all the Insights we have on Mixing Light about creating HDR and Dolby Vision content. Plus, it links to key external resources on this topic.

