| Series |
|---|
New Tools, New Workflows & Dolby Vision For The Masses!
When I left off this series back in January, I promised that in Part 3 we’d jump in and take a look at the Dolby Professional Tools and creating mezzanine files. I still want to do that, but a lot has happened in the Dolby Vision/Resolve worlds since Part 2 back in January 2018 (gulp – where has the year gone?!). It’s these developments that I want to cover in this installment of our Getting To Know Dolby Vision series.
When it comes to Dolby Vision, the past few years have seen an amazing amount of growth of the system – from the Dolby Cinema Experience to the proliferation of Dolby Vision + Dolby Atmos on streaming services like Netflix, Vudu & Amazon. But nearly all that content creation has been happening at the top end of the content creation pyramid – meaning large productions working at the top post facilities in the world.
Because of this, I understand why many of you have thought of Dolby Vision as an expensive, complicated system and really just the domain of Hollywood and other major players. It’s true that Dolby Vision has ‘grown up’ in the hands of the top content producers and major post facilities, but if you think about this from Dolby’s perspective, it makes sense – put Dolby Vision to the test with the most demanding users.
In 2018, along with partners like Blackmagic, Dolby has made a concerted effort to make Dolby Vision accessible to more productions than ever before! While true HDR reference monitoring will still be a hurdle for many, as I wrote about in a previous Insight you can get into HDR grading with way less investment than you think and now that also includes Dolby Vision.
Said slightly different – Dolby Vision is here now, and accessible to projects of all sizes.
Own DaVinci Resolve Studio? You Have Dolby Vision!
By far the largest development that has happened this year when it comes to Dolby Vision and DaVinci Resolve is that for no additional cost if you own Resolve Studio you have access to Dolby Vision!

Resolve Studio features Dolby Vision automatic shot analysis, which analyzes the shots in your timeline to generate the metadata that is used to display Dolby Vision across a wide variety of devices. Every Resolve Studio user can leverage Dolby Vision shot analysis to create Level 1 (L1) Dolby Vision metadata – remember from Part 2 of this series, L1 metadata can be thought of as the automatic tone mapping performed by the Dolby Vision algorithm to the required SDR target as well as any lower nit level downstream HDR targets. It’s this automatic analysis that is included with DaVinci Resolve Studio.
Resolve studio now also includes a built-in Internal CMU (or iCMU) – which allows you to preview Dolby Vision at various target display settings, right on your SDI output. The iCMU also supports simultaneous HDR and SDR output using your Decklink or UltraStudio’s second SDI output.
While automatic analysis is available to all studio users, to enable the trim controls in DaVinci Resolve you’ll need a license from Dolby – at the time of this writing, cost information of that license was not available.
As discussed earlier in the series, the trim controls provide creative control over your downstream (SDR + lower nit HDR) versions that are derived from the original HDR grade. The concept with trim controls being if you’re not happy with the automatic analysis, (which usually does a good job BTW) you can use the trim controls to adjust the downstream image to better match the creative intent of your original HDR grade.
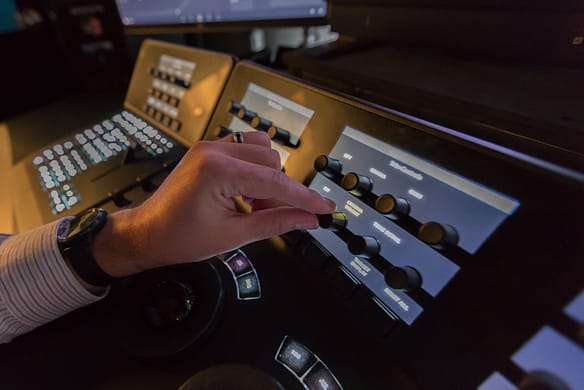
From a workflow perspective, the inclusion of automatic shot analysis and the iCMU brings up a few interesting things:
- You can market yourself/facility as having Dolby Vision capabilities – however, this doesn’t mean you are a Dolby Vision Certified Facility.
- You can get into Dolby Vision and HDR grading and later decide to get a license to enable the Dolby Vision trim controls if you feel that you need them.
- You can potentially partner with a facility that is certified/licensed for projects where trims would be helpful.
- You can preview Dolby Vision right in your grading suite without additional hardware.
Dolby is also working with other partners to enable functionality like Resolve Studio has. It’s not hyperbole to say support for Dolby Vision shot analysis in Resolve Studio is huge and very exciting to us mere mortals, who just a couple years ago had to gawk at high-end facilities who were part of an elite crowd that could provide a Dolby Vision workflow – no longer!
Enabling Dolby Vision, iCMU & Licensing Setup
Enabling Dolby Vision is easy in Project settings. Just like when working with hardware CMU or what’s known now as the eCMU (external CMU) you enable Dolby Vision on a project by project basis. After enabling Dolby Vision, the Dolby Vision palette will appear alongside other Resolve grading tools.
To enable Dolby Vision and setup the iCMU use the following steps:
- With a Dolby Vision HDR project setup (as detailed in previous parts of this series) open Project Settings > Color Management. About halfway down the page, you’ll see the option to enable Dolby Vision.
- The default Dolby Vision version is 4.0. Using the pulldown menu you can switch back to version 2.9, which is required if you’re using an eCMU (the external CMU checkbox becomes available at the bottom of the section once you select 2.9). You should choose 4.0 if you’re working on a new Dolby Vision project with the iCMU, but the iCMU will also work with the older Dolby Vision version.


- As I detailed in previous installments of this series, choose a Mastering Display that matches the peak luminance and gamut that you’ll be using.
- Press Save in project settings.
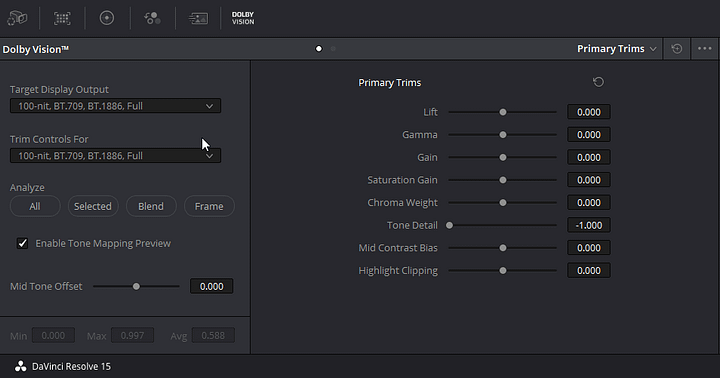
Once you’ve enabled Dolby Vision in a project, the Dolby Vision palette will become available. On this palette (or on the Resolve Advanced Panel) are analysis and trim controls. The automatic analysis will work without any additional configuration, but the trim controls will be grayed out after analysis unless you have a Dolby Vision license. Let’s explore adding a license next.
Adding A Dolby Vision License To Resolve
While automatic analysis works very well, you’ll often want to tweak the SDR (or lower nit value HDR targets) to better match the look of the original HDR grade – that’s what the trim controls do. To utilize the trim controls you must have a license from Dolby.
To obtain a license, reach out to Dolby. They help with all the details of obtaining a license.
Once you obtain a license, Dolby will send you two important .bin files. The first is a configuration file and the second is the license itself.
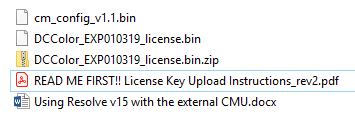
To load this in Resolve choose File > Dolby Vision > Load License and File > Dolby Vision Load Configuration. Restart Resolve after loading the config and license.

****It’s important to note that an iCMU license does not also license an eCMU. If you want to use both the iCMU and eCMU, you’ll have to have a separate eCMU license. The eCMU is still licensed as described earlier in this series.
Tone Mapping Preview & Dual SDI Outputs
If you’ve read Part 1 and 2 of this series, you know in a proper Dobly Vision setup there are two displays in use – An HDR mastering monitor and an SDR mastering monitor (and sometimes a lower nit HDR monitor).
With the eCMU and a video D/A or router this setup is pretty easy – HDR signal from your Resolve system to the HDR monitor, the tone mapped output of the eCMU to the SDR display.
Using the iCMU, the signal is coming from one source – Resolve. So how do you simultaneously see an HDR and SDR output from Resolve?
The Resolve team came up with a pretty cool solution.
The first is an option in the Dolby Vision palette to toggle tone mapping on/off. After analyzing a clip, and with the default state of the option enabled, Resolve on the Viewer, as well as on output via your Vidoe I/O, will show you the tone mapped version of the shot (usually a 100-nit Rec709 Target).
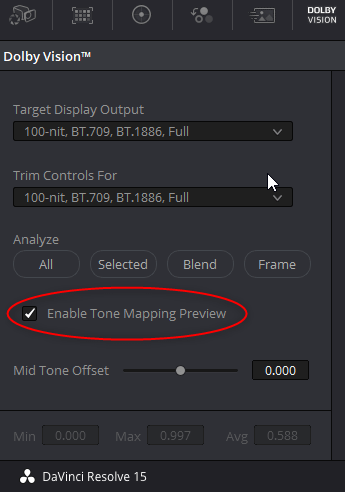
If you turn off tone mapping, you’ll be looking at the original HDR grade in the Viewer and that same signal is also output via your video i/o.
This setup would work ‘ok’ if you didn’t mind switching your external monitor inputs between two different ones (and potentially changing monitor settings each switch), but it also doesn’t allow you to view the HDR and tone mapped downstream version side by side.
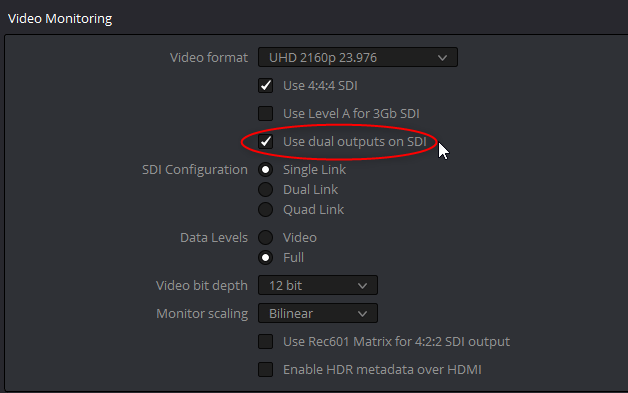
To get around this problem, Blackmagic introduced a new setting in the Video Monitoring section of Project settings called Use dual outputs on SDI. To use this option, you must have either a Decklink card or Ultrastudio product that has two SDI outputs. When enabled, output 1 is the HDR signal and output 2 is the tone mapped signal. You can still toggle tone mapping on/off but it will only affect the output of the 2nd SDI output.
Another modification to the Dolby Vision panel that’s related is two pull-down menus called Target Display Output and Trim Controls For.
Target Display Output allows you to switch between different downstream targets – this control is usually set to the 100nit BT.709 option but changing it to say a 600 NIT option will change the tone mapped preview in Resolve’s Viewer, as well as the tone mapped output via SDI. Because shot analysis is not tied to any one given target, this menu allows you to quickly see what your HDR grade would look like on other targets.
Trim Controls For lets you display trim controls for a given target – remember you can have multiple simultaneous trims on a shot.
In practice, tone mapping preview + use dual outputs on SDI works very well and in general, I find it less clunky than using the eCMU and a video router.
New Trim Controls
The automatic shot analysis included in DaVinci Resolve Studio works surprisingly well in many situations, but to leverage the full power of the Dolby Vision system trim controls can be used to get downstream versions of the project to match the creative intent of the original HDR grade.
In addition to slightly tweaked Primary Trim controls (discussed in detail in Part 2 of this series), Dolby Vision version 4.0 features Secondary Trim controls for even more creative power.
It’s worth noting that if you have your project setup to utilize version 2.9 or if you’re using an eCMU, secondary trims are not available and the initial analysis will be slightly different than if you were using version 4.0.
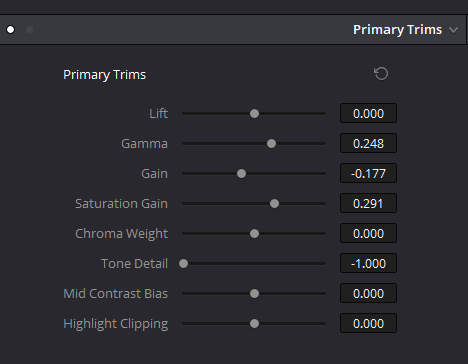
In version 4.0 with Resolve 15, the Primary Trim controls are largely the same – Saturation has been renamed to Saturation Gain, Chroma Weight Offset is now just Chroma Weight, and Tone Detail Weight is now just Tone Detail.
There are three new Primary Trim controls:
- Mid Tone Offset – This control is actually on the left side of the Trim Panel and not grouped with other Primary Trim controls. According to Dolby, it’s an offset to the average light level of the analyzed shot. In practice, it feels very much like a traditional offset control – moving signal up and down, all together when looking at a Waveform.
- Mid Contrast Bias – This control affects the contrast of the average light level of the analyzed shot, in practice this control feels sort of like the Pivot control in Resolve allowing you to take the contrast midpoint of the analyzed shot to push it brighter or darker.
- Highlight Clipping – as its name implies, this control allows you to clip or reduce clipping in an analyzed shot. This can be particularly useful if your HDR grade really pushes specular highlights, sometimes when analyzed those regions can be totally clipped.
The real news when it comes to Dolby Vision version 4.0 and the trim controls in Resolve 15 is the secondary trim controls.
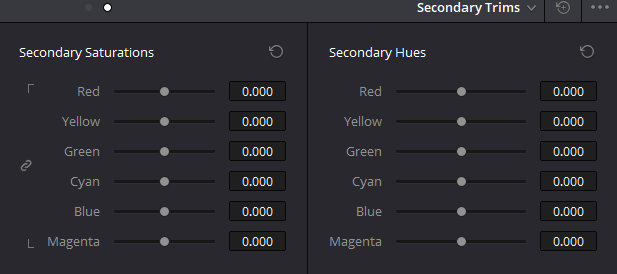
The secondary trim controls allow for individual saturation adjustment and hue rotation of the primary & secondary colors. These controls act similar to using the Hue vs. Sat and Hue vs. Hue secondary curves in Resolve.
One of the biggest challenges, when grading in wide gamut (P3, Rec2020) and really pushing it, is that strong colors in the tone mapped downstream version(s) can sometimes feel a little off. The secondary trim controls go a long way to getting the downstream versions to match back to the original HDR grade – keep in mind you’re never going to get it exactly the same as the original, but these controls go way further than just the simple Chroma Weight control found in the Primary Trim controls.
Rendering Dolby Vision IMFs
IMF or Interoperable Master Format is a popular delivery format and is the format of choice for OTT services like Netflix and Amazon. While providers like Easy DCP have provided IMF abilities in Resolve for a while now, Resolve 15 now features native IMF support (as well as native DCP support) using the Kakadu codec.
That’s notable for this article because Resolve 15 also supports Dolby Vision IMFs – what that means is Resolve 15 can create an IMF that also includes Dolby Vision Metadata.
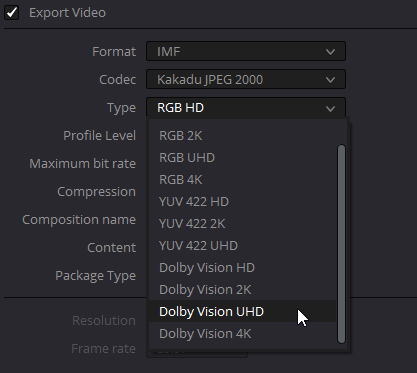
The traditional approach to Dolby Vision renders from Resolve has meant 16-Bit Tiffs + a Dolby Vision XML or a ProRes file + a Dolby Vision XML. The Dolby Vision IMF package is a self-contained deliverable, which makes Dolby Vision delivery much easier.
I’ve found that the Netflix standard for Dolby Vision IMFs is well followed – check out this very detailed white paper from Netflix.
When it comes to setting up a Dolby Vision render there are just a few steps to follow:
- Choose IMF as the render format.
- This will select the Kakadu JPEG 2000 codec.
- The Profile level is set by default to auto, but to create a Dolby Vision Netflix compatible IMF make sure to set this to Main Level 6, Sub Level 3 for UHD less than 30fps and Main Level 7, Sub Level 4 for UHD frame rates above 30fps.
- For HD Dolby Vision deliverables Main Level 4, Sub Level 2 & Main Level 5 Sub Level 3 are the right choices for material less than and above 30fps.
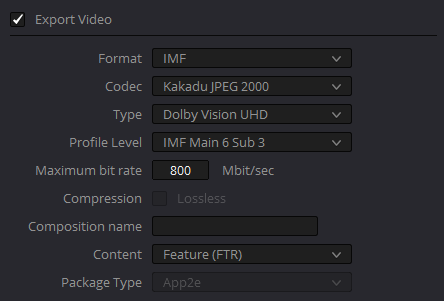
- For maximum bit rate, you’ll want to choose 800 Mbit/s for UHD 30fps or less and 1600 Mbit/s for 30fps or higher. For HD deliverables, that’s 400 Mbit/s for less than 30fps and 800 for greater than 30fps.
- Choose a composition name and the type of package i.e. feature, short etc. For the composition name, it’s always a good idea to put key information like mastering nit level, gamut, etc.
Last year, I strongly considered for a number of weeks purchasing a $100k seat of Color Front’s Transkoder for its ability to create Dolby Vision compatible IMFs. Sure, that powerful tool does lots of other stuff, but you can imagine my excitement when Blackmagic announced Dolby Vision IMF capabilities in Resolve 15! I don’t mind saving 100k!
Dolby’s professional tools can still be used to combine a Tiff Seq or ProRes master with a Dolby Vision XML, but I would imagine for the vast majority of cases I have moving forward I’ll be using the IMF route – it saves several steps in the process. Also worth noting, is IMF package validation (called Photon) is also including in Resolve when making an IMF – ensuring basic QC on IMFs that you make too.
Rendering Tone Mapped SDR & Lower Nit HDR
One day, we might live in a 10,000 NIT all HDR world, but that, of course, is not the case at the moment. One of the benefits of a Dolby Vision workflow is creating downstream deliverables.
But creating standalone downstream deliverables was a bit of a pain before Resolve 15, as it required using the Dolby Professional tools or another partner product.

Resolve 15 now supports the ability to create tone-mapped outputs directly from the Deliver page. What this means is let’s say you were grading at 3000 NITs on an FSI XM310K, analyzed the footage and want either a 100nit Rec 709, or even 600NIT HDR (typical of consumer OLEDs) render. You can now output those downstream tone mapped versions easily from the delivery page as standard ProRes, DNxHR MXFs, etc.
This saves a lot of time and is really handy for creating stand-alone versions for clients without having to extract a derived version from a Dolby Vision mezzanine file with Professional Tools.
Next Steps
Although I threw a curveball at the end of Part 2, in the next insight the series we will take a look at the Dolby Professional Tools as well as take a look at a QC method using the eCMU called HDMI tunneling.
Remember, if you have something to add to the conversation or questions, please use the comments below!
-Robbie


