| Series |
|---|
Day 4: 24 Insights in 24 Days 2018 New Year Marathon
Part 2: Dolby Vision Client Monitoring, Trim Controls & Rendering
It’s true, I’ve had Dolby Vision on the brain for the past few months – ever since the event my company hosted with Dolby in November 2017 showing off our Dolby Atmos and Dolby Vision capabilities, I’ve been actively seeking projects to grade in HDR so I can put the Dolby Vision workflow through its paces. My enthusiasm continued when in mid-December, Mixing Light contributor Joey D’Anna and I headed out to Burbank, CA to Dolby’s facility for a one-day intensive Dolby Vision training class.
The class exceeded our expectations! Besides getting a chance to see the Dolby Vision workflow in action AT Dolby (as well as seeing the Pulsar in action) and talk to their in-house colorist, over 5 or 6 intensive hours we learned a ton about the Dolby Vision delivery and encoding pipeline, Dolby Vision theater setup and more. It was a great experience.
Still excited about that trip, it’s the perfect time to dive right back in and continue our free series on Dolby Vision grading.
In Part 1, you looked at the essential setup, gear, and overall Dolby Vision Workflow, but I stopped short of looking in depth at the real power of Dolby Vision – trimming for SDR and active metadata.
In this installment (Part 2), you learn about:
- Dolby Vision client monitoring
- The Dolby Vision trim controls in DaVinci Resolve (which are similar to other grading systems) and how they work
- The trim workflow and making trims for multiple display targets
- Plus, we explore setting up a render for Dolby Vision content.
More On Client Monitoring
Before diving into the making SDR trims using the Dolby Vision trim controls let’s address the topic of HDR client monitoring.
After we published part 1 of this series, I got quite a few emails (remember, you can use the comments too!) about how exactly I had the consumer LG OLEDs connected in my suite. As I mentioned in part 1, normally I don’t have two client displays, but for the purpose of the demo we did with Dolby I had two – one showing the SDR mapped output of the CMU (matching my SDR reference monitor) and one showing the PQ HDR signal. Day to day, I skip the SDR client monitor and use just one 65′ LG C7 as the client monitor so clients can preview HDR grades.
There are a few issues with trying to run the LG OLEDs for this purpose.
- Dimming – it’s well known that LG OLEDs after about a minute of static content on screen (common in the grading suite) start to dim, aggressively. While this is annoying in SDR, it’s REALLY annoying in HDR. You want to turn off the dimming behavior which you can, with the help of an LG service remote (please keep in mind this voids your warranty).
- Enabling the HDR Metadata Flag – with professional HDR displays that connect via SDI, all you have to do is enable a viewing mode with PQ and you’re set. On a consumer display that connects via HDMI, the display will only go into an HDR mode (HDR 10, HLG, or Dolby Vision, etc.) if there is a metadata flag in the HDMI stream. Embedding this flag can be accomplished quite easily if your Resolve I/O device supports HDMI 2. All you have to do is enable HDMI metadata in Resolve and connect the display to your I/O. If you’re not connected directly via HDMI, things get a little more tricky and you’ll need to rely on 3rd party hardware to ‘trick’ the TV into HDR mode (more on this in a moment). The third option is to disable the metadata flag requirement in the service menu altogether (called module HDR), making the LG essentially act like a professional display, but I’ve had issues with calibration with this option disabled.
- Calibrating –
Right now LG OLEDs do not support 3D calibration LUTsThe 2018 LG OLEDs support direct upload of 8-bit calibration LUTs. For more bit depth (or on older OLEDs) you’ll need to rely either on the built-in Color Management controls or add an external in-line LUT box for SDR/HDR calibration LUTs.
In my setup, I can’t connect directly to an HDMI output of a BMD I/O device, so I adapt SDI > HDMI. Additionally, disabling the metadata flag option in the LG lead (on my C7) to really bad SDR/HDR calibrations so I use a box to embed an HDR metadata flag into the HDMI stream.
I take 2x 3G loop outs of my HDR reference monitor into 2x 3G inputs of an FSI Box IO. This unit stores 1D/3D calibration LUTs in both HD (single channel) or UHD (dual channel up to 2160p30). I then take the dual 3G outputs of the Box I/O into two of the inputs of an AJA Hi-5 4k Plus.
The AJA box lets you convert the SDI signal to HDMI, but the really cool part is by using the HDR tab of the AJA Mini Configuration Utility you can insert HDR metadata into the HDMI output, which tells the LG TV to go into HDR mode.
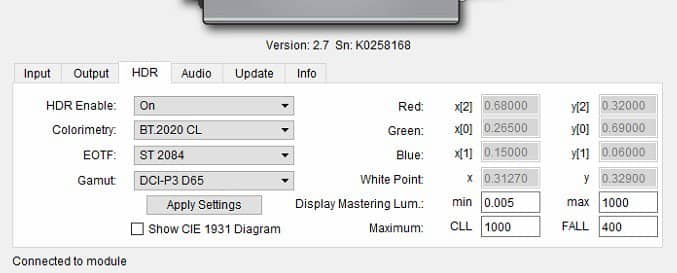
With HDR enabled on the AJA box you can calibrate for ST 2084 PQ and P3 gamut using a tool like Calman or Lightspace as well as preview HDR grades for clients on client sized monitor. Keep in mind I did say preview.
Currently, the best in breed client HDR displays from LG, which are the popular choice for overall performance, can only pump out about 700-750nits which falls short of the 1000nits recommended by Dolby for mastering and which also matches the popular Sony x300. So you won’t be able to see the full brightness of the grade on the client monitor, but I’ve yet to find this a real dramatic problem.
Conversely, you could use a consumer LCD display that can go much brighter so no roll off or clipping would occur, but I have not had any experience with those displays in my suite (I’m an OLED snob!).
Finally, one last thing to be aware of in a multi-display setup where consumer and professional displays are being used is APL and limiting behavior.
APL or Average Picture Level is important in an HDR discussion because different displays will trigger ABL, or Automatic Brightness Limiting, when APL hits a certain level – and these thresholds are different for different displays. For example – I’ve pushed APL on a Sony X300 and the ABL didn’t kick in but the LG OLED dimmed considerably because its ABL has been enabled. You’ll have to find a good balance point for APL and experiment.
We’ll talk strategic and creative grading techniques in a later part of this series, but I’m tending not to really push APL and rather utilize specular highlights to add in some HDR magic to avoid such problems.
Step 1: Making Your Initial Image Analysis
The first step in a Dolby Vision HDR workflow is to color correct and create an HDR color grade on a shot. But what do you do next? There are two schools of thought:
- The first school of thought: Continue color correcting in HDR for the entire project. Then in a second pass deal with the SDR conversion and make necessary trims.
- The second school of thought: Create color correct in HDR for a shot, and then immediately create the SDR version of that shot.
I see benefits in both approaches, but my personal approach is to grade the entire project in HDR and then come back and work on the SDR side of things. I find this lets me stay focused on the HDR grade and not visually distract myself – I keep the SDR monitor turned off while making the HDR grade.
With either approach, after your HDR grading, you’ll need to analyze your images and create metata. With Dolby Vision you can do this on one frame, one shot or the entire timeline.
What do we mean by analyzing?
Dolby uses proprietary algorithms the create SDR images from your HDR color corrected images. It’s partially based on the target display (remember that 100 nit 2.4 gamma target when we set up the Dolby Vision project?). When you tell the software to analyze a shot, the color grading system analyzes the tonality of the shot, and embeds tone mapping metadata into the SDI output. Then the Content Mapping Unit (CMU) displays the image on its SDI output, tone mapped to your target display. This analysis takes a few seconds per shot and when done, generates what Dolby calls Level 1 (L1) metadata. You can think of Level 1 metadata as the automatic mapping performed by the by the Dolby Vision algorithm.
After the analysis has taken place, the ‘mapped,’ SDR shot will appear on your SDR monitor connected to or routed from the CMU output.
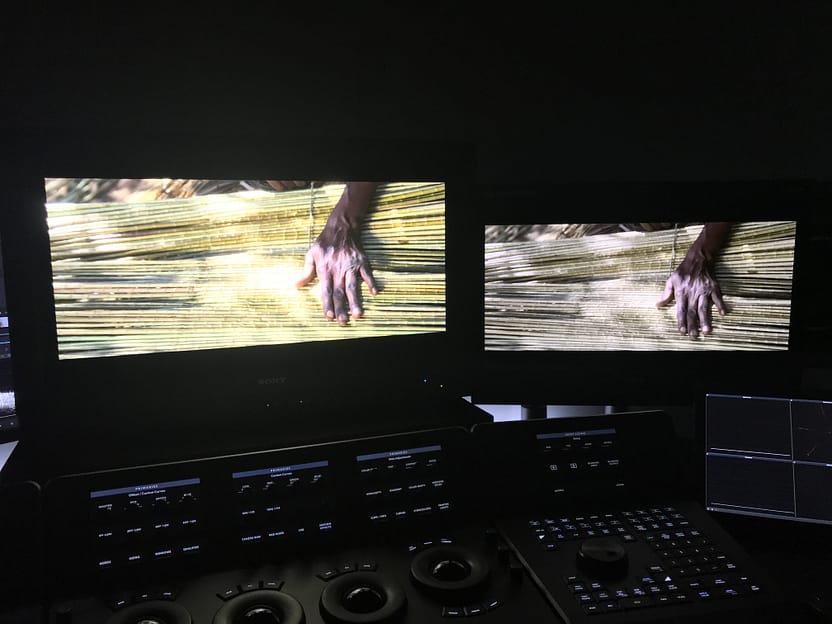
Here’s how to perform the analysis:
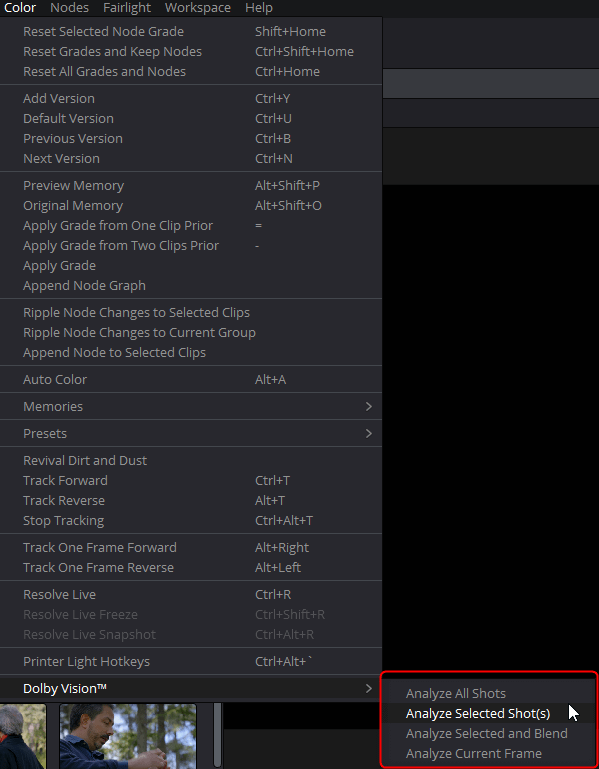
- In DaVinci Resolve Choose Color > Dolby Vision
- In this submenu you have several options for shot analysis, which are mostly self-explanatory – Analyze All Shots, Analyze Selected Shot(s), Analyze Selected and Blend, Analyze Selected Frame
- The analyze all shots and selected shots are my go-to options. Analyze Selected & Blend was designed for averaging similar selected shots and applying that analysis to the constituent clips; I’ve not had great luck with this option and Dolby has recommended that each shot is analyzed on its own or that shot analysis data be copied to similar clips but your mileage may vary. Analyze Selected frame can be used to quickly visualize an SDR mapping without waiting for an entire shot to be analyzed.
The analysis takes a few seconds per shot. I can typically analyze an entire 90 min film (1200 shots) in about 30 minutes, but your mileage may vary depending on your grading system and CMU capabilities.
Step 2: Making Your SDR Trims
After generating L1 metadata (basic target analysis), for me, the power of the Dolby Vision system lies in the ability to tweak that analysis to get the derived SDR version of your grade just right. Unlike HDR-10 that applies a global mapping approach, with Dolby Vision you can make trims on a shot by shot basis.
Shot by shot trims are what Dolby refers to as Level 2 (L2) metadata. Unlike the automatic L1 metadata, L2 metadata is a creative venture. It is you, the colorist, in combination with feedback from your clients, that adjusts the derived SDR version of the grade so that it best matches the creative intent of the HDR Grade.
Here’s the interesting thing; it might be that the L1 metadata – the automatic analysis – does a good enough job that no further work/thought is required for the SDR version of the shot! Many of the colorists I’ve talked to doing Dolby Vision work say this happens on about 40%-45% of shots, which just shows you how good the automatic mapping is.
With that said, having the control to get the SDR version just right is a major advantage of the Dolby Vision system.
Once the initial analysis has taken place, the Dolby Vision trim panel becomes active (in Resolve 14 it’s to the right of the Motion Effects panel).
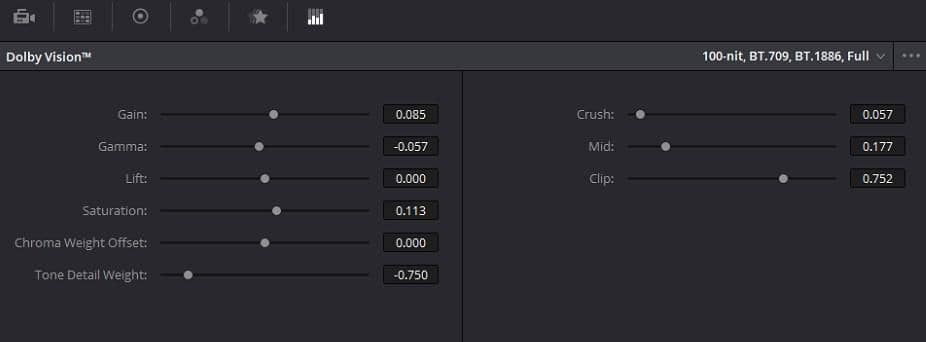
The trim panel allows you to adjust the derived SDR signal post CMU mapping to best match the creative intent of the original HDR grade. I know, these controls seem quite simple, but because the Dolby algorithms are so good, a little goes a long way with the trim controls. What’s more? Dolby will continue to improve and add to these controls in their SDK that BMD and other companies can implement.
There is one VERY BIG CAVEAT about analyzing shots:
Only shots on video track 1 will be analyzed! If you have a multi-track project, you’ll need to move clips down on to track 1 prior to invoking analysis on those shots. After the analysis is done you can return them to whatever track you need them on – but a safer approach is to try to just limit your projects to one video track. According to Dolby, the need to move clips down on to track 1 is a Blackmagic issue and not a Dolby Vision one.
While I haven’t encountered a situation where this a show stopper, I can see in complicated timelines this being a bit of a pain – hopefully Blackmagic will address it in future updates.
About The Trim Controls
Although the Dolby Vision trim controls are pretty simple, they’re worth explaining in a bit more detail.
First up, let’s look at the three sliders labeled Crush, Mid & Clip. In many tools, that support Dolby Vision trim controls these tools are not accessible but in recent versions of Resolve they are. Essentially, these controls show the initial L1 metadata that is generated in the L1 analysis. As their names imply, the CMU maps the three different parts of the tonal range based on the average over the entire clip.
According to Dolby, you really shouldn’t mess with these controls – as they’re the baseline for the automatic tone mapping and altering them may result in unexpected results when the grade is played on a display with capabilities between the 100nit trim target, and the 1000 or 4000nit mastering target.
The controls you’re adjusting are found on the left-hand side of the trim palette:
Lift, Gamma, Gain – These controls, albeit in slider form, should be familiar to any colorist. They’re the primary controls you’ll use for tweaking the initial SDR mapping. Just keep in mind they ‘feel’ slightly different than Resolve’s built-in Lift, Gamma, Gain controls.
Saturation – This one should also be familiar. It controls the overall saturation of the SDR signal. Curiously, there is no overall Hue control currently in the Dolby trim controls.
Chroma Weight Offset – in the process of mapping the HDR, wide gamut signal to SDR there is a balancing act between saturation and brightness. The Chroma Weight Offset slider allows you to adjust the balance between brightness and saturation of signal outside the capabilities of the mapped target. I use this control all the time to strike the right creative balance in SDR shots.
Tone Detail Weight – Tone Detail Weight allows you to control the level of detail in highlights that might be blunted in the mapping HDR > SDR. However, for a 100NIT target, the control doesn’t work. Its functionality is only available in higher nit target trims.
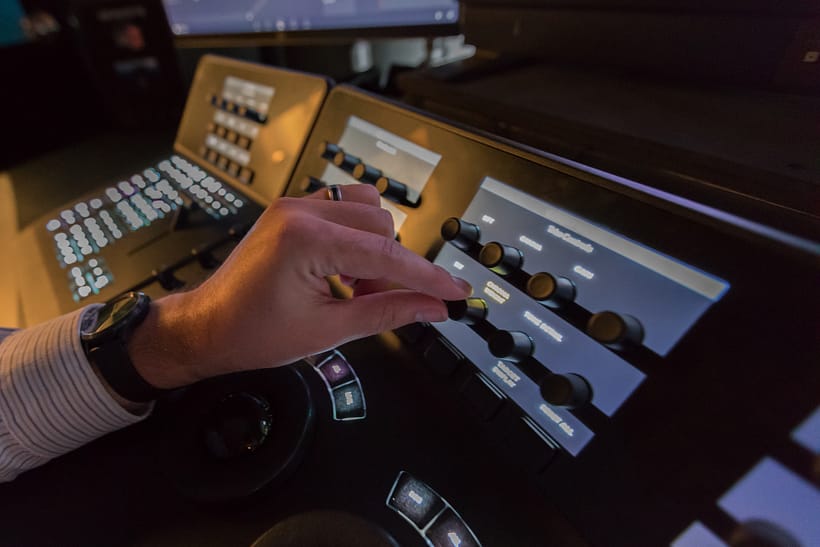
Each control can be adjusted directly in the Dolby Vision palette, but if you’re using a DaVinci Resolve Advanced Panel the Dolby Vision trim controls are also available in the center panel making trims quick and easy.
In general, I find the trim process to be pretty straightforward as the initial tone mapping is usually quite good. But to reiterate, the goal should be to try to get the SDR signal to match the HDR one as closely as possible.
It’s also important to understand that the trim controls are a work in progress – as Dolby updates their SDK and exposes additional functionality, it’s up to companies like Blackmagic to implement the new controls.
Finally, when you make trims, understand that you are only affecting the SDR version of the shot that has been mapped via the CMU and that your trims exist as an abstracted correction in Resolve – meaning they aren’t contained within a node, but rather only on the Dolby Vision palette.
About the Trim Workflow
When it comes to making SDR trims in the Dolby Vision workflow you’ll quickly find that while the process is straightforward and simple, there is a ton of repetitive work. What I mean is in a typical scene you’ll often make the same trims.
It could be that you have a lot of shots from the same camera angle or could be just universally a scene needs an adjustment. Whatever the case, Resolve offers a few simple ways to copy and paste trims from shot to shot.
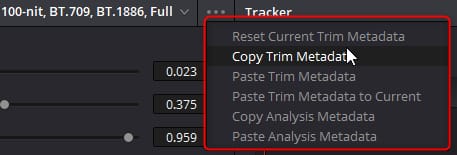
In the palette menu (the three horizontal dots in the upper right of the palette), you’ll find options for copying and pasting trims. You’ll also notice in this menu that you can copy and paste analysis data – these options are sometimes used when a shot doesn’t analyze properly (a rare occurrence) and you’d like to grab the analysis data from a similar shot.
Just keep in mind the Dolby Vision pallette copy/paste functionality lives outside the normal node copy/paste workflow.
(optional) Step 3: Trims For Multiple Targets
Dolby dictates that you must always target a 100nit Rec709 device. By doing so, a Dolby Vision capable TV can map the HDR signal from 100nits through the mastering level based on the capabilities of the display.
However, there is nothing stopping you from being a little more OCD than that. You can create multiple trims that can co-exist at the same time. So let’s say that you know for a particular project that a 600nit P3 LG OLED is going to be a big subset of the viewing audience.
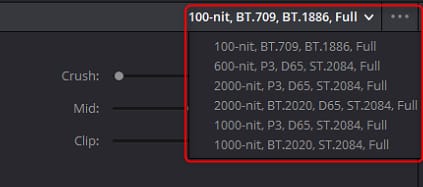
In the Dolby Vision palette, you can click on the target pull down and choose an additional target. To be clear, any new trims you do on the new target don’t replace the ones you’ve done on the required 100nit Rec 709 target – they’re in addition to your earlier trims.
While many colorists probably won’t bother with an additional trim due to budget and or time, it’s reassuring to know that additional trims are possible. I’ve found that each targeted pass for trims takes about 10% of the original time to grade the project.
Step 4: Rendering
Now that you’ve analyzed shots (or an entire timeline) and you’ve gone through the trim process (and made an award-winning HDR grade), it’s time to render! Yes, I know I’ve skipped over the whole grading thing! We’ll do that in later part of this series!
One thing that you have to get your head around is that the initial render from DaVinci Resolve is the start of the process in creating a final Dolby Vision deliverable that will stream on OTT services like Amazon and Netflix.
In part 3, we’ll explore the additional parts of the deliverable process but from Resolve, you’re going to create two elements:
- 16-bit Tiff Image Sequence or Open EXR Image Sequence
- Dolby Vision XML
On our trip to Dolby in December, Joey and I learned that ProRes 4444 and ProRes 4444 XQ may soon become a rendering option to feed the rest of the encoding pipeline as Apple as embraced Dolby Vision but for now, you’re best sticking to Tiff and EXR image sequences.
When it comes to naming styles used for your Dolby Vision renders this is a good template:
title_resolution_framerate_colorspace_whitepoint_eotf_masteringnits.tiff
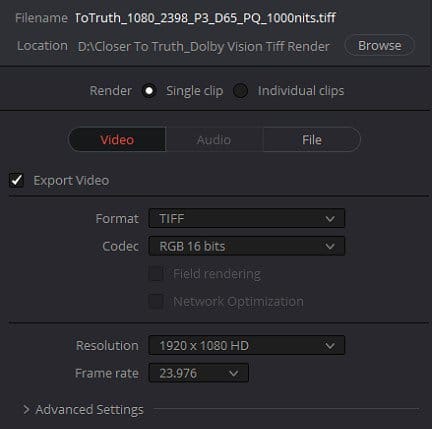
Keep in mind 16-bit Tiff or EXR sequences are BIG, especially at high resolutions. You’ll need a lot of storage space, however, there is really no need to playback in real-time these image sequences.
After rendering, the last step is to choose File > Export AAF, XML….
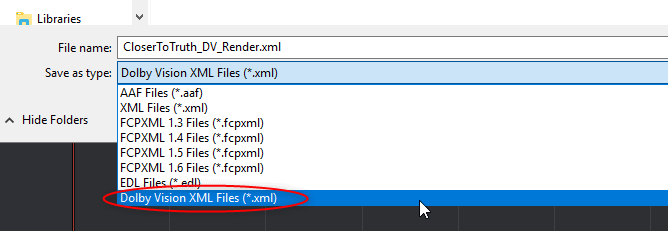
Because the Dolby Vision toolset is enabled (see part 1 in this series for more information on enabling the tools), you get a new type of XML that can be exported. In the Save As Type pulldown, choose the option for Dolby Vision XML. This XML is specifically formatted for Dolby Vision.
Coming Up In Part 3: Dolby Professional Tools, Mezzanine File Creation & Deliverables
You’ve done your HDR grade, made SDR trims with the Dolby Vision toolset and rendered out a Tiff sequence and Dobly Vision XML. That’s it, right?
Well, not exactly…
The render and xml are the starting point for creating a Dolby Vision mezzanine file, extracting additional deliverables like a SDR Rec 709 file, and more. In part 3, we’ll explore what Dolby calls its Professional Tools – command line programs for encoding, editing metadata and more. We’ll also touch on commercially available tools that have Dolby Vision support like Colorfront’s Transkoder.
As always if you have a question or something more to add to the conversation, please use the comments below.
-Robbie
Learn More About How to Create HDR and Dolby Vision
- What Is HDR and Dolby Vision and How Do You Create It? : This Flight Path Guide shows you all the Insights we have on Mixing Light about creating HDR and Dolby Vision content. Plus, it links to key external resources on this topic.


