
| Series |
|---|
Help us welcome Luke Ross as a brand new Contributor to Mixing Light! You can say hello to him in the comments below. Luke Ross is a professional freelance colourist based in Wellington, New Zealand and worked as a Baselight Assistant for two years while working in London. Click on the link for his name to learn more about Luke.
As an experiment, this series is being cross-posted to Mixing Light’s YouTube channel – his videos will appear there one week after being first released here, into the Insights Color Library. We expect to publish a new episode weekly.
Understanding Baselight, Using Baselight Student
Baselight is a premium colour grading and finishing platform created by Filmlight that is used by colourists all over the globe. I say a ‘platform’ because it is more than just software. When you purchase a Baselight system, Filmlight configures and delivers a full computer system tuned to the needs and demands of a high-end colourist. It’s my understanding that every Baselight system also requires an annual support contract. But FilmLight’s support is far more personal, hands-on, and responsive than you might initially assume.
Currently, Filmlight offers three levels of Baselight:
- Baselight ONE – This 2-GPU system is the entry-level platform. You can configure it to work with your existed storage or upgrade to FilmLight’s optimized storage solution.
- Baselight TWO – For more performance, you can upgrade to a 4-GPU with a larger and higher-performance dedicated RAID 6 storage (compared to Baselight ONE). Among other things, this platform is also supplied with a Baselight custom colourist control surface.
- Baselight X – This top-of-the-line 8-GPU platform is optimized for 8K UHD or stereoscopic 4K 120fps real-time playback. It ships with a RAID “[that] incorporates a large, ultra-high-speed storage system that connects directly to the internal image processing components.”
Baselight also sells (3) colourist control surfaces. As of this writing, Filmlight does not sell a software-only version of its full system. But – Baselight does offer a free software-only version that is accessible to everyone and is a great way of learning the fundamentals of its colour grading software – it’s called Baselight Student.
How is Baselight different from DaVinci Resolve?
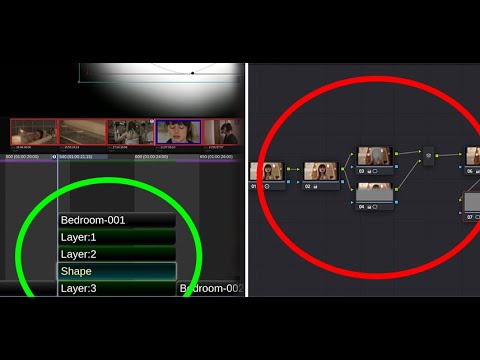
I talk about this in more detail in the video below but besides pricing (Baselight is radically more expensive than Resolve and is designed as an integrated hardware/software platform) and running on Linux, Baselight does one thing and one thing only: Colour grading. Plus, unlike Resolve, your colour grades are built using a layer-style paradigm that’s more similar to After Effects.
Baselight also requires you, the colourist, to be extremely granular and intentional in setting up (and manipulating) your colour pipeline. It’s extremely powerful – and for the uninitiated, intimidating. Resolve colourists will find Baselight has tools that have no equivalent in Resolve.
What is Baselight STUDENT?
In this series you’ll use Baselight Student to learn the fundamentals of Baselight. Here’s how Filmlight describes Baselight Student:
Baselight STUDENT is a comprehensive version of FilmLight’s Baselight colour grading software—with GPU rendering—that runs on any supported Mac platform. This includes support for an optional control surface, like our Slate panel, and even SDI monitoring for a full grading suite experience.
The STUDENT version is not limited to educational institutions. Rather, it’s designed for anyone who wishes to become a ‘student’ of the Baselight method of colour grading:
FilmLight encourages individuals who want to learn to grade on Baselight, or to move up to Baselight from another application, to register for our Baselight Learning Programme …
We are keen that everyone who learns to use the application remains in contact with FilmLight, so we can help you along the way to achieve your goal. That’s why, even though the application is free, you must register in our programme to obtain a copy.
While Baselight STUDENT is free, it has a very simple easy-to-understand limitation:
The principal limitation is that the application is restricted to render out only h.264* movies or JPEG images. With no watermarking, this means that Baselight STUDENT can be used to create academic-year projects within the limitation of the delivery formats. Along with conform capability, colour space handling, format editing and the ability to render both image sequences and movie files, this also makes the application the ideal tool to learn how to start your career as a professional colourist assistant.
If you’re a professional Resolve colourist and want to follow along in this series, there are a few additional limitations you want to be aware of:
- In addition to the Baselight Slate, Student also supports Tangent colourist control surfaces (but not Blackmagic control surfaces).
- The student version uses a different database structure for jobs and scenes, so you cannot share projects between Baselight Student and full Baselight (dang!).
- External SDI monitoring requires AJA hardware. Blackmagic’s Decklink, Ultrastudio, or Intensity Pro gear is NOT recognized/supported.
Baselight Student Minimum Requirements to follow along
- MacBook Pro, Mac Pro or iMac
- 1GB GPU memory
- 8GB RAM
- 3-button mouse with middle mouse button
- External hard drive (USB or thunderbolt drive is fine)
Baselight Student Recommended Specification
- Mac Pro 6.1
- 2GB GPU memory
- 16GB RAM
- External high-performance disk system for local playback
- Tangent or Baselight Slate colourist control surface (legacy JL Cooper Eclipse and Avid surfaces are also supported)
How to follow along with this series, step-by-step (while using Mixing Light’s Practice Project, ‘Mother Died’)
We will be using footage from ‘Mother Died’, a practice project available for purchase here on MixingLight.com and shot on RED. To follow along with me, shot-by-shot and step-by-step:
- Join the Baselight Learning Programme
- Download and install Baselight Student, as instructed by Filmlight
- Purchase and download the colour grading practice project, ‘Mother Died’
Are you uncomfortable getting started? No worries – I’ll explain and demonstrate in detail how to install the software in Part 2 of this series.
What will this series cover?
My goal for this series is to lay the foundations for a Baselight career. Everything you learn in Baselight Student can be applied to the full version of the software.
Across 20 videos, we are going to cover a lot of ground for beginners. I am assuming you’re starting from zero. If you are new to Baselight – or want a serious refresher – this series has your name written all over it. To be clear, in my mind these Insights aren’t just for beginners. I’m hoping intermediate/advanced users may pick up a trick or two as we discuss workflow, colour grading techniques, and the nuanced Baselight interface. Here’s my series outline:
- Welcome & Overview <- You are here
- Installing Baselight Student <- You are here
- Baselight User Interface
- Setting Up Your First Scene
- Importing Media
- Conforming: Scene Detect Tool
- Organising Media: Shots View
- Baselight Colour Management
- Primary Grading: The Basics
- Primary Grading: Blending Layers
- Primary Grading: Adding Flair
- Secondary Grading: Shapes
- Secondary Grading: Tracking
- Secondary Grading: Keys
- Managing Grades
- Reviewing Grades: Clients
- Repairs: Stabilising Shots
- Repairs: Abnormal Colours
- Repairs: Painting & Dustbusting
- Delivery: Rendering
This Insight covers Parts 1 & 2 of the series
To kick things off below is Parts 1 & 2 of the series. In Part 1 I give you an overview of this series and talk about Baselight in general terms. In Part 2 you’re walked step-by-step through the installation process.
Without further ado, let’s get started. I’m looking forward to reading your comments and answering any questions you have below!
Luke
Part 1 – Series Introduction
Part 2: Installation and Setup
Additional Downloads
Sorry... downloads are available for Premium Members only.
Become a Premium Member-
A Complete Guide to Baselight’s Base Grade Operator
-
Conforming in Baselight? Start here.
-
Rendering Files for Review or Delivery in Baselight
-
Fixing Dead Pixels And Image Artifacts in Baselight
-
Fixing Oversaturated and Out-of-Gamut Colours in Baselight
-
Stabilizing Shaky Footage in Baselight LOOK
-
How To Compare Grades With Clients In Baselight LOOK
-
How To Manage Your Timeline For Efficient Color Grade Copying Operations In Baselight Student
View All
