How To Solve Clip Conflicts (and other Conform Problems) in DaVinci Resolve

How to Solve ‘Clip Conflicts’ (and ‘Force Conform’ Errors) in DaVinci Resolve

December 9, 2016

When importing a timeline into DaVinci Resolve, learn how to find and solve 'reel conflicts'. Plus, learn to solve a 'Force Conform' error.


Series

Starting the Conform and Solving Initial Problems

After exploring a range of different XML import options – I finally settled on the version of the import that I’m fixing (remember, in Part 4 we tried several import methods and all of them failed… but in different ways). In this Insight, we’re starting the Conform and the first problem we’re solving is the most common: Clip conflicts.

One of the first things I do after an XML import? Look for Clip Conflicts

In Resolve, they’re easy to find. Just look for this little red icon in the timeline on the Edit Page:
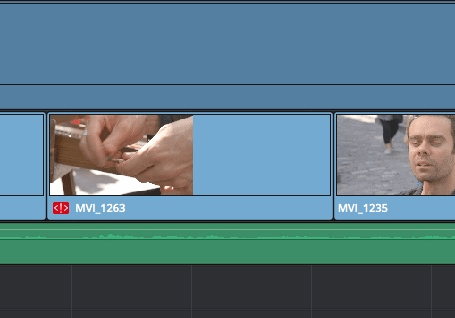
The 'Conflict Resolution' icon in DaVinci Resolve
The little red icon at the bottom left of a clip is the ‘Conflict Resolution’ icon. Double-click it to open a window and select a different shot with the same timecode.

In Resolve 12 and later, just double-click on the icon to open the Conflict Resolution window. Typically, these clip conflicts are the result of multiple clips sharing the same timecode. Here are a few tips to keep in mind:

  • The Conflict Resolution Icon doesn’t mean there IS a problem: It’s just Resolve’s way of flagging a clip that MIGHT have a problem. You’ll need to check the Reference Movie to confirm if the clip is correct, or not.
  • Rendered media is one of the biggest headaches for clip conflicts: After Effects exports are one of the biggest culprits in this regard. After Effects doesn’t embed a reel name into their renders and all its renders tend to start at the exact same timecode number (usually 00:00:00:00). This confuses Resolve big-time, kicking up the Conflict icon. And as you’ll see in Part 6 of this series, we’ve got a bunch of these we’re going to have to deal with.
The other problem we fix is more annoying to diagnose

Sometimes, editors forget they did speed changes and don’t tell you about them. During the XML import, those speed changes can send DaVinci Resolve haywire and you need to figure out what went wrong. In the Shadow of Giants, we run into a clip mismatch that had been relatively rare but I’m seeing more and more often. And if you’re not eagle-eyed you may never discover the root cause of the problem.

In this Insight, I spin my wheels showing you the ‘old school’ method for eye matching shots

And in a later Insight, we’ll use the ‘difference’ technique for eye matching. Eventually, I figure out the real problem and show you a quick and easy fix. Suddenly, all those shots that seemed to be out of alignment? Fixing them takes just a few clicks – and they snap perfectly into place!

So… sit back, relax, watch and enjoy the schadenfreude

If you ever dealt with any of this Conform stuff then you know how painful this process can be. One of the good things in this Series… you get to watch someone else suffer through the process—me! And as we discussed in the comments in Part 4, there can a certain satisfaction to that!

Enjoy!

-pi

Member Content

Sorry... the rest of this content is for members only. You'll need to login or Join Now to continue (we hope you do!).

Need more information about our memberships? Click to learn more.

Membership options
Member Login

Are you using our app? For the best experience, please login using the app's launch screen


Comments

Homepage Forums How to Solve ‘Clip Conflicts’ (and ‘Force Conform’ Errors) in DaVinci Resolve


  • Bernd Gareis
    Member

    Well, can you do one on AAF from Avid to Davinci? Premiere is only SemiPro and not common in my market place, so AAF is the Exchange Protocol to go. Is an Avid Speedramp translated to Resolve?


  • Patrick Inhofer
    Guest

    Yes. AAFs from Avid work fairly well – just remember to simplify the timeline and remove all the nests. Constant speed changes are fine. But variable speed changes will not survive the AAF or XML exports. Those shots need to be rendered out and replaced in the timeline before doing the AAF.

    With Avid, I usually do a different workflow – I have the Avid editor do the Media Management, since Avid is robust in that regard. Then I have them remove every single effect. I don’t want a single shot in any kind of nest. Then I grade using the AAF but render out with ‘Unique File Names’ off (since Avid has already made them all unique). Then, the Avid editor can relink back to my color graded renders in their fully effected, media managed timeline. Works like a charm.

    RE: Premiere – At Mixing Light we don’t believe PrPro is semi-pro. These are all pro tools – each with different strengths and weaknesses. But indeed, some markets definitely skew toward one set tools versus other markets that skew differently.


  • Pedro Saboya
    Member

    Hey Patrick
    I was wondering why you chose not to import the reference clip as “offline reference clip” and use the tools available in that method. I aways find it easier not to drop the ref clip into the timeline, especially now with the wipe and difference tools.

    Really liked the insight on changing the framerate in clip atributes in the timeline in order to connect it properly. For some reason I only tried it in the Media Bins, it would turn offline in the timeline and I had to add it manually.

    Thanks!


  • Patrick Inhofer
    Guest

    RE: Offline Reference Clip – This question has come up a few times, so I’ll be answering your question in full at the end of this series – which should be in the next week or two.

    RE: Framerate Clip Attributes in Media Bin – You know, it hadn’t occurred to me that I’d get different results depending if I change the framerate in the timeline vs. Media Bin. I need to test that, because I do remember getting Media Offline a few times when doing the original conform and you may have just nailed why that happened.


  • Willian Aleman
    Guest

    Patrick, thanks for this deep insights in conforming.
    I agreed with Pedro. I have found more convenient and easier to use, >Reference Offline Clip> which provides more advantage than overlaying the reference clip in the timeline. It’s specially useful when used in combination with the check boxes found in the >Conform Options> and >show offline reference for non-conform edits>.


  • David
    Guest

    Hey Patrick, I know I’m digging into the past, but I’m hoping you can bring this back online. I’d love to watch it.

Log in to reply.

1,000+ Tutorials to Explore

Get full access to our entire library of over 1,100+ color tutorials for an entire week!


Start Your Test Drive!
Loading...