Custom ACES Part 2: Grading Custom ACES With Fixed Node Structures

May 20, 2020

Learn how to build a powerful fixed node structure in DaVinci Resolve to work within a valid ACES pipeline, without normal limitations.


Series

Custom ACES Grading With Fixed Node Structures

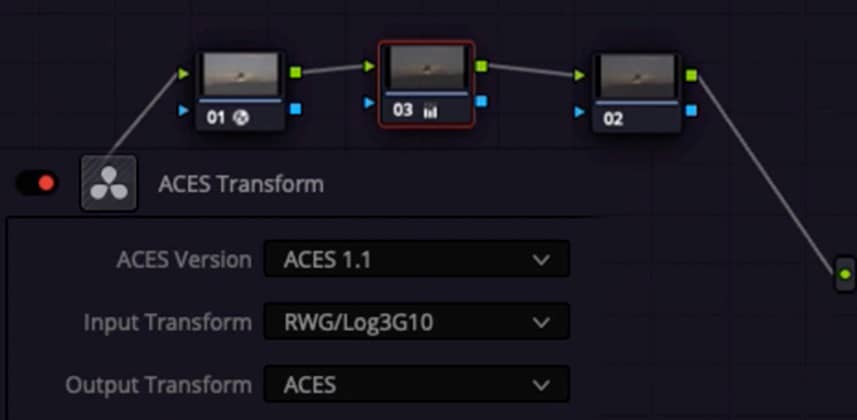
In Part 1 of this series – you learned why I like to skip setting up project-level ACES color management, and instead build the ACES pipeline myself in the node tree. This workflow opens up lots of exciting possibilities!

In this Insight, I’m going to expand on the custom ACES workflow by combining it with one of my other favorite techniques – a pre-built, fixed node structure. I’ll also show you some practical examples, using my fixed node tree to solve real-world grading problems.

If you aren’t familiar with fixed node structures and the workflow benefits they bring, check out my previous series on fixed node trees.

Practical uses of a custom ACES node tree

In the video I’ll walk you through the node structure that I use, and you can:

  • Tag clips for different input colorspaces in custom ACES
  • Use colorspace transforms to dial in film grain for various formats
  • Use formats that don’t have ACES IDTs
  • Recover Highlights
  • Do paint/repair work in camera space
  • Get great qualifiers while still grading in ACES
  • Fix saturation problems that normally are difficult in ACES
  • Adjust node colorspaces for control feel and preferences

So if you can’t tell – this one is pretty jam-packed. I’ve also included a download of my node structure, so you can get started with this workflow yourself. As always – leave any questions or comments below, I would love to hear how other people feel about this workflow after trying it!

joey

Member Content

Sorry... the rest of this content is for members only. You'll need to login or Join Now to continue (we hope you do!).

Need more information about our memberships? Click to learn more.

Membership options
Member Login

Are you using our app? For the best experience, please login using the app's launch screen


Additional Downloads

Sorry... downloads are available for Premium Members only.

Become a Premium Member
Comments

Homepage Forums Custom ACES Part 2: Grading Custom ACES With Fixed Node Structures

Page 1 of 2

  • Alejandro M
    Guest

    Great job, Joey! Things are definitely falling into place now. I now see that Part 1 was just an introduction to the basic concepts and motivations behind your approach. I like how you applied and built upon those basics in Part 2, to create a practical and flexible node tree and workflow. I can’t wait to see Part 3, and use this on my next project.

    As for generated elements, like titles, would you apply this same node tree (whether at clip level or group level), setting the IDT to Rec709-to-ACEScct, or would you use a simpler tree for that? In other words, would you treat them like Rec 709 footage? While you may not grade the titles, I imagine you may still want to apply grain and perhaps do some ODT trims (e.g., SDR vs HDR) so they blend with the footage, no? I get that Part 1 already gave us a simple solution. I’m just wondering how you handle this on your real-world projects. I’m guessing this applies to more than just titles.

    Thanks!


  • Joey D’Anna
    Guest

    Thanks Alejandro! In general I use the same tree for graphics/titles – but I disable the vignette (if i’m using it) – and like you said, set the IDT to Rec709. Even if I’m not using any node in the tree except the IDT, I like to keep the node tree the same (its not like disabled nodes cost anything!)

    I don’t use the CST to convert Rec709 to LogC (like i do with other camera formats) – because I’ve found that doesn’t work very well. CSTing between camera log formats works excellent – but I haven’t been happy with trying to convert Rec709 footage into a log space.

    Another benefit is that if I switch the IDT node to Rec709, then the first bank of parallel nodes has the added benefit of behaving *exactly* like they would in a Rec709 project. So in projects with mixed log/Rec709 sources – I have the option of grading Rec709 in the original space, or in ACES, or both.


  • Alejandro M
    Guest

    This makes so much sense. Thanks!

    I was going to ask for your thoughts on using the CST to take Rec709 into Log space, but you answered it before I even asked. (Queue the theme from the Twilight Zone, lol)


  • andydv
    Guest

    love your highlight recovery method @9min. ACES or no ACES that’s a slick trick!


  • Joey D’Anna
    Guest

    Thanks – big credit to Dan on that one, he told me about it first!


  • François Dompierre
    Guest

    Thanks Joey! I understand you like the way NR and Nitrate work when placed before the IDT, but is there a way to place them after the IDT (but still before the ODT) ? It seems to be the main (the only?) limitation of a fake ACES pipeline.


  • Joey D’Anna
    Guest

    Hey Francois – nothing stopping you from putting them inside ACES space. I just prefer how it looks to do it as if it was a film negative – and therefore before the IDT (which isn’t an option in project-level ACES).

    Nitrate doesn’t have a built-in ACES profile but since ACEScct is a log space, the LogC one actually works as a pretty good starting point inside ACES, and you can always tweak the grain curve to taste. The builtin Resolve film grain also works nicely in ACES – so that’s another option as well.


  • Diego B
    Guest

    Thanks, Joey! Your approach is very useful. First, previous nodes for saturated lights help a lot. I had an issue with ambulance lights that broke in ACES. I couldn’t fix them with LMT’s so I had to key them out and tried with another IDT, in a different layer. Also, changing gamma to Log C in RED footage helps to reach IDT a little less harsh in blacks with NR in underexposed shots. Thanks, again!


  • Aleks V
    Guest

    Thank you. I have a Q. How would you deliver GAM for Netflix with this workflow?


  • Robbie Carman
    Guest

    Aleks – check out part one in the series – Joey covers that using adjustment layers in a pretty clever way

    https://mixinglight.com/color-tutorial/custom-aces-part-1-building-an-aces-workflow-in-a-resolve-node-tree/


  • Joey D’Anna
    Guest

    Hey Aleks- as Robbie said definitely check out part 1 – but even if you don’t use adjustment clips, and instead choose to put the ODT on the timeline level, making a GAM is as simple as changing the output on your ODT node (wherever it may be) to ACES AP0 linear.


  • Aleks V
    Guest

    Thank you


  • R Neil Haugen
    Guest

    Loved handling the keys pre-“input”, the corrections post-“input”. Slick. Clean. And yea, doing that replacement prior to grain also good.


  • Joey D’Anna
    Guest

    Thanks! Yea this has absolutely become one of my favorite ways to work.


  • David Scott
    Guest

    Very helpful – thank you.

Page 1 of 2

Log in to reply.

1,000+ Tutorials to Explore

Get full access to our entire library of over 1,100+ color tutorials for an entire week!


Start Your Test Drive!
Loading...