Custom ACES Part 1: Building An ACES Workflow In A Resolve Node Tree

May 9, 2020

Learn how to leverage a powerful ACES workflow without any limitations, by customizing it a DaVinci Resolve node tree.


Series

Customizing ACES

Here at MixingLight – we’re all big fans of the ACES. We’ve covered it extensively in the past, from an introduction series, to case studies. Dan even spent an entire month in ACES. Most recently – Peder Morgenthaler did an excellent webinar on ACES.

Personally – I’ve worked a good bit in ACES – and I absolutely love the workflow. I love the way the controls feel, I love how log footage just comes in at a fantastic starting point for grading, and I love the ability to apply ODTs for different deliverable formats. Most of all? I love that it maintains floating point precision from input to output.

However, I have run into some stumbling blocks along the way – and in this Insight – I’m going to show you a workflow that I think solves them.

The Problem

So what exactly is the problem I’m trying to solve? Well, if you’ve worked in ACES – you know that it isn’t all roses and rainbows.

The experience can vary greatly depending on how deeply your grading software has integrated ACES color management. In Resolve, a lot of things like Fusion, some OFX plugins, text/graphics, and more – aren’t always ACES-aware.

In addition – for some mixed format projects like documentaries – where you may be mixing and matching quality log footage with Rec709 archive footage – dealing with Rec709 can be a challenge, as the grading controls just don’t react the same way as they do natively.

The Solution

With the above problems in mind – in the past I have always decided that ACES may not be for every project. Some projects just didn’t seem suited to it – but I found myself missing the look and feel of working in ACES.

So in pursuit of a more flexible solution – I moved away from using the builtin ACES project level color management, to building the same color pipeline inside the Resolve node tree. Basically – I’m keeping my project set to color management disabled – and implementing ACES with nodes.

In this Insight – I’ll walk you through:

  • Potential problems with ACES in Resolve
  • Why you can’t built your own ACES workflow with only color space transform nodes
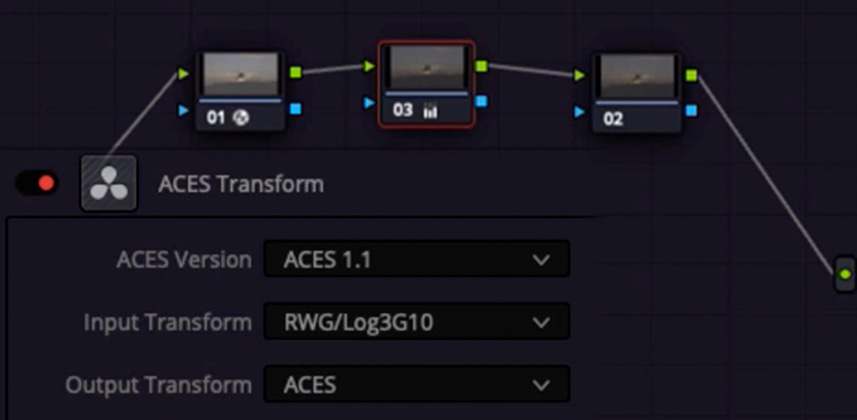
  • The ACES transform node which makes this workflow possible
  • Clipping considerations with render caching
  • How to use adjustment clips and timeline nodes as color management devices to set ODTs and render ACES linear (AP0) graded archive masters if needed

I’m going to show you a starting point for building your own custom ACES workflow – but the entire point of this is that it is customizable. You can tailor your needs to that of your project – so the steps here may not be the exact method you would use for every project.

Also – this is going to be a series of Insights. This one will lay the foundation for how and why I build my own ACES pipeline. In part 2 – I’ll be digging deeper into advanced grading with a much bigger and more powerful node tree.

“The Rescue” images courtesy The Film Bakery.

As always – leave any questions or comments below

-Joey

Member Content

Sorry... the rest of this content is for members only. You'll need to login or Join Now to continue (we hope you do!).

Need more information about our memberships? Click to learn more.

Membership options
Member Login

Are you using our app? For the best experience, please login using the app's launch screen


Comments

Homepage Forums Custom ACES Part 1: Building An ACES Workflow In A Resolve Node Tree

Page 1 of 2

  • Peter McCabe
    Guest

    Joey this is an awesome approach! Thanks!
    At the end it gets pretty creative and I am hoping Resolve 17 addresses your work arounds with Fusion clips and Title so we do not have to do all of these great hacks you are ferreting out.


  • Diego B
    Guest

    Amazing tutorial, Joey! Would be ok for you to sandwich transformations to ACES LINEAR in gamma so as to put some LMT out of cct log encoding chain?


  • Joey D’Anna
    Guest

    Thanks! I don’t see why not. I’m usually putting the ODT on the timeline level – and theres nothing stopping you from applying more nodes before it. You could use a ACES transform from ACEScct to linear, then whatever LMT you want, then from linear to whatever your final output is.


  • Joey D’Anna
    Guest

    Thanks! yea I’ve been really enjoying working this way on a ton of different projects.
    I do wish more tools were color-space aware, but in the world of OFX I can’t really even see how it would be possible for everybody to be on the same page. So I like to take a more flexible approach if possible!


  • Grant McNair
    Guest

    Thanks for this Joey! I’ve been successfully using a similar pseudo ACES approach for a while now, and had never considered that the render cache format was causing clipping issues – very helpful info. Looking forward to part two to check our your ACES fixed node tree.


  • Alejandro M
    Guest

    Joey, this was incredibly informative! One part that puzzled me, though, was how you handled the graphics. Once you grouped the graphics clips together and applied the transform into ACEScct at the group level, couldn’t you then simply put those clips under the original adjustment layer and use that one adjustment layer to handle all the ODT needs? Unless I’m missing something, the group-level transform effectively applied a sort of IDT to the graphics clips, didn’t it? So to go back to Rec709 (or any other output space), couldn’t you just set the transform on the upper adjustment clip to target Rec709, instead of disabling it, re-enabling the lower adjustment clip, and disabling the graphics-group transform? If so, didn’t the group-level transform negate the need for an adjustment that sits between the graded footage and the graphics? What am I missing?


  • Joey D’Anna
    Guest

    Hey Alejandro –

    The reason I did a transform into ACEScct on a group level was because the graphics themselves are not ACES-aware in the timeline. So yea – essentially I was just giving them an IDT so they would show correctly either under an ODT, or when rendering a linear GAM.

    You absolutely could do it all with one ODT – the only reason I showed two was just to demonstrate that you could do one ODT for rec709, and then do a different one for a AP0 linear GAM if needed. Switching the ODT on a single adjustment layer (or timeline node) – would work just as well!


  • Calen R
    Guest

    This was amazingly helpful to see along with examples for the problems as well. Thank you! Can’t wait for the next installment.


  • Thomas A
    Guest

    Thanks Joey, I like this best of both worlds approach, I really like how raw formats such as Red/R3d behave in ACES. Nice malleable curves and seemingly easier to get a decent base grade with clean colour separation.

    What I’d love to see your approach to matching similar shots from the same scene in this aces scenario, ie. ive nailed the wide, lets try than on the mid and see if I can tweak a tiny bit, but get a different results in comparison to my normal workflow of printer light offset then colour space transform seems to. do you find it easier to work in the aces space for this or pre-transform, Do you work from the shadows up?


  • Brian Singler
    Guest

    Joey,

    Can I ask you a quality question? I fully understand that these transforms are mathematical and in theory have no affect on image quality.

    I am doing a Red project right now. When I set up a timeline like this with Aces nodes (RWG to Aces CCT and then ACES CCT to .Rec 709) and then I set up the “normal way” with a simple color space transform (RWG to .Rec 709)….

    The ACES image shows significant noise and banding and the normal method is far cleaner. Have you noticed this? Am I doing something wrong?


  • Joey D’Anna
    Guest

    Printer lights work pretty well in ACES for most things, so a lot of the balance/adjustment i do is just offset inside the ACES space.
    But the cool thing is if you want to do a printer point or two *before* the IDT – in this workflow you absolutely can.

    Usually I’ll CST from whatever the camera original is, into LogC, work in LogC as needed and use the LogC IDT to get into ACES, and do the bulk of the grading there.


  • Joey D’Anna
    Guest

    Interesting. It shouldn’t have any real quality difference. A few ideas –

    -What are your red debayer settings? When you don’t use project-wide color management, you need to be sure the red clips are being debayered into the colorspace/gamma that you are using for your ACES transforms.

    -On any of your color space transforms are you using tone mapping? when going between multiple log formats – tone mapping can go a bit crazy.

    Any chance you could share some screengrabs of the settings/results?


  • Temesgen G
    Guest

    Fantastic tutorial, Joey. Definitely will approach the aces workflow this way. Did a test yesterday and I love the way it feels. Feels organically like Rec709. I’ve been wanting to switch to an all aces workflow for my projects but just couldn’t find myself liking the sensitive of the controls. But after watching this tutorial and trying it for myself, I will definitely be using aces on my next project that starts in a few weeks. Thanks!


  • C. Ryan Stemple
    Guest

    Hey Joey,

    I’m running into something peculiar with this workflow, and I wanted to see if you know what’s going on here.

    I’m able to verify (by comparing a screenshot taken in ACEScct with one taken in DaVinci YRGB with your IDT / ODT ACES Transform node set-up, as you did) that the initial images do indeed appear to be identical. However, adjustments that are applied to nodes in-between these nodes do not seem to produce the same effect in YRGB as they do in ACEScct.

    For example, this is ARRI sample footage from an Alexa 65, within a project set-up for ACEScct (IDT – Alexa, ODT – Rec709, AP1 Color Science):

    https://uploads.disquscdn.com/images/

    And this is the same image within the same project, this time set-up for DaVinci YRGB with 2 ACES Transform node — one an IDT – Alexa node and the other an ODT – Rec709 node:

    https://uploads.disquscdn.com/images/

    Identical, awesome! I then go back to ACEScct, turn off the IDT and ODT nodes, add a 3rd node between them, and apply some quick adjustments to the image:

    https://uploads.disquscdn.com/images/

    Switching back to DaVinci YRGB, I turn on the IDT and ODT nodes, and this is what the image looks like:

    https://uploads.disquscdn.com/images/

    Quite a big difference between the two. Is this to be expected? I’ve attempted to switch the Color Space and Gamma of the adjustment node to AP1 / ACEScct, but that was unsuccessful. Looking forward to hearing your thoughts!


  • Marc Wielage
    Guest

    Brilliant stuff. I have to admit, I’ve been skeptical and annoyed with ACES in the past, but this actually shuts up a lot of my objections to the process.

Page 1 of 2

Log in to reply.

1,000+ Tutorials to Explore

Get full access to our entire library of over 1,100+ color tutorials for an entire week!


Start Your Test Drive!
Loading...