| Series |
|---|
Hi Everyone, it’s Robbie!
Last month Mixing Light contributor Joey D’Anna wrote an excellent overview article of – Blackmagic’s new Resolve Mini Panel. As I teased in that article, we wanted to get different colorists perspective on this exciting new professional control panel from Blackmagic.
So, in this installment of our Color Correction Gear Head article, we bring in another brand new contributor – Marc Wielage – a veteran colorist based out of Los Angeles.
You’ve probably run into Marc online as he’s an active participant in online forums like Lift Gamma Gain, The Facebook Resolve Users Group, and many others.
In this Gear Head, Marc provides some deep insight into the pro’s and con’s of this panel based on his long tenure as a senior colorist. Team MixingLight is looking forward to many more contributions to the Library from Marc!
A Veteran Hollywood Colorist Explores The Resolve Mini Panel
Blackmagic Design really knows how to keep a secret. I think many people in the business had suspected they had planned to release a lower-cost version of Resolve Linux, but the introduction of not one but two dedicated color-correction panels caught a lot of people by surprise.
For many pro colorists, the panel is the color-corrector, and the color-corrector is the panel. We think of the panel as an extension of our brain, just as the keyboard transmits the thoughts of the writer to the printed page, or the brush allows the artist create the painting.
There are some great A-list colorists out there who do all their work the hard way — just with keyboard and mouse alone — but they generally benefit from having long schedules, lots of support staff, and vast budgets… something everyday working colorists rarely have.

Most working colorists need a control surface that responds quickly, provides the most-needed functions in logically-arranged places, and also gives the user feedback to let them know how and where the change is taking place. For almost 20 years, the original daVinci Ethernet panel provided these functions — originally with the daVinci 2K, later with daVinci Resolve — and the current USB incarnation of the three-piece panel (recently rechristened the “Advanced Panel”) has been relatively unchanged.
A $30,000 price tag for the Advanced Panel has put off all but the most serious, well-heeled buyers — mostly facilities and broadcast studios who crank out dozens of hours of TV, features, and home video releases every week.
The Resolve Mini Panel is the little brother to the $30K Advanced panel, packing in far more features than you would think possible for 10% of the price. Because it’s not even 25% of the width of the Advanced panels, everything is a lot closer together and the rings & trackballs are a little smaller, but aside from that, most of the functionality of the controls are still there.
I was surprised that there’s very little documentation on the panel from Blackmagic: no brochure, no specs (like size & weight), and no operating manual beyond the 3 pages in the current Resolve 12.5 manual.
If you haven’t run Resolve from a panel before, I’ll tell you that having the ability to make multiple color and contrast adjustments at one time is worth the cost of admission alone.
Another key point: as you’re getting used to the panel, avoid using the QWERTY keyboard as much as you can. The more you use the panel alone, the faster and more productive you’ll be, particularly as muscle memory kicks in over time.
Getting More Out Of The Panel: Tweaks & Settings
I’ve run three different small panels with Resolve before:
I started off with the Tangent Wave panel, which is one I never liked for the simple reason that it splits out the lift/gamma/gain level apart from the RGB trackball. I much prefer a trackball + ring setup, as found on the Avid Artist Color panel (which I used for about a year) and the Tangent Elements (which I used for quite some time).
In truth, you can do fast, productive work on all of them, and any panel is better than none — at least for the way I work.
A key advantage of Blackmagic’s design integration of the Mini Panel and Resolve is that the software talks to the panel, and the panel talks to the software… so that means when you change modes in Resolve, the panel is (generally) aware of what you’re doing. Since this is proprietary information within Resolve, this is an advantage Blackmagic has over everybody else.
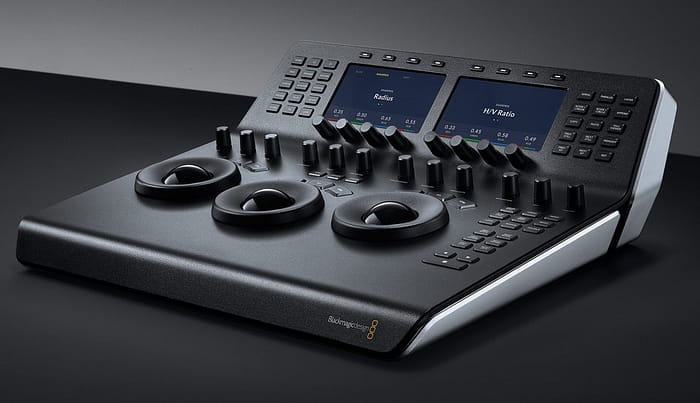
One thing that’s decidedly different about the Resolve Mini panel from the others is the control panel adjustments in the Project Settings. While I previously had to crank the settings pretty high for the Tangent Elements, I had to go in the opposite direction for the Mini:
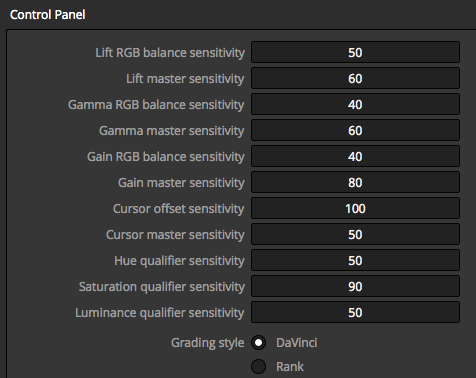
These settings boil down to personal preference: I know people who are using considerably lower settings, and some who might prefer higher settings. The settings above got me through an entire 2500-cut feature over the last few weeks, and I settled on these particular settings after about 40 minutes of material over a period of a few days and it seemed to work for me. No doubt I’ll refine this a little more as the weeks roll on.
As many online reviews of the Mini Panel have already said, the action & response of the Mini trackballs & rings are smooth and responsive. I also had no problem with the Avid or Tangent Elements panels in that regard. I think the transport buttons on the Mini are a little tougher: they’re quite a bit smaller than the ones on competing panels (including the Advanced panel), and I’ve noticed that I sometimes have to hit the Play Forward multiple times before it responds.

I’ve tried this with three samples of the panel and it’s the same on all three, so this appears to be a design issue. Few others have complained about it, so this may be just a case of me having to get used to them, or my ape-like fingers being too large for the buttons.
The Mini is very quiet in operation. By comparison, the Tangent Elements is a cacophony of castanets, but it never bothered me. I actually found the Elements pretty satisfying in terms of tactile feedback; one of my freelance bosses once quipped that he liked hearing the clicks from me pounding the Elements panel down the hall, because to him “that was the sound of money” (since we were billing the client whenever the panel was in use).
Mini Panel Hits & Misses
While the mini panel has a compelling feature set, it’s not perfect. Like any panel, you grow into it, discover what works and what doesn’t and more importantly find workarounds for the things that you’d like to see. Although I’ve only been working with the panel for a short time, a trial by fire on a 2500 shot feature has given me a pretty good idea of what can’t you do on the Mini Panels.
Here’s a short list I came up with:
Navigation
- First clip frame / last clip frame – I use these constantly in order to determine where and when to track and where and when to use keyframes. We have Previous Clip and Next Clip, and we have Previous Frame and Next Frame, but not First Frame and Last Frame. This is a big miss.
- No Jog/Shuttle knob – In truth, this was always a buggy function in Resolve, but I found the Tangent Elements panel fine for slowly inching through scenes. I get that there’s only so much room, so this one I can live without.
- No switching to Media Page, Edit Page, Color Page, or Deliver Page from the panel – but I generally do this with the function keys on the regular keyboard no Jog/Shuttle knob.
- You can’t play back at double-speed by pressing play twice – which does work on the Advanced panel. If your normal QUERTY keyboard is off to one side, you can engage double-play by hitting the “L” key twice, assuming the system can keep up with the media.
Keyframes
- Starting and ending a dynamic keyframe- no Start Dynamic, no End Dynamic. This is kind of unforgivable, a huge omission, and these keys are very well-worn on most of the Advanced Panels I’ve seen around town.
- No Timeline Color Keyframes / PTZR Keyframes – I use these frequently in order to simplify the keyframe display and highlight only keyframe-specific nodes.
Grading Workflow
- No Color Page 2 controls – which I think is kind of head-smackingly dumb. You can’t use the panel to switch to Color Page 2, and while you have dedicated knobs for Contrast, Pivot, Mid-Detail, Color Boost, Shadows, and Highlights, you can’t see any kind of bar-graph readout of what’s happening on the LCD display — only the numeric display on the Resolve GUI. [I notice that Offset has a blank LCD screen on the right — perhaps that could be used as readouts for these modes.]
- No Apply Grade from the Previous Event (=) or Apply Grade from 2 Clips Prior (-) – which I use constantly. (This is the “-1 Preview” and “-2 Preview” mode on the big panels.) Very important for colorists working on episodic TV shows.
- No Memories – more on this in a moment
- No Delete Node – Which is fine by me. I think this can be dangerous, and I don’t mind having to really think about whether I want to delete a Node and disturb a fixed node structure, which I generally use. But I can see why some would like to have it, and I’d be fine with a Delete Node button provided it was a shift function (and hard to hit by accident).
- No Split / Join Clip – which I use sometimes when I’m given flattened media by the client.
- Adding versions – You can’t add a New version of a shot correction, and you can’t go back and forth from previous version to next version. And no Default version. Add, Default, Previous, and Next could’ve had an entire row of buttons, or at least three of the four. Another miss for me.
Stills & Comparative Tools
- No button for the Lightbox – I use the Lightbox frequently when I need to see the whole timeline at a glance, and I specifically want to compare a current shot with how a similar one from 5 or 10 or 15 minutes earlier.
- No button for the Gallery – I sometimes need to bring up the entire Gallery page in order to pull in stills from other sessions.
- No split-screen controls – I would’ve loved to use a knob for wiping a Gallery still with the shot shot.
- The Still-Store buttons are a little schizophrenic in the Mini Panel layout – Next Still is in the top group of 15 buttons, but Grab Still & Play still are below in the other group of 9. It might have made more sense to group all the Gallery still buttons together, but that’s me.
Some critics have knocked the panel for not having an “Outside” button for Windows, but it actually does — albeit stashed deep in the “Tools” section of the Power Window soft controls. I would’ve rather they had made this the second level of the <–> control in the LCD windows.
Making Power Windows visible is a bit kludgy: in theory, it turns on whenever you go to the Window mode, but it depends on where and how you have the View -> Window Outline control set. The current system of having to manually toggle the lower-left viewer cursor mode is clumsy; with the Advanced panels, you hit the cursor button on the 4th trackball and it (generally) pops up.
Speaking of the 12 knobs in the middle of the panel: it’s great to have dedicated knobs for Y, LGG, Contrast/Pivot/Mid-Detail, Color Boost, Shadows, Highlight, and Sat, Hue, & Lum Mix.
But the engraved labels below the knobs are in tiny 4-pt. type that’s very hard to read for my tired eyes, particularly in dark rooms. Given enough muscle memory, good operators will eventually know what these knobs are without having to look — I memorized Sat after less than an hour of use, since I use that a lot — but the others are a lot harder.
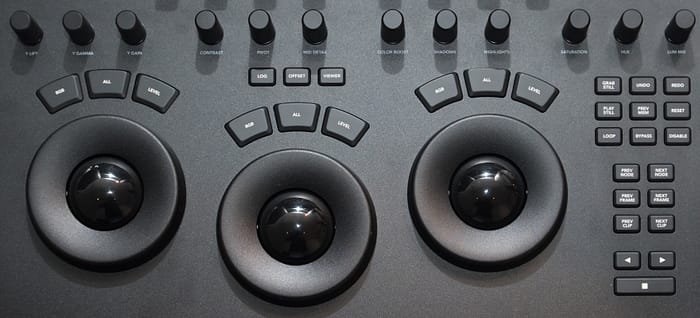
I wish these had been backlit to make them easier to see. For now, I’m using two $50 dimmable Litlites with blue filters to sorta/kinda turn the 3200° incandescent lamp into something resembling 6500° (but is probably more like 5400° at best). (The non-dimmable LED Litlite is a bit too bright for me.)
The lack of power switches on the panel might worry some. BMD has said that in the past that (in general) they never put power switches on rack-mounted components, based on the longstanding engineering theory that many components fail at the moment of being powered-up.
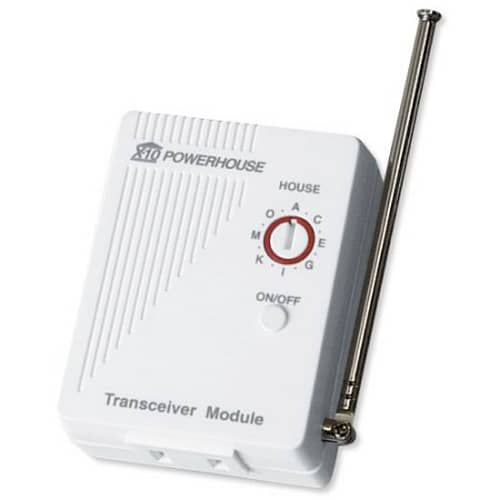
I decided to work around this problem by putting a remote X10 TM751 transceiver module on the AC connector, so I can turn off the panel at the end of a session. The module is $20, and the remote on/off switch is another $20. A “sleep” function where the LCD panel turned into a bouncing ball or a Resolve logo might have been a good compromise for a power switch, maybe after 15-20 minutes of disuse.
Some have criticized that there’s no dim switch for the LCD panel displays. I’m personally not bothered too much with them in my current configuration, but I can see why some would want a control to just cut the voltage in 10% or 20% increments — or better still, provide direct control within the Project Config controls.
And a few have groused that for $2995, you wish you could at least have a dust cover for the panel so it won’t get cruddy over a period of time. (The panels I work on generally get pretty filthy after long sessions due to a combination of blood, sweat, tears, and cheeseburgers dripping over the console.)
I found a small company in Texas, Cover-It-Audio.com, which makes custom covers for audio mixing panels that are roughly the same size as the Resolve Mini. A nice black cloth cover cost under $30, and I think looks pretty snazzy.
Workaround: X-Keys Macros To The Rescue
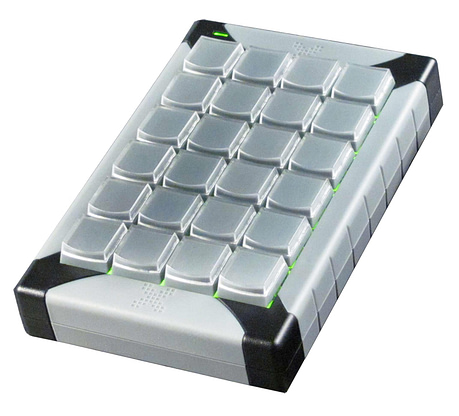
As a workaround to the keys not found on the panel, I use an XKeys 24 panel to store some oft-used commands:
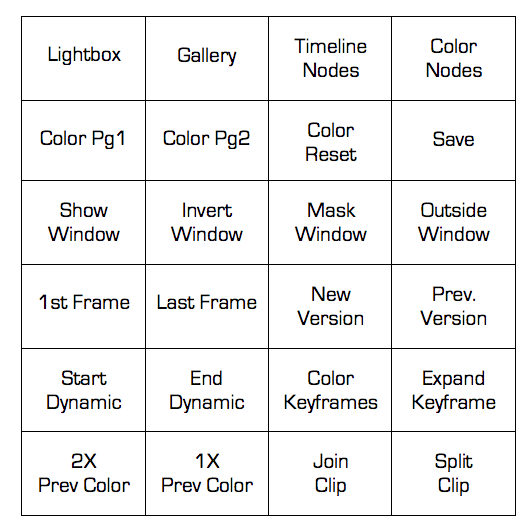
Lightbox & Gallery are self-explanatory; I can display or close the Lightbox with one button. Gallery is more mouse-intensive, but I don’t use it that often. Timeline Nodes and Color Nodes toggles between these two Node windows; if I was ambitious, I could add Pre-Clip and Post-Clip to this as well. (Note that the GUI window sizing will affect the mouse clicks for these functions.)
The next row is all for color-related functions: Color Page 1 and Page 2 toggles between those two GUI views; Color Reset zeros out lift/gamma/gain for either Video or Log grades (faster than hitting the “all” button on each trackball); Save just manually saves the session.
The next row is all window-related: Show Window pops up the window regardless of mode, but (as I said) this function is a little buggy. In theory, hitting Window or Tracking on the Mini panel should bring up the visible window if you’re in a node with a power window, but it’s a little hit and miss. Invert, Mask, and Outside are duplicated on the panel, and I may change these to something else at a future date.
The next row are all clip-related: 1st Frame and Last Frame provide controls not on the panel, as do New Version and Previous Version. (You can cycle through all the versions just by hitting Previous several times.)
Row 5 are all keyframe related: Start Dynamic and End Dynamic are used for a keyframed color or pan sequence; Color Keyframes is the same as hitting Mark -> Keyframe Timeline Mode -> Color, and Expand Keyframe does a mouse-click to expand or contract the Keyframe window.
The bottom row is one I use a lot: 2X Prev Color previews the color nodes from two shots before the current clip, and 1X Prev Color does the same for the shot right before the current clip. Join Clip and Split Clip are tools I use only for situations where I have flattened media.
Note that some of these macros require mouseclicks, while others require that you use custom keyboard commands to access certain menus. It’s not hard to do, but it does require some thought and experimentation, plus you have to customize the X/Y cursor positions for a specific display size (which means they won’t work if you change your GUI screen).
I mentioned the Memories before: at the moment, I’m trying out a second keypad, the Logitech G13 (detailed by Patrick a year or two ago), and using that just for grabbing and previewing Memory corrections.
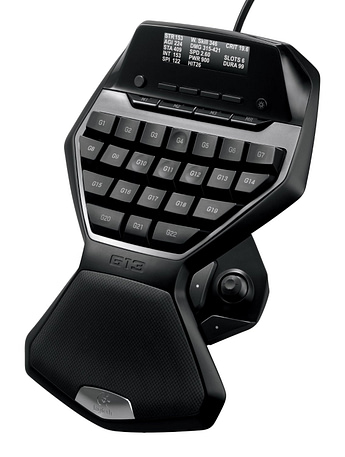
There’s pros and cons with the Logitech, but one great thing going for it is that it’s stylish, widely available, and very inexpensive compared to the XKeys. But between the G13, the XKeys, the regular keyboard, the mouse, and the Mini Panel, my desktop is getting mighty crowded.
Final Thoughts
All considered I think the Mini Panel is really well-done. It’s solid, built like a tank, and a pretty good value for the money.
Operationally, it’s tough because you do have to reach more forward than you do with the Avid Artist Color or the Tangent Elements, and I’m already paying for this with some sore shoulder pain. If I were in a situation where I needed to use multiple programs (like Premiere or FCPX or Colorfront or Baselight or whatever), Tangent Elements would be a better choice.
Also, I’m looking into getting a Pelican case sized just for the Mini provided I can get laser-cut foam that fits it just right. The latter is harder than the former.
Since the Mini is 24 pounds,so I’ll probably go with a rolling case with a luggage-type handle. We’ll see if there’s something suitable at NAB.
My final verdict: if you primarily use Resolve and don’t need the additional functionality, the Mini works fine… with a little extra help from the accessory keypads.
If you have any questions or additional thoughts on my review, please use the comments below
-Marc

