
| Series |
|---|
Day 13: 24 Insights in 24 Days 2018 New Year Marathon
Exploring Denoiser III (and testing against a popular competitor)
Before we start evaluating Red Giant’s denoiser, I first need to explain why I’ve been committed to Neat Video for years now. It’s my go-to plugin when I need to denoise footage. If you’ve never used Neat Video then please watch Robbie’s Insight on revisiting Neat Video 4.1, to understand how it works and how it’s different from most other denoise plug-ins. My road to Neat Video followed the typical 3-Act narrative.
Act 1: Discovering DSLRs for Cinematography
I started my dive into color correction during the DSLR revolution. It was in 2010, and Vincent Laforet just released Reverie. It was shot with a ‘consumer’ DSLR camera. This short fooled me – and probably the rest of the world – into thinking that achieving his images is easy as buying a new Canon DSLR. Well, it wasn’t. It’s not. Not at ALL.
I was disappointed with my results. Sure DSLRs are easy to shoot with, lightweight, perfect for my one-man-team. And with enough time in Premiere I managed to get the edits I wanted. Except one thing was still bugging me: The Look. My efforts were FAR from ‘Reverie’ cinematic feel!
Act 2: Discovering Red Giant Looks
I discovered Red Giant Looks (RGL) plugin watching Stu Maschwitz’s video tutorials. That was my next revelation: Color Correction. It’s not enough to acquire great images. I needed to craft those images. And color correction was the missing part of my workflow.

RGL offered so many options and creative power. But, as soon as I pushed a control to get the effect I wanted, pixels started to dance all over the image: Noise was a serious limitation to color correcting DSLR footage. Hello: Big frustration and new disappointment.
Act 3: Discovering Noise Reduction
Fortunately, my narrative has a third act. After much research, I discovered that what I was fighting was noise, induced through color correction due to the low fidelity of those codecs in those early DSLRs. One day I’ve downloaded the trial version of the Neat Video plugin. This version was processing only the center of the footage in a boxed window. But I can still remember this Ah-HA! Moment after comparing the noise-reduced and the rest of the image. Yes!
From that day forward, I would be able to grade my clips the way I intended. Neat Video gave me the final bit of control I needed.

A Look At Denoiser III (compared to the expert, Neat Video)
Back in September, Patrick decided to revisit Magic Bullet Looks 4 to evaluate the improvements over Version 3. He also started a series on Noise Reduction Plug-ins. This Insight is part of those series. And we’re going to take a look at how Neat Video and Magic Bullet Denoiser compare to each other, at the start of 2018.
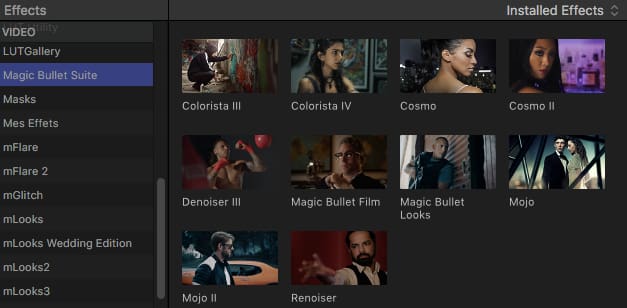
About Magic Bullet Suite
Looks is part of Red Giant Magic Bullet Suite. It can be purchased separately but to save costs, most people buy the whole suite (Magic Bullet Looks alone is almost half the price of the suite).
The Magic Bullet Suite offers six additional tools along with Looks: Colorista IV, Denoiser III, Mojo II, Cosmo II, Renoiser and Film. The current update of the suite is version 13, released at the end of 2016, and I expected a new major update for the end of 2017. But Red Giant has only updated the Trapcode Suite to version 14 (August 2017). So Magic Bullet Suite 13 is the latest version, and so is Magic Bullet Denoiser III (3.0.2).
Magic Bullet Denoiser III
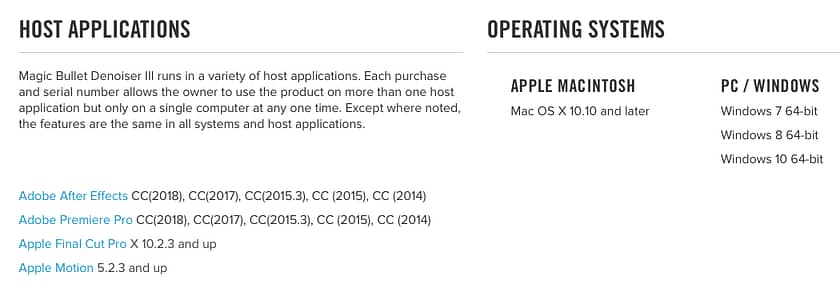
Denoiser works with Mac OS X 10.10 and later, or any Windows 7 to 10 64-bit station. For HD resolution outputs, Red Giant recommends a GPU with at least 2 GB of VRAM memory or 4 GB of VRAM memory for 4K and more projects.
Host Compatibility: Not Resolve-Ready
Almost all the plugins in the Magic Bullet suite are compatible with After Effects, Premiere, FCPX, and Resolve. But Denoiser III and Colorista IV aren’t currently compatible with Resolve (you can still use Colorista in Resolve through the Looks plugin if you need).
High Promises
“ Denoiser III has been rewritten entirely from scratch to give you the best, fastest, and most reliable video denoising experience available. Denoiser III runs on the GPU providing near real-time renders.”
Red Giant Website
Red Giant’s marketing for this new Denoiser suggests it’s better, faster, and easier to use. Like much of the Suite their previous version was CPU-only, so GPU processing is a welcome upgrade. It allows the plug-in to work faster every time you swap in a faster GPU. The question we’re asking: How does it compare to the competition?
Ease of Use, Quality of Results, and Render Speed
Here’s a quick look at Denoiser III on three major points:
- Is the plugin easy to use?
- Do we like the results we get from it?
- Is it providing real-time playback, or at least “near real-time renders” like advertised?
Installation: Download and install the Magic Bullet package from Red Giant’s website. In FCPX a new folder labeled Magic Bullet Suite is created in the Effects tab.
Ease of Use
Applying Denoiser III is easy as dragging it on a clip, whether you’re in Premiere or FCPX. At first sight, the UI looks minimalist with only five sliders:
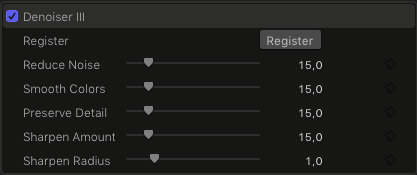
The Sliders:
- Reduce Noise: This master control adjusts how much noise is removed; the more you add, the more noise is removed (at the cost of rendering time)
- Smooth Colors: Looks for color noise in the footage and tries to blend that noise together
- Preserve Details: Brings back details that may have been lost after high levels of noise reduction
- Sharpen Amount: Brings some of the lost sharpness back after the Denoising process
- Sharpen Radius: Affects the radius of sharpening performed on regions of the image having a sharp contrast between light and dark color values
The effect is produced as soon as the effect is dragged on the clip. According to Red Giant, the sliders default state are set to benefit almost any footage instantly.
Beginners will appreciate this simplicity, compared to a plugin like Neat Video which does nothing until you open its interface (and it’s interface can be overwhelming). When it comes to ease of use… it doesn’t get simpler than this.
So how do those simple controls compete against complex plugins with a lot of parameters, allowing you to fine-tune the right adjustments for each piece of footage?
Quality of Results
Sidenote: I’ve seen a few reviews of Denoiser with tests performed on footage that I would label as ‘friendly’. In the intro, I have explained how I’ve learned color correction the hard way: H264 compressed 8bit-codec material, 4:1:1 sampling, no proper lighting… in a word: the ‘independent’ filmmaking workflow.
Member Content
Sorry... the rest of this content is for members only. You'll need to login or Join Now to continue (we hope you do!).
Need more information about our memberships? Click to learn more.
Membership optionsMember Login
Additional Downloads
Sorry... downloads are available for Premium Members only.
Become a Premium Member