Visual Math – Building A Subtractive Saturation Node Tree In DaVinci Resolve

January 14, 2022

'Subtractive saturation' is a hot topic with colorists. Learn how to manually build this tool in DaVinci Resolve for more natural results.


Series

Learn how Subtractive Saturation works by building it yourself

Series Note: Cullen Kelly recently finished a series on coding your own DCTL ResolveFX plug-in to create a split-tone look. Today, Cullen starts a new multi-part series teaching you how to use the Layer Mixer node to build really useful tools without going the DCTL or plug-in route.


Math.

In the end, all of our color grading tools are essentially mathematical operations on the red, green, and blue values of each pixel captured by our cameras (or rendered out of software). But some operations are more complicated than others.

The value of many of our favorite plug-ins lies in their ability to make the complex, simple. The cost of this simplicity is that we never learn how to do these things ourselves. We lose insight into what’s going on ‘under the hood’. But if we know the underlying math, we can (potentially) manually recreate the math even if we don’t have access to those plugins.

One of the most powerful ‘math-based’ instruments in the DaVinci Resolve toolbox on the Color Page is the Layer Mixer node (if you need it, at the bottom of this Insight are a few Mixing Light links to get you up to speed on the Layer Mixer node). This node lets you perform math operations in the form of blending modes (as you’d find in Photoshop or After Effects).

Subtractive Saturation: Combining Layer Mixer node math with node-specific color space processing

If you combine the Layer Mixer’s blending modes with Resolve’s ability to switch the color space of the node(s) feeding the Layer Mixer node, you can build sophisticated tools that give you targeted control beyond RGB math.

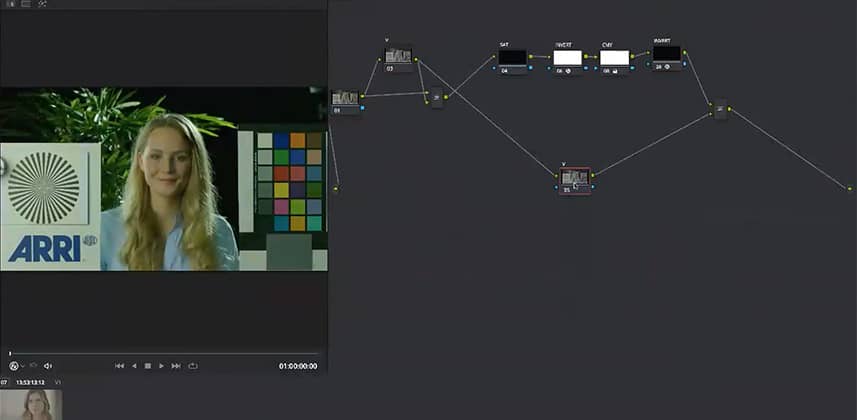
In this Insight, we learn about one of the hot topics in color grading circles, Subtractive Saturation. In a nutshell, a subtractive saturation tool allows you to add saturation without adding brightness. This behavior has a much more natural look and feel. It also limits your need to follow up saturation increases with isolations to reduce excessively bright saturated elements.

Sign up for a 7-Day Test Drive to explore this topic (and more)

This free Insight is just the tip of the iceberg! We’ve been teaching these topics for a decade.


View Membership options

In this Insight Series, you’ll notice a common theme

We’re building side-branches to our main node trees that allow us to perform a specific set of complicated operations giving us a custom tool for nuanced behaviors not found in the core Resolve toolset. Once you build these node trees, you’ll probably want to save this ‘branch operation’ as a PowerGrade, to add to your node graph while working.

If you like to work with fixed node trees then you can build these side branches into your node trees and hide them as Compound Nodes – reducing node tree clutter.

Premium Members can download the final Subtractive Saturation PowerGrade, built in this Insight. Feel free to use it, deconstruct it, or modify it to your preferences.

Start or Join a discussion in the Comments below

We’re always curious about your thoughts, confusions, questions, or observations – and are happy to answer. Please use the comments below to discuss this Insight!


Feb 16, 2022 : The Additional Download of Cullen’s node tree has been updated with the proper DRX for Premium members to download.

Additional Downloads

Sorry... downloads are available for Premium Members only.

Become a Premium Member
Comments

Homepage Forums Visual Math – Building A Subtractive Saturation Node Tree In DaVinci Resolve

Page 1 of 3

  • Jonathan R
    Guest

    Is there a difference in output between using a CST node and a combiner to right clicking menu a node to HSV and switching of the r,g channels? And if these two options differ only in style is there a guiding reason choosing this more explicit way? As in a philosophy, style guide or a set of best practices? As in using standardized building blocks, node tree idioms or design patterns.
    Same goes to using an invert color effect vs flipping in the curve tool.

    P.S. thank you Cullen. I find your tutorials extremely insightful.


  • Cullen Kelly
    Guest

    Hey Jonathan! The main difference between using a CST vs setting color space by right clicking a node is that the latter only affects that particular node, not any nodes that come after it. So if I want to convert to HSV and then split/combine the channels, I need to use a CST. If I just set my node to HSV and then create a splitter combiner from there, I won’t have H, S, and V channels.

    Re inverting color, I simply trust the Invert Color plugin more than my hands — IMO there’s no benefit to introducing the variability inherent in performing the inversion with curves.


  • Austin G
    Guest

    Excellent tutorial! Keep these subtractive color videos coming. I will pay money to understand in depth best practices/methods to create subtractive color.


  • Antonino D
    Guest

    Awesome tutorial Cullen, clear and very useful. More stuff like that it’d be much appreciated!! Also, it would be nice to see how you can build a look with this technique. Like where would you put it on your node structure? Or can I use it as node to control the saturation (as opposite to Saturation know which we know it does other stuff as well). Thanks


  • charles w rodriguez
    Guest

    (aka Bill Ravens) I’m a devoted follower of Cullen’s various presentations. Over the past few months he has completely affected a change to my workflow with his tutorials. The net result is not only a more consistent result, but, a much easier node graph.


  • David C
    Guest

    Thanks for the insight, Cullen. I was just curious if you need to put a CST after all of this to bring the OCS back to its original value if this will be used in a dedicated pipeline with secondaries and look design afterwards. I would think so, since it essentially means everything after that first CST would have HSV Color space, correct? Also, if this is pocketed away in a compound node, does that Color Space stay nested away in there, or does it continue outside the nest as well?


  • Cullen Kelly
    Guest

    Glad you found it useful Austin! More videos coming on this topic for sure


  • Cullen Kelly
    Guest

    Great question David! No, you don’t need a CST at the tail, because we’re not actually in HSV. We’re simply calculating HSV in a separate “dead” branch, then borrowing only the ‘V’ channel, which we subtract and ultimately add back to the original image. Hope that makes sense!


  • Cullen Kelly
    Guest

    My guy! Glad you’re seeing great results, you’ve been putting in the work of pushing your knowledge and asking great questions


  • Cullen Kelly
    Guest

    Thanks Antonino! Yes, could be fun to demo deploying this in a practical node tree, will chew on this!


  • David C
    Guest

    Thanks, Cullen! I think it does. It’s due to the first node being in RGB, then having the HSV Value branch layered/mixed over top, correct? In that way, we’re essentially staying in RGB since it’s the bottom layer of the mixer, but dipping into HSV just to get the parts we like to use. The “Branch” of HSV stops at the layer mixer, which is why we need to send it out to another lone node in order to have the HSV V mix into the second layer mixer, right? I’ll dive into the Resolve Manual and see how it discusses layer mixers in regards to color space awareness just to touch up on it some more, always more to learn!


  • Pat Inhofer
    Guest

    David – The key to these latest Insights from Cullen (more coming) is the Splitter node. Once you flip the node colorspace to, say, HSV, all RGB operations within that node now happen within the HSV color space – but only within that node!

    BUT – if you immediately attach a splitter node, you can extract the internal color model of that node and reroute H/S/V (or whichever model you’ve chosen) to R/G/B in whatever channel order you desire. From that point on in that node branch, you’re technically performing RGB operations – but upon the channels that got split out. Then, to get back to R/G/B output, you’ll either use a Combiner node to put the channel back in proper order OR you do what Cullen is doing in this series and use a Layer Mixer node to use ‘operators’ to interact with an underlying RGB signal.

    Does that explanation help?


  • Pat Inhofer
    Guest

    Also – here’s a series on the Splitter-Combiner: https://mixinglight.com/tutorial-series/using-resolves-splitter-combiner-nodes/

    I’ll add this to the Related Insights on this post.


  • David C
    Guest

    Gotcha! That helps a ton Patrick. I’ve never had the need for splitter nodes within my current workflow, but it’s always good to continue learning should the need to use them ever arise.


  • Austin G
    Guest

    Excellent tutorial! Please keep making more of these!

Page 1 of 3

Log in to reply.

1,000+ Tutorials to Explore

Get full access to our entire library of over 1,100+ color tutorials for an entire week!


Start Your Test Drive!
Loading...