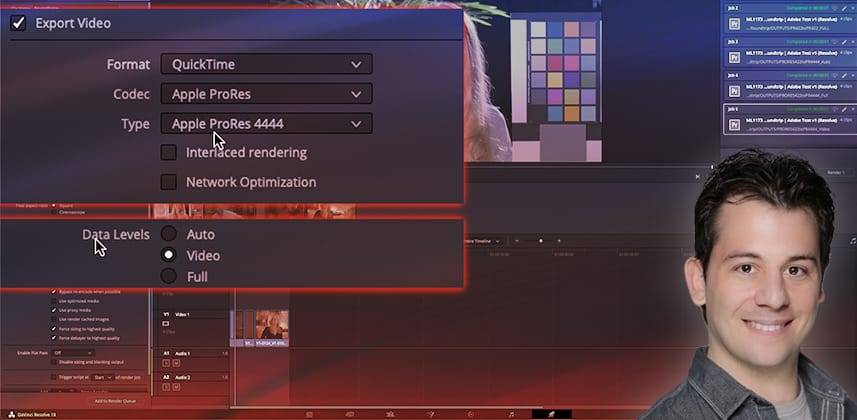
Update! DaVinci Resolve ‘Levels’ Setting For Premiere Pro Renders

April 8, 2023

Colorist and finisher Jason Bowdach revisits the topic of which setting to use in Resolve for exporting to Premiere Pro: Data vs Video Levels?


Series

Wrestling with round-trip workflows

Roundtripping between post production software applications is complex and ever-evolving, especially as all of our software platforms get updated independently of each (and generally with little regard for competing platforms). It’s nearly impossible to generate a broad set of rules for moving timelines between different applications that work 100% of the time.

That’s exactly why I have to emphasize that everything in this insight is evolving and the recommendations found are based on the specific versions of the software utilized in the test, at this moment in time.

Throughout this series, I’ll be approaching application-specific issues and will attempt to boil them down to a simplified set of recommendations that you can follow for optimal results. If at some point in the future you follow these recommendations and the workflow breaks down, let me know in the comments! I will revisit this topic in the future on an as-needed basis.

Today, we’re deconstructing the often problematic rendering from DaVinci Resolve into Premiere Pro.

For years, colorists and editors have been complaining about shifts in contrast when importing Resolve renders into Premiere. And for years, the advice has been changing. Guess what? My advice is changing again!

A word of caution

This insight is filled with assumptions based on my current run of these workflow tests. In fact, while recording this Insight I had to completely revise my workflow advice, since recent updates to both DaVinci Resolve and Premiere Pro made that advice 100% wrong and I found a new problem!

The advantage of being in a community like Mixing Light is that we can alert each other to these changes and then update our shared documentation. Consider this Insight an update to our shared documentation!

Key takeaways from this Insight

By the end of this Insight, you should understand how:

  • On MacOS, the ‘data vs. video levels’ issue between Premiere Pro and DaVinci Resolve is fixed if you select Auto for your DaVinci Resolve exports using 444 codecs.
    •  Important note: While this should be consistent with the Windows version, there could be slight differences between operating systems. If you find any differences, please share them in the comments section.
  • There’s a new issue with 422 exports, which exhibit visible color shifts! My recommendation is: Only export 4444  media when rendering to Premiere Pro.  
  • This Insight currently applies to software versions:
    • Premiere Pro v23.10 or later
    • DaVinci Resolve 18.1.2 or later

Questions or Comments? Leave a comment!

Is this Insight useful to you? Let us know! Mixing Light is all about community discussions and we’re curious if you found this helpful, if you have something to add, or if you have more questions you need answered?

Also – if you find different results in later versions of Resolve or Premiere, please let us know in the comments! I want to keep all of us current on this very important topic.

Finally, are there roundtrip issues you’re wrestling with? Use the comments to let me know and I’ll try to address them in an Insight.

– Jason

Member Content

Sorry... the rest of this content is for members only. You'll need to login or Join Now to continue (we hope you do!).

Need more information about our memberships? Click to learn more.

Membership options
Member Login

Are you using our app? For the best experience, please login using the app's launch screen


Comments

Homepage Forums Update! DaVinci Resolve ‘Levels’ Setting For Premiere Pro Renders

Page 1 of 2
  • Great Insight Jason, thanks! Out of interest, did you test 444 source to 422 and bring that back into Resolve to compare with the 444 source? I assume that was virtually identical?

    Thanks again


  • Jim Robinson
    Member

    Really interesting Jason.
    It seems that even after all your tests that some of the variables in the tests were not swapped out to find the problem.
    It’s one thing to see a problem,( first ) and another to then determine the exact variable(s) causing the problem. In all test shown here – the two softwares involved were Resolve and Premiere.
    I am guessing that since you acknowledged that an Adobe update changed your tests, that one could assume that Adobe’s handling of the codecs might be the problem.
    To test that assumption, maybe a different software to ingest the different codecs could be tested as well, as a confirmation to the source of the problems.
    Also the rendered clip.
    Was that used to test against on all the different renders? If so, just to be sure that it wasn’t influencing the test, maybe a second rendered file could be exported in DnX or even 422 ProRes? Just to confirm or rule out the constant variable. Or maybe I missed something there.

    Now if it is determined to be an Adobe problem and Resolve is correctly rendering all files, shouldn’t we just ignore it, and not make any changes in our workflow?
    It seems to me that Adobe at some point could change this ( but not fix it correcty ) and an opposite swap where the 422 would look correct and the 444 could have the color shift.
    So making all our renders 444 could then be the wrong approach.
    Tough call. But determining the actual cause, might give us an indication as to what to do or what not to do.
    Just some thoughts.


  • Marc Wielage
    Member

    Yikes! This is alarming news… now we may have to re-assess our workflow for our Premiere clients.


  • Scott Stacy
    Member

    Great Insight, Jason, and timely for me, as I am about to finish a film and render out clips to a Premiere client. I was planning on DNxHR HQX. Now, I will look at DNxHR444. I am becoming increasingly frustrated with Premiere as the years go by.


  • Evan Anthony
    Member

    @jason-bowdach-1 is there a difference that you started the timeline with Rec709 Scene instead of 2.4? I never use Scene for any broadcast work. Also for PC users is DnX HR & HD the same?

    • I would have thought that using 709 Scene as the working space wouldn’t make a difference to the output since colour management isn’t turned on so no transforms are being applied, it’s just setting the working space (the way the controls respond when grading) and tagging the output, which was 2.4gamma.

      I agree though, gamma 1.96 is an annoying hang over from the past and I try to avoid it.


      • Jan Klier
        Member

        Good point. Output color space was set to 2.4. Would be worthwhile to double check that the working color space didn’t interfere though. Does the timeline color space impact the import of a clip (possibly depending on its tags)? And the export was set to use tags ‘per project settings’. Does that refer to the output or the timeline setting of the project? Don’t know the answer to either one right now. Would be good to rule out/verify.

        If absolutely no transforms are applied (are we certain?), why do the settings exist then (instead of being greyed out)?

        I guess the canary in the coal mine test would be to bring the clips back into Resolve and compare them on the timeline there too. That would validate that no transform was applied. Or do comparisons in a 3rd party app and/or external scopes.


  • Jan Klier
    Member

    Echoing @evan-anthony here, I believe Rec709 (scene) on Mac is gamma 1.8, while Rec709 in Premiere is 2.4 (Premiere is now color managed btw, didn’t used to be). A gamma shift could explain color differences in the vector scope that look different than your classic levels mismatch.

    The fact that Resolve defaults to Rec709 (scene) these days is a known headache.


    • Jim Robinson
      Member

      I have had doubts about a lot of workflows since Resolve started defaulting to rec709(scene ). What does it do to my calibrated display if there is no transform to the calibrated rec709 2.4?
      I’ll have to watch Jason’s video again, but I thought he made a point of not doing any transforms or grading in. the video.
      I wonder if there was a CST on the timeline to change to the rec709 gamma 2.4, if then Premiere would process it differently?
      Something definitely feels like there is a difference in color space expectations from the different software.


  • Jan Klier
    Member

    Would also suggest for testing, that rather than (or in addition to toggling) before/after, which relies a bit on visual memory, you do a side-by-side by cropping the upper track 50% and/or doing a difference blend mode. Both of those can reveal more subtle changes and detailed comparison than a memory based toggle.

  • I also have been dealing with this shift. Premiere seems to be the culprit. But it’s hard to blame others… that being said, clients are noticing and I am being not blamed, but questioned…

    So is what does the 422 media do when imported into Resolve? When I re-Import to Resolve, it’s correct, are you finding this?

    Is there anything we should be telling editors to set color mgmt to in Premiere, I don’t subscribe to Adobe so don’t know this.

    Thanks for doing this Jason!

  • I haven’t revisited this testing in-depth with the latest version of Premiere but I would assume that the results Jason is getting mimic my previous testing but there is one big thing not shown or discussed here that’s not a levels or codec thing that I think is vital in these workflows – proper NLC tagging.

    One of the things that Output Color Space in Projects Settings > Color Management governs is output file NLC tagging. In the video, Jason has his output color space set to Rec 709 Gamma 2.4 and on the deliver page has both output gamma and output gamut set to the same as the project (not overriding them) – which will use what the Output Color Space option is set to.

    Because Output Color Space was set to Rec 709 Gamma 2.4 this creates an NLC tag of 1-2-1 (Color Primaries, Transfer Function, Conversion Matrix). This is problematic because a tag of 2 actually means (in NLC parlance) undefined. Although some pro applications do understand it to mean Gamma 2.4 that is the exception, not the rule.

    Like many applications, Premiere Pro expects a 1-1-1 tagged file and will also output 1-1-1 tagged files (confirmed with Adobe Premiere Team). So when Premiere Pro (or insert player here i.e. frame.io etc) sees a 1-2-1 tagged file, potentially some sort of compensation will be applied to go from ‘undefined’ to ‘defined’. What that compensation is, depends on how the devs want to handle it for that app or player. While proper color management ‘should’ solve for this it can confuse things to where you get color shifts, gamma shifts etc – I mean just look at any user group for ‘why does this look different!’

    Having your output color space in an SDR 709 workflow set to 709 scene (the new default since early 17) will when using Same As Project for gamma/gamut on the deliver page actually creates a properly tagged 1-1-1 file. Or you can override/enforce this (I usually do since I’m OCD and want to be sure) by setting each of these deliver page pulldowns to Rec709. Doing so forces a 1-1-1 tag regardless of what your Output Color Space setting is set to in Project Settings.

    Just keep in mind If you’re using properly calibrated 709/2.4 external monitoring the output color space choice has no effect on the pixels you’re seeing there – it’s just metadata so it controls NLC tagging, iCMU Tone Mapping and the Resolve viewer on a Mac using ‘use mac display profiles’.

    It’s easy to see this NLC metadata on the file itself in a tool like the free Media Info or my player of choice which is Screen from Video Village (Mac only sorry!).

    @joey actually did a detailed, well-explained video on all this a while back – https://mixinglight.com/color-grading-tutorials/davinci-resolve-17_4_5-custom-yrgb-output-color-spaces/

    It’s also worth noting, while you can encode/package data/full levels (or R’G’B’) in a ProRes or DNX container these formats are always under the hood – legal range Y’CbCr. Meaning internally all flavors convert to/from legal Y’CbCr.

    Quick tangent: This was actually a big source of confusion in the early days of Dolby Vision mastering when ProRes was starting to be accepted as a mezzanine file. Because a DV workflow is largely full range (monitoring etc), people were making explicitly tagged full range ProRes mezzanines that once they hit the AWS encoders at Netflix, Hulu etc that are(correctly) expecting legal range ProRes – a shift happened. If you really want some light bedtime reading Dolby actually has a great article on this here – https://professionalsupport.dolby.com/s/article/Dolby-Vision-Legal-Range-workflows-for-home-distribution?language=en_US

    It is true in the past that Premiere Pro had this levels stuff wrong and made all sorts of levels of ‘assumptions’ based on codec, chroma subsampling etc but as Jason shows Auto (which for these codecs makes the file legal) or forced to legal works as expected now. 98.9% of the time auto or legal is the right choice.

    I’m not saying that Premiere Pro doesn’t do dumb stuff and their really confusing approach to color management is making it worse, but @jason I’d revisit this test using properly tagged 1-1-1 files and see if you get the same results.

    Remember NLC tagging is not changing encoded pixel data – it’s a metadata instruction. You don’t have to regrade anything if you tagged it wrong – tools like CineXMeta can change this metadata on the file instantaneously.

    Doing some quick tests tonight any differences in scopes or using a difference mode with the original source file in Premiere and a properly 1-1-1 tagged legal range ProRes (not graded) render from Resolve can be chalked up to encoding entropy – visually they are identical and I was getting the same results with 422 or a 444 render (from 422 footage).

    We deliver dozens of national-level spots for a big agency every month that does final online (text audio etc) back in Premiere (and they’re more OCD than me!) and delivering 1-1-1 Legal ProRes 422 that pipeline is rock solid.

    Curious to see if you’re able to retest Jason what you get with a 1-1-1 Auto/Legal ProRes 422 and what your results are.

    -Robbie

    P.S. I don’t seem to have permission to attach screenshots/images. I was going to attach screenshots from Screen showing different NLC tags and CineXMeta editing the tags themselves.

    DaVinci Resolve 17.4.5 – Custom YRGB Output Color Spaces

    • Thank you very much Robbie for the link to Dolby Vision, finally an analysis of the worries I have between Resolve and Premiere using Op-Atom (Avid) on a PC. I use Op-Atom all the time for Broadcast works in a Avid ecosystem, no complain, and check regularly the behaviour with Premiere with this grey shift if I am not “Full” for DNxHR 444.

      For the moment, between PC & Mac world, I use Op-Atom DNxHR HQX 12 bits in “Auto” and DNxHR 444 12 bits in “Full”. Never had any color shift!

      https://professionalsupport.dolby.com/s/article/Dolby-Vision-Legal-Range-workflows-for-home-distribution?language=en_US

      Using DNxHR as an intermediate file: Some (predominantly Windows) users use DNxHR as an intermediate file to take the output from their Windows grading system, which can then be taken to a Mac based system for final encoding into ProRes. Like ProRes, DNxHR can be encoded as full or legal range. A majority of tools would interpret DNxHR (like ProRes) as legal range by default. Resolve will encode a DNxHR encoded file using video/legal levels (auto) and interpret an imported DNxHR file as legal range as well. Other tools may interpret DNxHR (especially their 444 variant), as full. We recommend to not using any intermediate files without proper testing.

    • If Premiere has started color managing media internally based on NCLC tags, that would be a huge change.

      There is a viewer color management option on Mac, but it doesn’t change in response to the media and is static in SDR as REC709 gamma 2.4 (hence the difference people see in the GUI viewer image vs an export played in a color managed app on Mac since Premiere applies only 1-1-1 tags to the output. Premiere is just a mess.)

      EDIT: I just compared the same color chart shot tagged as 1-1-1 versus tagged as 1-2-1. There was no difference between them in the current version of Premiere (v23.2.0) looking at both internal and external scopes. I see no indication that Premiere is color managing based on NCLC tags.

  • Hi all! Thanks so much for your comments and suggestions!

    I’ll be doing a few additional tests and I’ll follow up soon with the results.

    EDIT: My initial testing with 1-1-1 tagged media into Premiere brought more questions than answers. I’ll be diving deeper with more testing and a follow-up insight as soon as I get back from NAB! 😃

  • From my extensive testing and discussions with devs, I’m comfortable saying that Robbie probably has a very crucial point. Premiere is now “sensitive” to NLC tags and that could easily account for the color shifts apparent in the scopes.

    And Premiere needs 1-1-1 tags for reliable Rec.709 work. Which means that anyone working in Resolve needs to be aware of what Resolve is setting the tags to for any export.

    Another thing Jarle Leirpoll tested out awhile back, is that having both the sequence preview settings set to Max Bit Depth and also any export set to go with Max Bit depth was crucial to getting proper bit depth for any Premiere export. Why the sequence preview setting affects an export is anyone’s guess, but … from checking his work, he was correct.

    Premiere is, as Jason notes, a moving target. I’ve spent more time testing it and in contact with the devs than most, and they still release things that catch me totally by surprise. And the public beta has a new wrinkle … the “new” color management settings are moving from the Project panel context menu (right-click/Modify/Interpret Footage) … to a new “Settings” tab in the Lumetri panel.

    There are several subtabs … Input, Working Space, Clip, and Display.

    The Clip settings are only available if certain conditions are met. They’re grayed out otherwise. It’s … intriguing. I put in the main request for an overall color management panel, was notified some months back it had gone from a request to under consideration.

    But this panel seems still a bit of a transitional thing. But something like this is coming to a release version near you … sometime … probably.

    • If NCLC tagging was a cause of the vectorscope shift shown in Jason’s excellent tests, the shift would have been present in both 422 and 444, but it was only there with 422.

      Not to say that NCLC tags aren’t worth paying attention to, just that they wouldn’t be the cause of the issues shown in the video.

      I didn’t know about the Preview settings limiting exports. Thank you for the heads up on that.

      • agreed and understood. I’m NOT saying this is the only issue at play and to be fair I haven’t done detailed tests with the most recent version of Premiere but I do know that a undefined transfer function has caused problems in previous versions of Premiere and other places. After talking to engineers at adobe and apple as well as talking to color scientists the consensus is that for SDR 709 1-1-1 is your safest bet for portability.

        My point to @jason was to simply give 1-1-1 a go and see if the results differ.

        In my opinion, there are three things at play

        1. Levels – shouldn’t be an issue using legal/auto

        2. NLC tagging – I believe 1-1-1 to the most portable in the most places

        3. Internal transforms/processing.

        The more that I thought about this I do think Max Bit depth is something to look at within the Premiere Pro timeline. This option does a lot of things, and it would surprise me that the math and any potential rounding issues (as seen on scopes) would/could be different.

        • I agree that the bit depth timeline setting is the area to investigate.

          For what it’s worth, I just compared two versions of the same color chart shot, one tagged as 1-1-1 versus one tagged as 1-2-1. There was no difference between them in the current version of Premiere (v23.2.0) looking at both internal and external scopes.

  • Good point about the output tagging – but but my understanding is that tagging it 1-1-1 (rather than the undefined 1-2-1, gamma 2.4) would make Apple assume it was gamma 1.96 and covert it from that to the Apple display. So I’ve always assumed that it’s a better idea to actually define it as gamma 2.2 (1-4-1) so at least it would be closer! Maybe my thinking is wrong? I don’t know what Adobe does as opposed to what Apple does – will Premiere Pro assume 1-1-1 would be 2.4!? Or does it actually understand that 1-2-1 as gamma 2.4 . Probably not.

    Thanks again, Jason, for testing! Looks like you’ve got a lot to do for the next episode 😉

  • It would be ever so nice if the good people at Adobe’s DVA color section would actually tell us what goes on under the hood. But though I’ve got some contacts, and have asked a lot of questions, the replies (when I’ve gotten them) have all been simple use-case examples. “If you have X media and want Y display, use these settings.”

    Not a single response as to what the processing pipeline looks like at this time. Not … one.

    The “clearest” answer I’ve been able to get was when I told several managers at last year’s NAB that it seemed obvious that the old Premiere CM … covered thoroughly in my Insights here back in 2019 … had been completely gutted and replaced by a new operation. Which they hadn’t officially stated.

    What was “clear”? They simply looked at me, and did not disagree. If I was wrong, they’d have told me. So woohoo, confimed they’d gutted & replaced all color management & processing. Almost by reading tea leaves … sigh.

    But … they wouldn’t say what in particular was different other than it now can ‘natively’ handle HLG and PQ color spaces rather than treating them as “over-range Rec.709 values” as done up through the fall 2022 release.

    So do they use a specific or general internal working space? Dunno. It looks like the three working space choices for sequences may set the actual mathematical working space basis, for that sequence only, to that color space. Which are Rec.709, HLG, and PQ.

    And perhaps all the media is transformed to that color space prior to the changes made by Lumetri controls and the image is sent to the display.

    Or … perhaps the original data is modified by the Lumetri control changes, then that result is converted/sent to the ‘display’ space controlled by the working space setting … as I’ve seen speculation about from a couple people who also geek on this stuff. In a couple tests, that to them seemed possible. I don’t think so, but … it’s possible. They’ve made a number of choices that have seemed highly illogical to me, why not this one?

    So what order things occur in during the processing pipeline … I just dunno. And I’m hoping of course, to get some clarity at NAB next week, but I’m not holding my breath.

    The clearest thing at this point, is that this is all constantly, slowly shifting. The movement of CM settings (in a just-released public beta) from the Project panel/Interpret Footage context menu, to the Lumetri panel “Setting” tab, is simply one more step in a continuing process. Where it will end up I’ve no idea.


    • Jan Klier
      Member

      The clearest thing at this point, is that this is all constantly, slowly shifting. The movement of CM settings (in a just-released public beta) from the Project panel/Interpret Footage context menu, to the Lumetri panel “Setting” tab, is simply one more step in a continuing process. Where it will end up I’ve no idea.

      [soapbox] And that is the most concerning. While innovation is necessary as our workflows, cameras, and deliverables evolve, stability and transparency are key for an application like Premiere to be taken seriously. They clearly have a lot of market share with editors that don’t get into this level of detail, or never round trip to other apps, and that’s fine. It’s no wonder that some folks either migrate to editing in Resolve or other workflows to keep Premiere and its pain points out of the mix. Somehow Adobe doesn’t seem to understand that or care. I guess enough digital agencies outfit their editing pools with Premiere because there’s enough talent to pull from and it’s cheaper than some other options.

      I keep my copy of Premiere around because I need to open projects from others, or as a utility. And sometimes for a beyond-simple assembly, it’s faster than the alternatives. But I have a hard time considering it for any major workflow.[/soapbox]

  • This is one of several major working issues I’ll be talking with the folks in the Adobe booth about next week. Not sure I’ll get any real illumination, but I’ll certainly ask the questions.

    • I did get one very clear statement on Premiere’s color pipeline. From Eric Philpott, formerly asst. manager of SpeedGrade under Patrick Palmer, now some kind of executive for forward facing client relations or some such phrase.

      The sequence color space setting tells Premiere the color space you wish to monitor in. Doesn’t affect actual data.

      The original file data is processed for changes made by the Lumetri controls, with that output mapped to the scopes panel and the chosen display space.

  • Hi. The color shift you see was sadly related to a rather serious ProRes Hardware Accelerated Decoding bug from Adobe, specifically on Apple Silicon (M1/M2) computers, that I reported back in August 2022. The decoding bug caused 8-bit decoding of all ProRes files, which also affected encoding from ProRes source files due to the decoding bug. It was finally fixed in Premiere Pro 23.3, released on April 12th.

    I posted a sample from my Fusion 3D cube analysis, of ProRes files exported from Premiere Pro, which was caused by the mentioned ProRes decoding bug. As you can see, it was pretty bad: https://twitter.com/thomasberglund/status/1584557970569895937

    The workaround to fix the problem before Premiere Pro and Media Encoder 23.3, was to disable Hardware Acclerated ProRes Decoding in both Premiere Pro and Media Encoder.

    Here is a detailed post from Adobe about the ProRes issues that were fixed in Premiere Pro 23.3.
    https://community.adobe.com/t5/premiere-pro-beta-discussions/now-in-beta-improvements-to-prores-playback-quality/m-p/13546603

    • Thank you for sharing, Thomas! I was unaware of that specific issue. I’ll be adding a mention of it (and the recent resolution) to the next update to this insight series. Stay tuned!

    • Thomas,

      Thanks for the post, both highly informative and detailed. Nice to also get the link to the post detailing thing on their PrPro public beta forum.

      Always … the questions … always … but hey, Adobe is almost as focused on “being uinique” as Apple. Not my favorite aspect of the corporate cultures but whadda I know anyways … 😉

Page 1 of 2

Log in to reply.

1,000+ Tutorials to Explore

Get full access to our entire library of over 1,100+ color tutorials for an entire week!


Start Your Test Drive!
Loading...