Integrating Resolve’s ‘CST’ Plugin with Fixed Node Trees

February 25, 2020

Learn how a pro colorist is integrating the Resolve 'color space transform' plugin into his fixed node tree to get better results, faster.


Series

Integrating a ‘Color Mangled Workflow’ into fixed node trees: Following up on two Insights

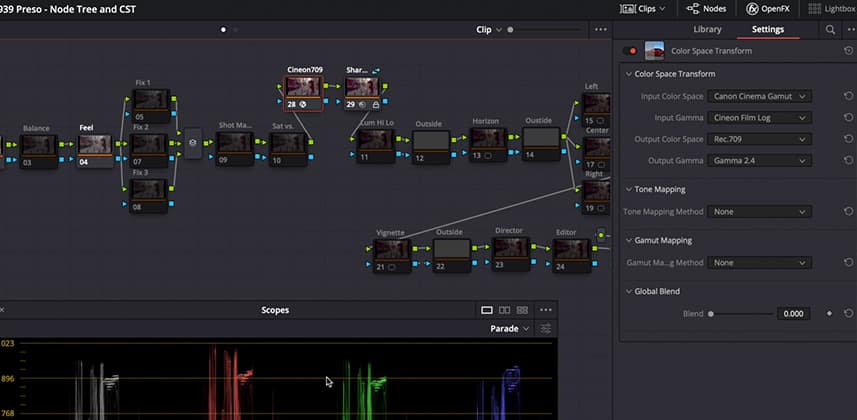
In previous Insights, I got you up to speed on the evolution of my Fixed Node Tree as well as what I call the ‘Color Mangled Workflow‘ (which relies on Resolve’s Color Space Transform ResolveFX plugin). There are two follow-ups I want to share regarding those Insights, as my workflow has evolved and I want to pick up on an item I left open in the Color Mangled Workflow Insight.

The continuing evolution of my Fixed Node Tree

Based on great feedback in the comments to my previous Insight on this topic, in discussions with Team Mixing Light, and grading several shows with these fixed node trees – I’ve further optimized my Resolve node tree. Some of the changes are performance enhancements. Some of the changes are the result of how I’m actually using the node tree, in practice. I’m offering up these changes to give you an idea of how to think about your personal style and how you can (and should) be adapting your fixed trees to better reflect how you personally work – or how your team likes to work (if you collaborate with other colorists).

Digging further into the Color Mangled Workflow (with Resolve’s Color Space Transform plugin)

My thinking and experience on using Resolve’s Color Space Transform ResolveFX plugin has evolved quickly over the past month, as I’ve used it on several shows. After studying it more closely, coming to a greater understanding of the options it presents, and modifying my workflow across several different shows I’m really happy with the results. In this Insight you’ll learn:

  • Where have I settled on placing the Color Space Transform plugin in my node tree?
  • Why have I set up two fixed node trees for each camera in a show? (hint: tone mapping)
  • Where did my inspiration for using Cineon in the CST plugin come from?
  • How has the Stream Deck XL suddenly accelerated the speed of working with multiple fixed node trees, making this approach much more viable when the clock is ticking and you’re working against a deadline?

A few quick thoughts on moving back to the new New Mac Pro

This Insight is my first after moving back to the Mac Pro. I’ll offer a few quick thoughts (including, why now?) at the end of this Insight.

Comments? Questions? Ask below!

As always, we love member comments, questions, and observations. It’s how we all learn.

-pi

Member Content

Sorry... the rest of this content is for members only. You'll need to login or Join Now to continue (we hope you do!).

Need more information about our memberships? Click to learn more.

Membership options
Member Login

Are you using our app? For the best experience, please login using the app's launch screen


Comments

Homepage Forums Integrating Resolve’s ‘CST’ Plugin with Fixed Node Trees

Page 1 of 2

  • Mike Keelin
    Guest

    Thanks Patrick
    Which Decklink card are you using? I’m looking for the same setup, one output 1080 and one 4K with down convert happening in the hardware. Out of interest what config did you go for with you new Mac Pro?
    Mike


  • William D
    Guest

    Another awesome insight video! Question: I think every tutorial or course I’ve seen or read has said to have your first node designated for contrast and second node for saturation and color balance. I recently watched a course from Lowepost, which credits many professional colorists in the field for the tips they shared, and throughout the course they always adjusted contrast first, but added the second node before the first so the color node would pass through the luma node. Does that science make sense to you, is it just a matter of preference, or did I get burned with bad tips? Any thoughts?


  • Pat Inhofer
    Guest

    Mike – You’re very welcome. My config is basically identical to Joey’s: 16-core, Dual Vega II as a tower. I added a Highpoint NVMe Raid Controller (SSD7101A-1) into the slot where the Afterburner x16 card would go and piled it up with 8 TB of SSDs in RAID 0 (BMD speed test puts it at about 7600 / 7200 write/reads) which is now the working RAID (Robbie and I think there’s more performance to be gained from that card and are working with Highpoint tech support to figure it out).

    I have the Decklink 4K Pro. They don’t sell this exact model any more. I checked last week and it seems the only current Decklink PCI card that support 4K input with 4K output + 1080p real time downconvert from a separate SDI output is the Decklink 4K Extreme 12G. On Blackmagic’s website, on the Tech Specs page you need to scroll down to the bottom, look for the ‘Processing’ section and that lists what types of Up/Down/Cross conversions that card supports.

    Here’s a page from the Desktop Video Setup showing where I set up the downconvert:

    https://uploads.disquscdn.com/


  • Zé Maria
    Guest

    Very interesting insight Patrick however I have to comment on your interpretation of the filmconvert cineon to print slider, as what that slider does is remove the print stock curve and gamut mapping from the emulation, but it is still converting the Cameras native EOTF to Cineon with the particular characteristics of the filmstock that is selected.

    I don’t think that interpreting the cameras native EOTF, which ever it may be, as Cineon with the CST OFX is the “correct” way to go about it. What you could do in order to get a similar effect to Nitrate’s conversion but without the emulation characteristics is convert the native EOTF of the camera into cineon gamma using the CST OFS. If you compare that with Nitrate’s cineon emulation you’ll see that it’s basically the same only without the neg. emulation characteristics.

    You should also try to combine Nitrate’s cineon emulation (cineon to print all the way off) with Resolve’s included Print LUTs, which actually expect a cineon gamma input and see what you get, I’ve been getting very good results with that method. I use the Koji Print Luts instead of Resolve’s own, they are very robust and very accurate (more than Resolve’s which have a very strange behaviour with blues) plus they also have the 2393 Stock, which I very much like!

    Aside from that really like your node tree, but I have some thoughts on it (if I may): I also use a sdt. node tree of about 25 nodes and I find that without the advanced panel I’m doing a lot of next and previous node already. You split Primary, Sat Balance Feel and Shot match in several nodes, I for example just have a primary node where I do all of those and then a trim node in the middle for an eventuality. Ever thought about combining those all into one node? Maybe it would save you some time and also when I used to split the nodes by tools I often found myself having to check if I’m on the correct node to do an adjustment (like Saturation) where as now it’s all in one.

    I also have my NR node right at the front for the same reason you mention, it’s cached once and it’s done

    Further notes the CST: You should try the CST Tone mapping with the output gamma set to rec709 instead of gamma 2.4 and see what you get, as far as I remember with that gamma option chosen the simple option on the tone mapping drop down will give the same results as the Luminance mapping with gamma 2.4 selected in the output gamma drop down


  • Pat Inhofer
    Guest

    Glad you enjoyed it! Great question. No – you didn’t get burned with a bad tip.

    Expanding contrast before touching saturation is always a good idea. Plus, order of operations does matter in the interaction between contrast and sat adjustments (as does the type of contrast adjustment… such as Y-only versus YRGB).

    As for always putting saturation before contrast in the pipeline? I can see wanting to do that as your colors may ‘develop’ differently. But I can’t think of a ‘science’ reason for accuracy. It may be that within that circle there’s a strong one-on-one mentoring tradition and part of that tradition is that workflow? You’d probably have to send that question up via Lowe to see what they say. Maybe there’s a color science reason – but I’ve not been exposed to it.

    I’ll give this approach a whirl on my next project. It’s also the type of thing you can do to differentiate scenes… changing up the foundation of the image whenever you hit certain locations, to help differentiate that location in a very subtle way with how color is derived in the initial processing of the image?

    Thanks for asking. You gave me something to think about.


  • Pat Inhofer
    Guest

    Great comments and observations! There’s a reason I call this the ‘Color Mangled Workflow’! The point about the FilmConvert Nitrate plugin that I didn’t make very well in the video – it was the inspiration for me to look at the CST plugin to find a way to separate the color operation of a LUT from the contrast operation of the LUT. I 100% agree that I didn’t properly explain what that slider operation means within Nitrate – thanks for filling in that blank.

    RE: Accurate EOTF transfers: Joey and Robbie have been working on a variation of this theme that is very similar to your suggested approach (although, not using LUTs). Once they’re comfortable with their approach I’m sure they’ll be sharing here.

    I do have the Koji LUTs and I haven’t pulled them out in a while. I’ll dig them out and experiment with your workflow. Thanks for the suggestion.

    RE: Split Primary/Sat/Balance/Feel – Two things about this… Primary / Sat nodes can 100% be combined. Especially if you understand Resolve’s Order of Operations. I do this mostly to maintain the habit when teaching color grading. That part of my node tree is designed to reinforce the notion of starting with contrast first. The Balance and Feel nodes can also folded into a single operation, but I find that I revisit those operations often enough, that having those ‘thoughts’ separated out makes it easier to figure out which operation is bothering me and adjusting it appropriately – without potentially rebuilding from scratch.

    RE: CST & Rec709 Gamut mapping – I’m finding a subtle difference in Rec 709 Output Gamma when switching between Simple and Luminance Mapping. To my eye, Simple has a mildly more aggressive shoulder. I’ll probably stick with 2.4 just for the precision of it.

    Great comments. Thanks so much!


  • Mark Todd Osborne
    Guest

    Great insight, Patrick. Lots of food for thought here, as I have been experimenting with a few CSTs this past year.


  • Pat Inhofer
    Guest

    Thanks Mark!


  • Jason Bowdach
    Guest

    Awesome insight Patrick! Killer idea to incorporate memories into the streamdeck XL.


  • Zé Maria
    Guest

    I technique I also used in the past, when doing a print film emulation workflow, was to convert the clips into cineon/rec709 at the start of the tree with a CST, grade in cineon/709 and at the very end apply the print lut (be careful with the blue channel specially on alexa material). That also gave really nice results, however the filmconvert cineon luts work much better


  • Steve Sebban, CSI
    Guest

    It really saves tons of time. If only we could map more of them and pass the thumbnails to the buttons instead of icons, it would be even better. Image a full page of memories… i have to look for a way to do so. (Maybe via a custom keyboard and macros)


  • Marc Wielage
    Guest

    One issue with using the Streamdeck for Memories is you can only access 8 memories in Resolve’s current mapping. You can access all 26 on the Advanced Panels — not that I use 26, but I do certainly use over a dozen on most projects — which is a major limitation. And don’t minimize the importance of Scroll Preview, which is a killer feature on the Advanced Panels. On CST: I use Gamut Mapping all time time for restraining and legalizing gamut excursions, about in the middle of the node tree, but I’m more into just creating 3-4 fixed nodes at the head to tame the camera format and then treat it like Rec709 from there on. The question is whether those could be replaced with a single CST node, and I’m not convinced it is just yet, at least for the way I work. I totally agree that the power of Resolve is that there’s a lot of ways to tackle the problem, and it’s good that we have more alternative choices. I’m in the process (still) of adding a Streamdeck to the Advanced Panels, because there are still buttons we don’t have or can’t get to.


  • Scott Stacy
    Guest

    Great Insight, Patrick! I like your order of operations and will certainly make some changes to my fixed node trees. I really need to use memories with my stream deck. I’ve been using CST with the Cineon conversion for well over a year and love it in combination with tone and gamut mapping. The gamut mapping OFX is a life saver (thank you Marc Wielage), too. I have found a place for the that OFX in all three of my fix node trees cause you can tweak settings. Thanks for mentioning the Decklink 4k Pro down covert from UHD to 1080. I have the same card. However, I heard somewhere that the down conversion mess with quality. Have you noticed any quality variation? I am hoping to pick up the 48″ LG when it comes out and your set-up would work nicely with that LG.


  • Pat Inhofer
    Guest

    Thanks Scott.
    RE: Decklink 4K Pro Downconvert – I’ve not seen any problems. Maybe firmware/software updates solved this problem? Give it a go and see what you think.


  • Andreas U
    Guest

    Hi Zé, when you described your method of splitting the conversion into cineon/rec709 via CST (start) and print LUT application (end), you then recap that the filmconvert cineon LUTs work much better. When you said that, did you mean that you apply filmconvert instead of the print LUT (end) or the initial conversion into cineon (start)? Or for both? In addition I also wanted to ask whether you have done experiments with the ImpulZ LUTs with regard to robustness and accuracy? Best, Andreas

Page 1 of 2

Log in to reply.

1,000+ Tutorials to Explore

Get full access to our entire library of over 1,100+ color tutorials for an entire week!


Start Your Test Drive!
Loading...