Texture Management – BYO Advanced Unsharp Mask tool in RGB & LAB

June 15, 2022

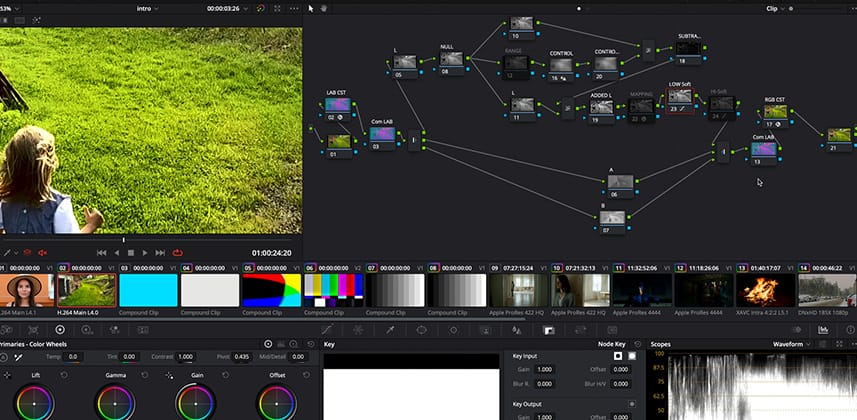
In Part 4, Hector Berrebi shows how to add clipping and range controls to our basic Unsharp Mask node tree in DaVinci Resolve in LAB and RGB.


Series

Part 4 – Building your own Advanced Unsharp mask node trees in LAB & RGB

In the previous Insight in this series, we created a simple Unsharp Mask tool in the node tree. This insight goes deeper into building a node-tree tool for texture work that has bigger functionality than a simple sharpen tool. We will add:

  • Clipping protection
  • Control the range of data we want to affect
  • Add the option to tone down our operation a bit by blending back the original (just like any OFX)

We will explore this in RGB & LAB color models and build this out in a node tree.

The value of building a complex node tree

This Insight creates two fairly complex node trees replicating what you usually find in a plugin. Is this effort worth it? Here’s what I think:

  • This series is about teaching concepts. You are learning – not working for a client under a deadline – and complex node-tree-tools are an EXCELLENT way to learn our craft, by going under its hood.
  • Plugins won’t have every control you may want built into them. So let’s say I’d replace the node tree with a Sharpen OFX – but what if I want to protect against highlight or shadow clipping? What if I want to limit the plugin’s input range? If I understand the plugin at a foundational level, then I may be able to add a few nodes to solve this problem.  

    Every professional (or aspiring professional) chooses the level of depth s/he wants to have with their software. The deeper you go, the more you’ll know – and that’s the spirit of this Insight.
  • Building your tools from nodes is a “gateway-drug” 😉  to heavier stuff – programing your own  DCTLs and Fusion FX can very well be your next step once you’ve gotten a taste of the power under your fingertips.

A note about working in L*a*b

I didn’t mention it in the video – using the L*a*b node tree gives different results in luma and saturation – it also prevents the nasty potential color artifacts/aberrations discussed in the second insight of this series.

Learning goals for this Insight

  • How to use the Soft Clip as a clipping protection segment in our pipeline
  • How simple math (subtracting something than adding it back) must be taken into consideration when building complex node structures
  • How to add a “Blend with Original” component to your tool
  • How to select and limit the range of data being affected by our work
  • Where in the pipeline should you place the Unsharp Mask operation

Additional Downloads

For Premium members, you’ll find two pre-built node trees from this Insight (if you’re a Streaming member, you can upgrade to Premium to gain access).

Download 1: Clipping Protection Unsharp Mask

Unsharp Mask Node Tree with Clipping Protection

Remember, this node tree has a Mix Back component (turned off).  The two control nodes for softening are sometimes helpful when combining tools or checking between two options.

Download 2: L*a*b* – L-only Clipping Protection Unsharp Mask

Unsharp Mask with Clipping Protection in LAB color space

This node tree operates on the L channel of L*a*b without the Mix-Back. You should experiment with placing it at different junctions to see its influence. The Mix-Back usually uses Normal blending mode with the original over the sharpened.

Related Mixing Light Insights

  • DCTL Series
  • Visual Math Series
  • FPE series

Questions and Comments are always welcome

As mentioned above, you are strongly encouraged to explore different ways to apply the Clipping-Protection component in your node tree. I hope you’ll experiment and then come back and discuss it in the comments below. If you find this confusing, also let me know to see if I (or other members) can help clear it up for you.

– Hector


Member Content

Sorry... the rest of this content is for members only. You'll need to login or Join Now to continue (we hope you do!).

Need more information about our memberships? Click to learn more.

Membership options
Member Login

Are you using our app? For the best experience, please login using the app's launch screen


Additional Downloads

Sorry... downloads are available for Premium Members only.

Become a Premium Member
Comments

Homepage Forums Texture Management – BYO Advanced Unsharp Mask tool in RGB & LAB

  • Thank you, Hector.

    I think, in a previous insight, you mentioned that Soft Clip sliders do not operate with floating points and it may be better to work with the Custom Curve to set the black & white thresholds for the signal. Is that something we should consider in this node tree too?
    </span>Looking forward to the OFX insight. 👍

    • Hey Pourang.

      To my best knowledge, unless you move the “High” slider to the left (lower than the default 50) you are not at risk of clipping any signal. Values above 50 are fine. Same goes for the “Low” –  just to the other side 😉

      Did I remember to say that in the insight? 🤔

      Regardless – yes. A curve could very well be used – I think SC is a simpler solution, easier to control & manipulate, and that in most cases you’ll be 100% fine with it.

      But as mentioned, do explore, test, and come back (here) with what you found.

      I am as curious as I am open to other/better solutions.


      Hector

      • Much appreciated, Hector, I added it to my notes. 👍


  • Scott Stacy
    Member

    Hector,

    This has been a very valuable insight.

    Thank you for all the work you put into these insights and all the research involved in the entire process.

    Well done!

    S

  • Hi ! Just arrived into mixing light – I must say I don’t regret subscribing one sec – looking at this series. Things I was doing or not intuitively are made clear (and going far beyond what I would do).

    Inspiring to see that level of understanding of the tools and mechanics.

    Many thanks !

    ps : Sounds like a SC insight would be interesting 😉

    • Hmmm… “SC”? what do you mean by it?

      The rest of the series though is coming right up. 🙂


      • Patrick Inhofer
        Administrator

        Hector – I think SC = Soft Clip, as discussed earlier in the thread regarding clipping.

        • Patrick- is Hector still monitoring this thread? I’d love an answer to my questions.

          • Hey Christopher

            Sorry for the late reply – Yes, I was away for a few months, taken by other obligations.

            I’ll try and answer all your questions 🙂

        • Can you explain more about the null nodes? What are they actually doing?

          • Null nodes – as their name suggests, do nothing 🙂

            In my workflows their purpose is esthetic in part – to make for a neater, more organized node tree. and slightly functional, if you split nodes and mix them back – having the node that splits empty – allows you to add a pre-adjustment faster, Sometimes you’d also want to have them as a mix node – that only shows you what you’re mixing without controls affecting it.

            • If I understand what you were doing in the video, you use the mix node by turning on the highlighter to see the isolated action of the previous node? Is that correct?

            • When I say Mix node I refer to the layer/parallel/key mixers. Turning on the highlighter on any node without a mask will show the steps up to that node – using it before the mix node helps identify what you’re mixing

            • Wow-that’s the best Hot Chip I’ve gotten in a long time!

            • I don’t seem to be able to edit he above comment so here it is again:

              Wow! That’s the best hot tip I’ve gotten in a long time.

        • Patrick – isn’t there an insight about SC in the MixingLight library? It’s been around forever, and was probably covered in the past… or wasn’t it?

  • When are we going to see the lesson on the various OFX sharpening and softening plug-ins That you spoke about?

    • As mentioned, I had to take a break from recording the series due to projects and other obligations. I’m back on it these days and the next episodes will be out soon 🙂

      Thanks for expecting them. I’m flattered.

      • Can’t wait! They’re really helpful.

  • What specifically are the functions/node controls that corresponds directly to radius and strength inputs in the photoshop unsharp mask tool? I think I see how you control radius by changing the amount of blur, but I don’t quite understand where the strength control is.

    • I think what you mean is you don’t find the equivalent of the Radius slider in PS not Strength which is the amount of blur. A radius slider would limit the operation to either low or high frequencies (big or small detail) and can be seen or expected to be, a better version of the level slider in the sharpening tab.

      this is an excellent question. and one of the things the series will go over in the OFX insights.

      SPOILER ALERT – this will be elaborated and explained in detail in the coming insights

      I tried to get this functionality into the node trees with varying levels of success using different approaches. In V17 the very useful yet little-discussed Detail Recovery OFX was added to the library and among its various functions and uses, it can be placed as a Freq separator in my Unsharp Mask node tree – and emulate the Radius slider in PS… Actually, its a lot better, and has more “play”, resolution and possibilities than old rusty UnsharpMask in PS 😉.

      How to exactly place it, and use it… you’ll have to wait for the insight.

      (unless it’s an emergency case, in a real project, where no other option can do… then you can contact me on FB and I’ll find time to help)

      Regards.

      Hector

  • <div>Hector – thanks so much for your reply. Unfortunately I can’t post the image here (the camera icon is grayed out) but what I’m trying to do is the image that I posted with the original Facebook post. Enhancing local contrast is really a wide radius sharpening — although, as you know, it doesn’t really look like sharpening.</div><div>
    </div><div>Yes, you are right, I meant to say the radius slider. It is a bit of an emergency as I’m working on a series of short black-and-white films that are a transition from 15 years of large scale, black and white portrait installations that I did around the country, that I developed a 35 step Photoshop action in my attempt to get “skin to speak.“ (You can see a lot of that work at: the Photo Booth project.org) being able to Enhance local contrast was a large part of that.</div><div>
    </div><div>Will contact you on Facebook.</div>


    • Patrick Inhofer
      Administrator

      Christopher – Off topic: What browser/OS are you using? The camera icon is working on my end. Clicking on it opens a window for dragging/dropping/uploading.

      You may want to try shift-reloading the page a few times to download the latest code for the website.

      FYI – there is a current bug in the forum software that doesn’t allow for the editing of posts. The developer has confirmed that bug, and we’re waiting on a fix.

Log in to reply.

1,000+ Tutorials to Explore

Get full access to our entire library of over 1,100+ color tutorials for an entire week!


Start Your Test Drive!
Loading...