| Series |
|---|
Day 9: 25 Insights in 25 Days 2019 New Year Marathon!
Learn A More Structured Way to Color Grade
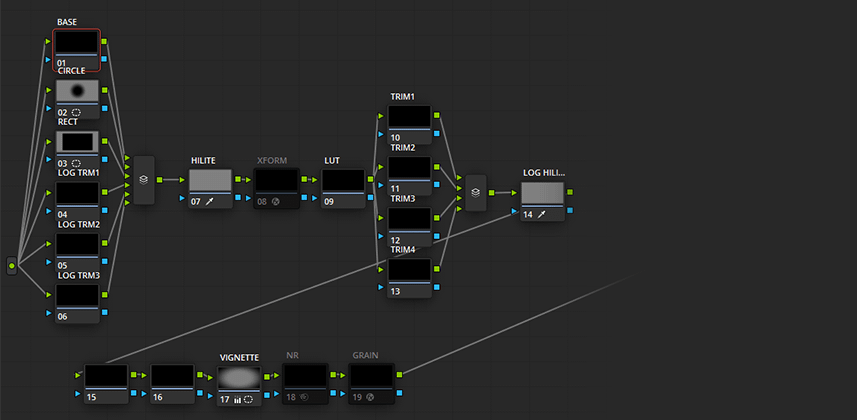
Over the past year – I’ve been using a fixed node structure workflow in Resolve almost exclusively. So what is a fixed node structure? It’s a template, or Power Grade – that has a fixed set of nodes, and I use it on every shot in a project. At first, this may sound limiting – but it isn’t! It can be a great way to optimize your workflow, and many feature film colorists swear by this method. A fixed structure has a few big advantages:
Saving Time
My node structure saves me time. I’ve pre-built a bunch of tools I use regularly, including various power windows, keys for highlight recovery, a vignette, noise reduction and film grain. I may not use all of them in every project, and I’ll always tweak their settings to the individual shot – but having everything built in advance saves me a ton of repetitive work as I’m grading.
Staying Organized
Once you settle on a node structure and use it often – you develop muscle memory for it. Just like the controls on the panel – I intuitively know where everything is. I can navigate much faster than if each shot had its own bespoke node tree. It also makes managing client revisions, and coming back to a project later – much easier.
Working With A Team
Recently I was tasked with supervising and training 2 other colorists to work on a project at a major cable network. I wasn’t going to be doing the actual grading – but I was assisting, training and supervising. One of the first things I did was I sat down with both colorists, explained why I use a fixed node structure – and walked them through my template. We decided on same changes to it for their preferred ways of working, and settled on a locked template. Now, with the project in full swing – any of the three of us can open any grade on any shot, and know where everything is. There’s no reverse engineering or detective work. Fixed node structures can enable teams to work together much faster than if everybody builds out nodes differently for every shot.
How To Build Your Own Template
In this Insight – I’ll walk you through the actual template I use. I’ll explain how it works, how I use it, and how to build one yourself that fits your needs. You’ll also learn a quick tip on how to get your new nodes to number sequentially, adding another layer of speed to your node tree navigation.
Coming Up: Resolve Commands That Only Work With A Structured Node Tree
This Insight lays the groundwork for Part 2, coming next week. In Part 2 – I’ll dig into some really useful tools that you can only really take advantage of if you’re using a fixed structure, including:
- Rippling
- Using “select same node” to grade faster
- Using “Preserve Number of Nodes”
Premium Members: Download This Insight’s Node Tree
Finally – I’m including my template as a downloadable DRX. If you’re a Premium member feel free to download and study it as an example to test out this workflow, to follow along in Part 2, or as a basis to build your own.
Additional Insights Related To This Topic
- Can You Prebuild An Ideal Node Structure? – Dan Moran shares his thoughts on building out his structure node tree.
- DaVinci Resolve Compound Nodes: Efficiently Managing Looks – If you want to ‘hide’ or ‘collapse’ sections of your new structured node tree for visual clarity then check out this Insight about Compound Nodes. It’s a good organizational tool if you don’t want to be assaulted by the onslaught of 18 nodes every time you apply your node template.
- Understanding DaVinci Resolve’s Parallel Mixer Node: Part 1 – As Patrick started designing his own node template, he decided to incorporate the use of Parallel Nodes, similar to what I do in my Node tree. This Insight gives you the low-down on how Parallel Mixer nodes work.
-Joey
Member Content
Sorry... the rest of this content is for members only. You'll need to login or Join Now to continue (we hope you do!).
Need more information about our memberships? Click to learn more.
Membership optionsMember Login
Additional Downloads
Sorry... downloads are available for Premium Members only.
Become a Premium Member


