Saving The Day With Input Sizing in DaVinci Resolve

Saving The Day With Input Sizing in DaVinci Resolve

January 24, 2017

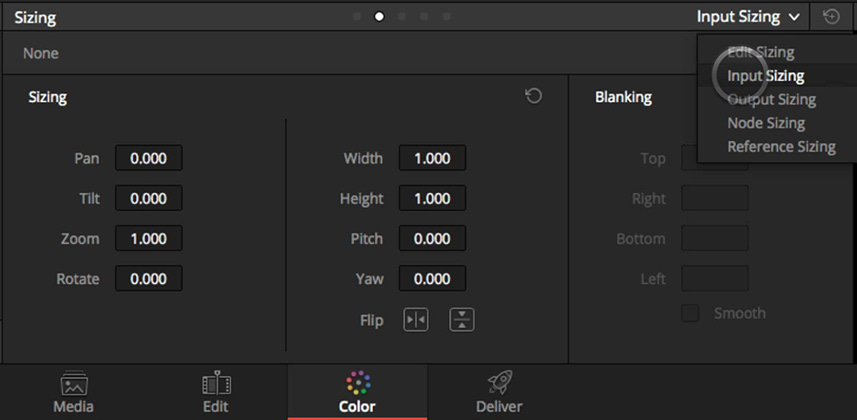
If you're having trouble with you sizing in Premiere Pro not being replicated in DaVinci Resolve, the Input Sizing control may be your hero.


Series
Day 23: 25 Insights in 25 Days New Year’s Marathon

Saving the Day with Input Sizing in DaVinci Resolve

Premiere Pro Detective, Part 4: Reconforming ‘In The Shadow Of Giants’ with What We’ve Learned

We are closing out this Premiere Pro Detective series by revisiting a short film from another series, ‘Conforming Giants‘. In that series, I ran into a ton of problems with resizes of 2.5K and larger images not properly importing in DaVinci Resolve. I didn’t follow the rules outlined in this series and wasted a ton of time.

Let’s go back to that project, and re-do it with what we now know

In the process, I’ll show you a very handy trick using DaVinci Resolve’s ‘Input Sizing’ to help you handle tricky conforms. This Insight features me only apply this tip to one set of images, the 5k clips. But you want to repeat this tip for each of the oversized frame formats since each of them will require a different Input Scaling number.

I hope you’ve enjoyed this series and found it useful.

Be sure to use the comments to share thoughts, feedback or ask questions.

-pi

Member Content

Sorry... the rest of this content is for members only. You'll need to login or Join Now to continue (we hope you do!).

Need more information about our memberships? Click to learn more.

Membership options
Member Login

Are you using our app? For the best experience, please login using the app's launch screen


Comments

Homepage Forums Saving The Day With Input Sizing in DaVinci Resolve

Page 1 of 3
  • It would be nice if someone wrote a new plugin for premiere that exports the timelines in a resolve friendly manner. Maybe something that converts the easing math, title, sizing etc.

    Resolve can use some more clip sub filters in the edit index to filter by clips with transforms and key frames to make this process easier to verify.


  • andi winter
    Member

    thank you very much patrick!!! the whole series makes totally sense and will be a huge time saver at the next premiere pro project. most of my projects are avid based (yippie!) but of course premiere projects drop in from time to time, as well as finalcutx.

    so, thanks again, i know this investigation stuff takes time and patience 🙂

  • I’m not sure to understand the last part with 5K clips and the Input Sizing. Of course I see the numbers are working well. But this part is going fast: could you explain how you’ve managed to reverse-engineer the thing? Thank you.


  • Patrick Inhofer
    Guest

    When two conditions are met: The oversized frame is ‘Set to Frame Size’ in Premiere Pro + Resolve is doing a ‘Center Crop with no Scaling’, the incoming footage will be shrunk in DaVinci Resolve. In the example in this video, it’s shrunk to 31.3% in Premeire for it to fit perfectly into a 1920 x 1080 frame.

    Using input sizing, we can assign every one of those oversized shots to be blown up so that when it is shrunk back down by that 31.3% factor, it’ll perfectly fit the 1080 frame. To find that number we need to figure out how much to blow up the image. It turns out the rough math is simple, just move PrPro’s decimal point one to the left and punch that as your zoom factor when creating your Input Sizing preset. In this case, the zoom number is: 3.13.

    But that’s the rough math and I was off a bit in the video (I was wrong where I stated the mismatch in sizing was due to motion blur). The precise math is:

    1/(PrPro scale factor)=(Resolve Input sizing zoom number)

    In my example: 1/31.3% or 1/.313 = 3.194

    So the number I should have entered in Resolve for the Input Sizing Scaling is 3.194 and that should give me the perfect zoom factor to offset the Premiere Pro’s Scale factor.

    I just wrapped a paying job today where this came into play for the entire timeline and I’m working on getting permission to show this in action; you’re right, I zipped through that bit pretty quick.


  • Patrick Inhofer
    Guest

    You’re very welcome. I love that Mixing Light gives me the excuse to take the time to figure this stuff out. Always learning… (and then teaching).


  • Patrick Inhofer
    Guest

    I’ve been thinking the same thing – more edit index filters for clips with Transforms, Crops, Keyframes would all be very welcome enhancements.

  • Thanks for the detailed answer, way easier now. 🙂


  • Greyson A
    Member

    Anamorphic footage adds an interesting layer to this conversation. This particular situation arose while conforming 2944×2160 anamorphic Alexa footage to a 1920x1080p XML timeline. The editor used Premiere Pro and scaled the clips manually. He did not use either “Set to Frame Size” or “Scale to Frame Size” from what I can tell. The clip I am referencing below was scaled at 0.400 with adjusted X & Y positioning upon XML import. The reference video is at 50% opacity.

    With “center crop with no resizing” and the Clip Attributes changed to Cinemascope, I got an improperly scaled but correct aspect ratio clip straight from the XML.

    https://uploads.disquscdn.com/images/

    Unfortunately, manually moving the the X & Y scale up to .800 to match the frame came out as below. The X & Y positioning is completely off.

    https://uploads.disquscdn.com/images/

    To experiment, I switched the “Cinemascope” setting under Clip Attributes back to “Square” and arrived at the image below. The result was a perfectly Y scale image, but squeezed X.

    https://uploads.disquscdn.com/images/

    With the Y zoom at the original .400, I took the X zoom and began to drag it out to match the reference video. It matched perfectly at .800, which is to be expected with anamorphic footage! However, this method perfectly matched the X&Y positioning, unlike my initial attempt at simply increasing the zoom.

    https://uploads.disquscdn.com/images/

    I was profoundly frustrated when both variables on the Premiere & Resolve sides were as this insight suggested, yet my footage still did not line up. Turns out, the “Cinemascope” Clip Attribute setting can mess the scaling up as well. The solution was to make the Clip Attribute to “Square” and manually adjusted the X zoom to be double of the Y zoom.

    As a side note, I even had a clip where the editor manually keyframed both scaling and X&Y position adjustments and this solution worked.

    If anyone has a better idea than manually adjusting or recognized that my settings were off, please comment! Working with anamorphic footage adds another potentially confusing layer to the conform process.


  • R.NeilHaugen
    Guest

    Slick … and thanks, Patrick!

  • This is great info, Patrick, thank you! There seems to be many variables in play here–Set To/Scale To in Premiere…Center Crop/Scale Entire Image in Resolve–all in conjunction with what frame size a clip is vs. timeline resolution + repo information. Whew! I wonder if there’s a way to condense these things into a flowchart or some easy-to-reference document. I understand the concepts you’ve brought into this series, but is there a method of gathering and connecting these variables for when we find ourselves in these situations during a session?

  • Thank you Patrick !!

    I’ve been using a slightly different approach with Premiere to Resolve Roundtriping:

    1- Create a new timeline in Premiere and name it (For Grading)
    2- Select all the clips, right click and remove all effects
    3- Clean the timeline and remove unnecessary clips and audio
    4- Export XML to Resolve
    5- Import it, grade it, and export it back to Premiere using the available Premiere Pro preset
    6- Import back to Premiere the graded XML and clips
    7- Copy & Paste the graded clips over the old clips and align them together
    8- Copy & Paste Attributes from the old clips to the new graded clips

    Although it is a little bit lengthy but it saves me from any XML related issue, and it’s very useful when you have VFX work in your project and you want to do the final export from Premiere Pro.


  • Patrick Inhofer
    Guest

    I’ve tried – but the variables keep piling up! Just read the thread below this one where Grey applies this to non-16:9 aspect ratios.

    In the end, there’s going to be a certain level of brute-force’ness to this until:

    a) Team Adobe decides to update their XML language and does the necessary math to translate into and out of their X/Y numbering space.

    or

    b) We can convince editors to stop using the ‘Scale to’ feature… which will require Adobe to offer a default ‘Set to Frame Size on Insert / Overwrite’. Otherwise the annoyance of having to manually ‘Set to’ will keep editors in mixed frame size projects from moving off the ‘Scale to’ workflow.

    or

    c) Editors move off Premiere and start adopting Resolve

  • I have done this as well rendering at source size. It’s kind of a PITA, but it does work effectively especially for shorter timelines (less copy and paste attributes). The method I used to see which clips had attributes changes (without having to squint to see that little FX box on the clips) is to set one graded clip at 50% opacity then copy/paste that attribute to the rest of the graded clips. When done, remove the opacity attribute from all graded clips.


  • Tyler Hawes
    Member

    This is a very helpful series. I would love to have something this in-depth on Avid Media Composer > Resolve (unless there already is one – I’m still going through all the vids).


  • Patrick Inhofer
    Guest

    I haven’t done something like this in Avid yet. I really need to get my license updated and start documenting my Avid roundtrip workflow. Thanks for reminding me.

Page 1 of 3

Log in to reply.

1,000+ Tutorials to Explore

Get full access to our entire library of over 1,100+ color tutorials for an entire week!


Start Your Test Drive!
Loading...