Editors Note: Please welcome back contributor Josh Petok! Josh was one of the very first Mixing Light contributors, and for many years was the driving force behind the Coloristos and later the Colorist Podcast. For the past several years, Josh has been in such extremely high demand in Los Angeles that we couldn’t drag him out of his suite, but we finally did – it’s great to have you back Josh!
With Strategy & Planning – 1700 Shots In Two Days Is Possible (Really!)
Congratulations! You’ve landed a job as a colorist on a reality show. On the first day of the gig, you’re eager to get started and the first thing you notice is how many clips are in your sequence:

The post supervisor walks in and calmly mentions that your review is in two days. A little scary right?
In this Insight, my goal is to give you the tools to confidently respond, ‘No problem’
Since 2004, I’ve been searching for ways to color grade reality shows faster, with the highest quality possible. And after delivering 700+ episodes of television, I’ve come up with several techniques that have made my life much easier. Just as an F1 pit crew tunes a car to shave milliseconds off their lap time, we’re going to explore several ways to speed up your workflow while retaining quality.
Let’s jump in.
Defining ‘Reality’
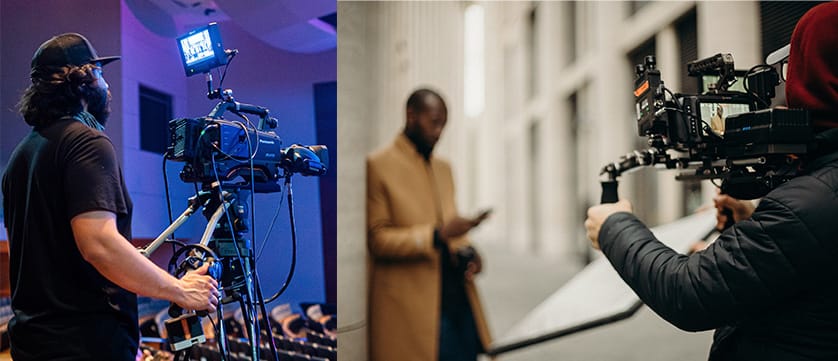
These days, reality (or ‘unscripted’ as it’s sometimes called) can be just about anything.
It can be a ‘competition show’ like MasterChef or a ‘follow show’ like Keeping Up With The Kardashians. For our purposes in this Insight, we’ll focus on competition-based shows as they have an easy-to-understand structure and encompass the majority of reality series that you’ll come across.
However, many of the concepts I describe and the techniques I use can be applied to any reality or documentary series.
Before You Begin An Episode

As you’ll see, there’s a significant amount of work that can be completed before an episode is picture-locked.
Of course, the time needed for this prep work is something negotiated with your production ahead of time. If you can persuade the production that every episode can be completed faster, and at a higher quality, it should not be difficult to make room in the budget for extra time at the beginning of a series for your prep work.
There are lots of things you can do before starting a single episode of the show. Let’s take a look at a few.
Take The Time To Watch A Full Episode
This seems like an obvious first step, but it’s a crucial one.
Simply watching an early rough cut can be extremely helpful. By actively watching an episode from beginning to end, you learn some of the key details of the show including:
- What are the key ‘segments’ in the show? Usually, there’s a ‘previously on’ tease followed by an introduction, and then a first challenge, etc
- Are there obvious problems with camera matching? Note the time codes for future reference.
- How are interviews presented and how much are they used during the show?
- Are there effects, transitions, speed changes, resizes, etc used in the offline edit that may pose a problem during a conform?
Gaining familiarity with a show before you start color grading gives you a leg up on both the technical aspects of the show and the story-telling aspects – character names, etc.
Clarify Your Role & Responsibilities

On many unscripted shows, not only are you responsible for color but the round trip and prep as well. That’s right – you’re often the finishing editor/artist too!
Clarify with producers ahead of time what tasks you’ll need to complete and when those are supposed to take place. In the highly time-compressed world of reality TV, you don’t want tasks to simply pop up. Getting this clarification enables you to put together an estimate of how much time you’ll have for each part of the process and when you’ll be able to complete each task.
Just keep in mind, in reality TV there are often other unforeseen and tedious tasks that may suck up time including reviews, notes, clearance issues, and crew/rig removals, etc.
How Are The Original Clips Sourced & What Cameras Are Being Used?
Each clip in your sequence should have a unique identifier.
This may be embedded in the file as a tape ID or it could be an original file name. However the production has decided to source files, it’s important to know ahead of time so your workflow is smooth.
Most series have a strict naming convention for their reels, which makes it easier to identify during the edit.
A common format may look like this:
ML10811A01
ML1 is the series, followed by the shoot day, then the camera identification, and the reel number.
Additionally, unscripted shows often shoot in TOD (‘Time of Day’) timecode. You’ll frequently reference the camera letter (which camera is shooting) and the source time code (when they shot it).
Well-organized shows will reserve camera ID’s for specialty cameras or interviews. For example, the majority of a series may be shot on an F55 on cameras A-D. However, GoPro’s might be the E-H cameras, and interviews are cameras Q-R.
Pre-Grade Interviews
Okay, I know I said there were things to do before you start grading, but even though this step involves grading it’s not about grading an actual episode but rather pre-grading interviews used in the series to create representative stills – let me explain.
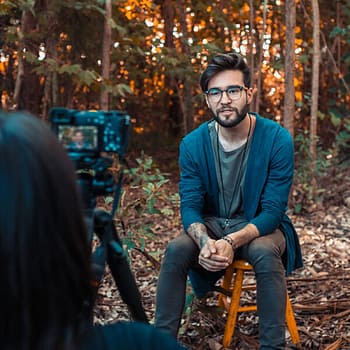
Interviews are the connective tissue keeping a reality show cohesive. They’re used to convey the inner thoughts of the contestants and are the glue that fills in the missing parts of the story.
Because they are so essential, there are often dozens of interviews scattered around your sequence. Interviews are usually shot in a controlled location with a well-planned lighting setup.
By the time you come on board to grade a show, many productions will have already shot an entire season of the series. If that happens then I recommend grading a sample of every interview for the entire season. This can be a significant amount of work, but it will pay off when you are ready to grade a new episode.
Here’s what I mean:
- Interviews are set up and should look as close to perfect as possible, thanks to your earlier work. Shots during the ‘reality’ portion of a show are more forgiving given the ‘run and gun’ nature of those segments. Spending upfront time doing the more detailed (OCD) work on the interview is a huge timesaver when you’re in the rush of getting an episode out the door.
- Matching cameras between interviews (wide to close up) can be solved ahead of time as well.
- Interview shots can take up a significant amount of screen time in your sequence. By saving stills of each interview (more on this below), you can quickly eliminate a large portion of your color grading work for every show in the series.
Ideally, to help prepare an assistant editor can create a sequence of all the interviews used throughout the series. I usually request a five-second section from every interview clip that is representative of the entire reel (i.e. not the top of the clip when they’re still setting up lighting).
With this interview string-out sequence, the goal is to create stills in DaVinci Resolve for every interview setup.

To do so, simply bring the Interview sequence into Resolve and grade every interview. When you’re finished, use the ‘grab all stills’ command to make representative stills for all your interviews. It’s important that the reel name is used for the name of the stills (this can be set up in Resolve preferences) as a lot of the workflow I will go on to describe depends on reel names.
Also one more tip – be sure to save the stills into a PowerGrade bin (not a regular stills bin) named ‘Interviews’ so that the stills will be accessible to every other project you work on in that database.
Create A Functional Resolve Project Template
Creating a template for your Resolve project prior to jumping into the grade on an individual episode is crucial. Remember – we’re trying to shave anything off of our time. Since every episode of a series will be the same in terms of tech specs and structure, it only makes sense to figure it all out ahead of time.
Consider all of the items you can add to your template including:
- Create default bins for your project (ref, import_date, source media, etc).
- Make a PowerGrade bin and import your ‘bag of tricks’.
- On the Color Page, make still bins for each of your color passes (CC1, CC2, Notes).
- Check and tweak all of your project settings, user settings, and Deliver Page export templates.
- Setup keyboard shortcuts or Stream Deck customizations.
The point here is the more setup you do within your project ahead of time the better. Here are some additional specific things to consider:
Smart Filters
Being able to quickly find shots based on different metadata is a vital part of working quickly. Fortunately, Resolve has Smart Filters that make quick work of letting you set up different criteria to find shots. What’s really helpful is that now in Resolve 17 these filters can be saved across projects
The first smart filter I always set up ahead of time is for Interviews – remember interviews are the connective tissue in most reality shows so locating them quickly is essential.
For instance, for the series I’m working on, interviews are shot on cameras Q, R, and S. By making a timeline smart filter and including it with every project (that new Resolve 17 feature), I can easily section off a big portion of my timeline and quickly apply the interview pre-grade stills that I did earlier to the actual shots in a given episode.
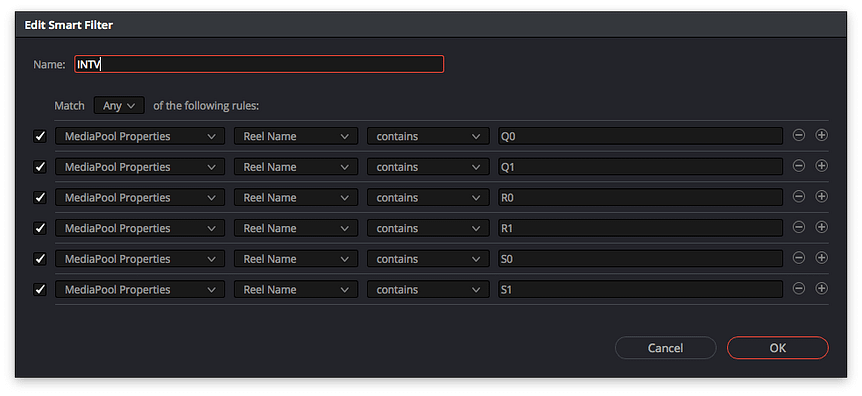
Another Smart Filter setup I use often is what I call a Part Filter.
Looking at a sequence with 1700+ shots and two days to grade all of them can be overwhelming. However, looking at 200-300 shots can be significantly (psychologically) easier to deal with, especially if that number continues to go down.
The timeline/part smart filter that I use achieves two things:
- It helps break down the sequence into manageable chunks that are easier to manage from a grading perspective and a visual one
- Breaking a sequence into sections helps create a better sense of color continuity for any given section or scene
To use this filter, I assign specific clip colors to a series of clips in the sequence (more on how to do that later). As you grade each section, you re-select the timeline smart filter. In doing so the number of clips you need to grade goes down and so does your stress level!

You can create as many of these ‘part’ smart filters as you need. I’ve found a good amount to start with is 10.
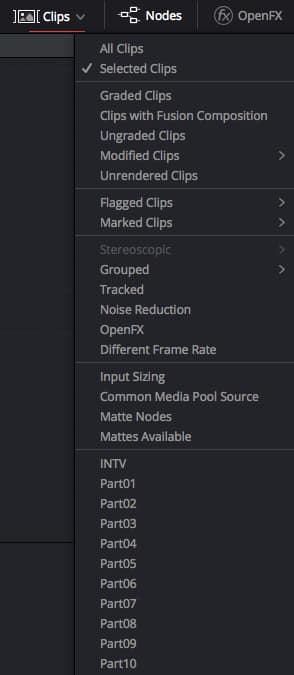
Turbocharging Smart Filters
The fastest way to use timeline smart filters is to map the functions to a Stream Deck. Currently, Resolve does not allow users to map timeline filters to the keyboard but mapping smart filters is easily achieved by utilizing a macro utility like Keyboard Maestro.

All of this may seem like a lot of effort to complete before you’ve even started on an episode, but all of this work will pay off once a sequence is ready to color. (ED: Mixing Light has several Insights on learning to use Stream Deck and Keyboard Maestro).
After all your prep work is done, be sure to Export the project as a .DRP file and keep it in an easily accessible location for future use as you start each new episode.
Starting a New Episode
Up to this point, we’ve done a lot of prep work and now it’s time to start color grading a new episode – but now we have a little more per-episode prep work to do.
The first thing to do is import your ‘template’ DRP into the database you’ve set up (I tend to use a database per season of a show). You’ll have all your Interview templates, settings, key commands, and timeline smart filters ready to go. Rename the template according to the episode number that you’re working on.
Up next, import the reference movie of the episode from the approved locked offline edit. This usually means a video file from the editor’s final picture-locked sequence (and should contain their temp color and effects & have burn-in timecode) as well as a stereo mixdown of the show. While your needs might vary I usually don’t need to conform audio for a show – that’s the job of the audio mixer!
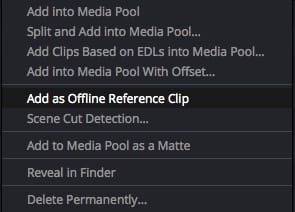
Because my project has bins already built I just drag the audio mix down into the REF bin I’ve created and I add the video reference as an offline clip to the same bin. You can do this last step by right-clicking on the video file and choosing ‘add as offline reference clip’ from the Media Browser before adding it to the Media Pool.
On occasion, a network executive may want to be sure that an extremely dark shot will work in the edit. Sometimes, color correction used in editorial proves that the shot can be sufficiently brightened, which will be reflected in the offline reference. Of course, the tools and skills that the colorist can offer should be an improvement over what an editor can do, but it’s a good idea to have an open line of communication to make sure these notes pass through the pipeline. That’s why it’s good to have these color decisions burning into the reference movie so you can see exactly what concerns the creatives wanted to be solved.
Conform: Import an AAF (Or XML/EDL)
On the shows I work on, media generally comes in via a ‘linked’ AAF file from Avid.
However, it’s important to note that other instruction sets like XML or EDL can be used to conform back to camera originals and rebuild the editorial timeline.
Also, while my preferred workflow (for lots of reasons) is to do a true conform, flat-file workflows are also possible – just a bit more limiting (especially in terms of clip metadata). (ED – this Insight series has several ideas for flat-file workflows.)
So first step – Rename your ‘import_date’ bin that you created in the template with the correct date, select the bin, and import your AAF file (or whatever instruction file).
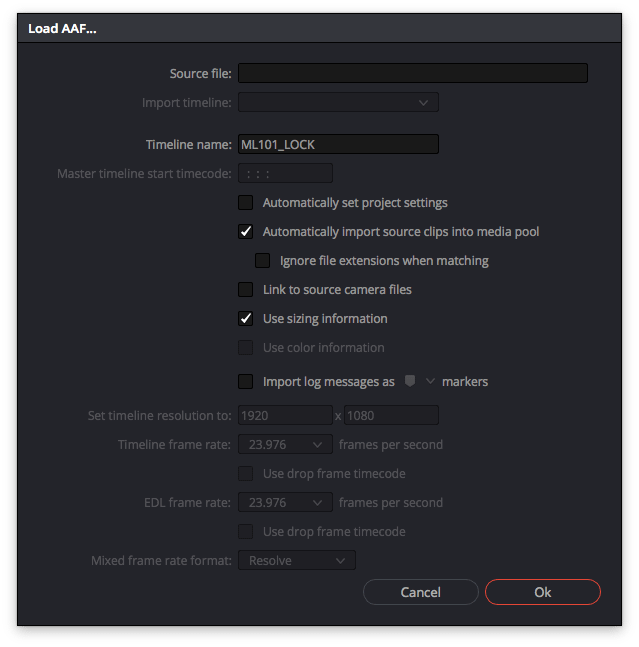
There are a few things to pay attention to in the dialog that pops up:
- Be sure to enable ‘use sizing info’. By checking this option, if any resizes are used in the edit, you’ll see them applied in Resolve. If you plan on round-tripping back to an NLE, you’ll need to make sure that you don’t render the scaling back out to your files. Otherwise, the clips will be scaled twice.
- Once the sequence has been imported, right-click on it to associate your offline reference to it.
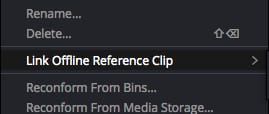
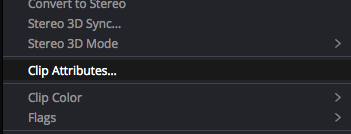
One thing to keep in mind with reference files – often editors will export them as .mp4 files. These files unless explicitly set, don’t include sequence timecode and will often start at 00:00:00:00. This means it won’t match the start timecode of your imported sequence. To remedy this mismatch (and to be able to actually see the offline reference), you can edit the reference clip attributes and change its timecode to match the conformed sequence.
Finally, edit the stereo mixdown into the timeline (it’s ok to remove any conformed audio).
Updating Sources
When dealing with a multi-camera series, it will be essential to quickly know which camera you are working with. There are times your clips won’t reflect the correct reel names in the Resolve.
This is easily fixed by selecting and right-clicking all your imported clips and using the % naming method in the ‘attributes’
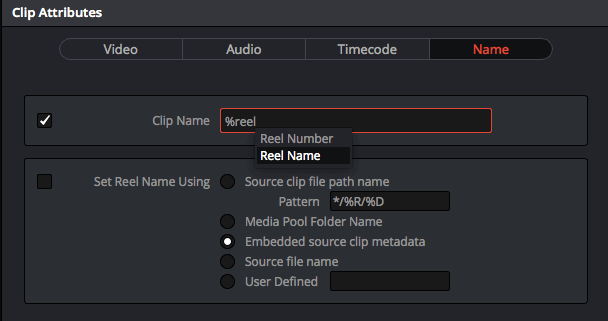
Fortunately, on most of the shows I work on, the source clips have an embedded Tape ID, so I’m using ‘%reel_name’ to apply the correct source to my thumbnail view. However, if you type just the “%”, you’ll see many other options that may be used to show the source in your thumbnail view.
Interview Pass
I’m including the interview pass as part of the individual episode setup because I already did all the necessary prep work ahead of time, so the interview pass will go very quickly. Use the timeline smart filter to show only the interviews in the sequence, and use ‘C-Mode’ to see all of your clips lined up together in timecode order

Find the still for each of the interview setups in this episode in the PowerGrade bin you created.
In some series, there may be hundreds of stills. Use the search field to quickly find the interview you’re looking for. After you’ve applied these grades, use the ‘show ungraded clips’ filter (timeline pulldown) – you’ll notice a big chunk of your sequence is already finished!
Color Coding A Sequence
In order for our ‘parts’ timeline smart filters to work, we need to color-code the sequence to make it easy to split into sections.
If you have the keyboard or Stream Deck mapped to easily apply clip colors, you can quickly section off your sequence.

Use the knowledge you gained from watching a full episode to find clearly defined sections. You may find that there is an introduction, challenge, judging, and elimination. Many shows follow this structure, but this should give you an idea of how you should section your sequence. During these scenes, lighting and setups should be consistent. And by coloring those in sections, you can maintain a sense of color continuity.
Looking at 1700 shots in a sequence can be overwhelming. But if we can break that down into small chunks, especially ones that shrink as you are working, you can feel better about making quick progress.
The First Color Pass
Okay! It’s finally time to start coloring the bulk of the sequence!
To do this, I will move through each of the ‘Part’ smart filters until every clip on the sequence has been touched – even if just a little bit. As I’m working through this first pass I like to remind myself to think like a dailies colorist.
Here’s what I mean:
The goal of the first pass is to get through the timeline from start to finish as quickly as possible without doing too much detailed work. I strongly suggest you avoid using any qualifiers, windows, or secondaries. Your goal is to get the shot to 50%-80% of where it needs to be, just as a dailies colorist might do.
Ideally, each section should have only one reference/representative shot. Find a good clip, grade it, and stick to it as your reference for that section. That will ensure continuity in each section.
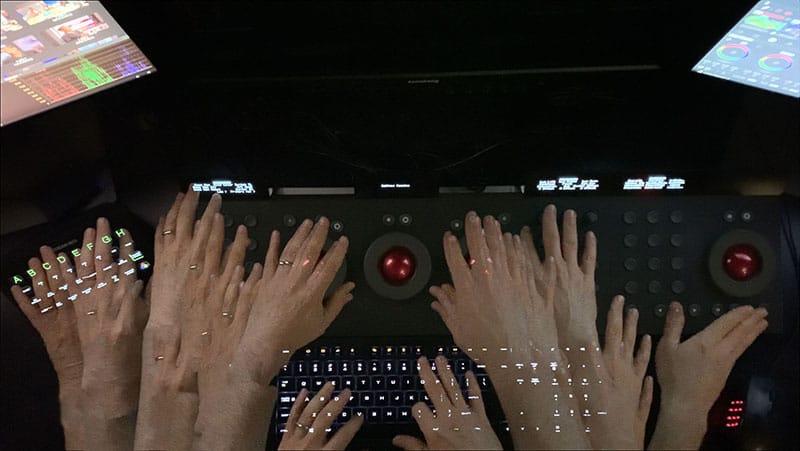
Try to stick to methods that change the whole image rather than specific parts. Contrast/Offset/Pivot, Printer lights, and Temp/Tint are great tools to use. Trust your initial instincts as a colorist. Too dark? Too yellow? Fix it quickly and move on.
As colorists, we can be enticed to do more with the images. At this point, it’s important to resist that urge and move quickly. We’re making time for that later by moving quickly right now. When you feel like you’re doing too much, reset and start over. Even though it might not feel like it, this work adds a tremendous amount of value – and in the worst case if you got stuck and ran out of time, at least you’ve touched every shot on the timeline.
While you’re working in each section, it can be helpful to use the ‘c-mode’ function to show the same sources next to each other. You’ll notice that probably several shots will look the same, are at the same angle, or have close source time codes. Grade the first shot and apply the grade to the following shots using the middle mouse button. You will knock out huge portions of your sequence with little effort.
Again, making sure these shots match perfectly is not a concern at this point. Reserve that judgment for your next pass.
The Second Color Pass

This is where we can make the show really shine. If you’ve followed me to this point, you have done a lot of prep work to ensure that you have enough time for this phase, and now it’s time to use it.
Start at the beginning of the show and start watching the show. Continuity problems will be apparent and you can fix them as you go, using whatever tools are necessary.
This is the benefit to your speed run through the first pass: You will not hesitate to re-grade a shot from scratch. Why won’t it be hard to redo a shot? Because you have nothing ‘invested’ in it.
When you’ve poured a ton of work into a shot, tracked windows, and painstakingly qualified your image, there is a ‘sunk cost’ associated with it. Not to mention, it will feel overly processed. If you have no attachment to it, it will be much easier to start over, which is usually the best and fastest way to go.
If you really feel the image still needs a lot of help, take your heavily processed image and grab a still. Try to match that shot with fewer nodes and you will likely have a much cleaner image.
This is the time where you can make the most of the grade, find what is truly important, and support the story as much as possible.
Final Thoughts
As you can see, there’s a lot that goes into coloring unscripted shows and most of it is upfront work!. With the right plan, support, and experience, you’ll stay on schedule and make an amazing-looking show.
Questions, comments, or something else to add? Please use the comments below!
-Josh

