| Series |
|---|
Understanding CDL Formats + Grading, Exporting, and Importing In DaVinci Resolve
In Part 1 of this series you were made familiar with what CDLs are and why we use them. You are ready to learn how to use CDLs in practice. There are actually several ways to go about this – remember, CDLs are designed to be platform agnostic. But just like how XMLs move timelines between different software, CDLs do the same thing with your color grades – and are equally NOT drag and drop when moving between software. Manual labor is often required, as there is in any conform workflow.
In today’s article Insight, we specifically look at how to prep DaVinci Resolve for CDL-compliant grading, managing, exporting, and importing of these grades back in using the Color Trace wizard. But first, there’s one more piece of theory to go over, and that’s recognizing the few different ways CDLs are exchanged. Then we cover how to color grade in a CDL workflow using DaVinci Resolve.
Special Thanks
Before we continue, here’s a shout out and thank you to Chandler Tucker (IATSE 600 DIT), Sam Gilling (Technicolor) and Rob Bessette (Finish Post / Mixing Light Contributor) for weighing in with their knowledge on this series.
CDL Interchange Formats 101
The ten parameters of a CDL (3 x SOP + S) can be transported and packaged a few different ways, some taking advantage of already-existing standards used in the industry. Each format has its own set of pros and cons, and are designed to combat CDLs’ featureless nature. Since CDLs are text-based formats, I encourage you to open them using NotePad or TextEdit to see what’s happening under the hood. Let’s have a look at the most common CDL types you need to know.
The following three CDL formats are built and coded under the XML (eXtensible Markup Language) specification:
*.CC – Color Correction File: This is the most basic form of CDL.
*.CDL – Color Design List: Functions essentially the same as .CC. You’re more likely to come across a .CDL then you are a .CC.
*.CCC – Color Correction Collection: This file contains one or several CDL subgroups in XML chunks. Typically used in together with a .EDL which requests these values if they aren’t already embedded inside of the EDL itself. More on this below.
The following three formats have their own origin stories and use cases, and are not part of the XML umbrella but carry CDL metadata:
*.ALE – Avid Exchange Log: ALE files are used to transfer auxiliary metadata at the time of dailies creation for editorial, generally specific to an Avid Project. In addition to fields such as ‘Scene’, ‘Take’, and ‘Reel’, ‘ASC_SOP’ and ‘ASC_SAT’ piggyback the ALE format and carry the CDL numbers in this way.
*.EDL – Edit Decision List: This works very similarly with Avid Exchange Log files, where the CDL parameters are kept in a set of extra fields as comments. This style of EDL/CDL can be thought of as an ‘inline EDL’. There’s a version of EDL that requests an XML file on import (usually .CCC or .CDL). This type of EDL is sometimes called an ‘external reference EDL’.
*.FLX – Film Log EDL Exchange: This file uses the extension .flx. Like an EDL, it is used to communicate a rudimentary edit from a film scan. It contains fields to accommodate the ASC CDL values. This file is not used much anymore, since it’s specific to telecine workflows and environments. If you strictly work with digital-originated footage you probably won’t see this format.
Preparing DaVinci Resolve for CDL-Compliant Color Grading and Exporting
Setting up Resolve for CDL-compliant grading requires some up-front work. Unfortunately, there is not a single switch, toggle, or dedicated panel getting you grading with CDL-only parameters immediately. But here are the five big tips creating CDL-compliant color grades from DaVinci Resolve:
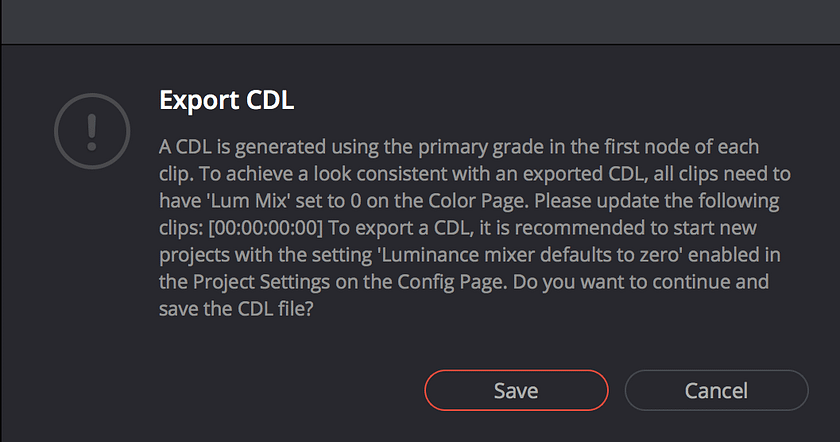
1. Lum Mix MUST be set to 0
- Setting Lum Mix is as easy as sliding the value down to 0 in the Color Page.
- You can force Resolve to operate with Lum Mix at 0 by default under Project Settings > General Options > Color > ‘Luminance mixer defaults to zero’.
If you forget to set Lum Mix to 0 then Resolve helpfully reminds you of this problem when you try to export the CDL:

What is the Lum Mix control?
To understand why this is necessary you need to understand the Lum mix control. By default, Resolve internally processes pictures in YRGB, deriving Y values in real time. It’s a unique way of encoding and decoding color information – think of it as a hybrid model between RGB and Y’CbCr. The following is an excerpt from the Resolve manual itself, straight from the horse’s mouth for more clarification:
Lum Mix: At the default of 100, YRGB and Y-only adjustments to contrast contribute equally. Reducing this value diminishes the effect of Y-only contrast adjustments until, at 0, Y-only contrast adjustments are turned off.
Member Content
Sorry... the rest of this content is for members only. You'll need to login or Join Now to continue (we hope you do!).
Need more information about our memberships? Click to learn more.
Membership optionsMember Login


