Part 1: Getting To Know Quiet, Easy To Use Mobile Shared Storage
I remember it like was yesterday, the huge boxes containing the 3U Xserve RAIDs, two Xeon Xserves and of course a box with XSAN software.
The spring of 2008 was my first experience with a shared storage system that I bought myself. XSAN was revolutionary in cost/performance at the time, but it was amazingly complex to set up and maintain and at least in my experience, I was always calling my XSAN ‘guy’ to come over to fix things when the system was down.
Over the past decade, I’ve gone through many shared storage systems – various QNAP setups, Facilis Terrablock, SmallTree TZ8 to name a few, and I’ve run these setups at the studio, at home and on on the go.
While all these systems had their pro’s and cons, I longed for something small, quiet, fast and most of all easy to use!
A couple years ago while at an event in L.A., my good friend Jeff Greenberg introduced me to Sam Mestman who is the President of Lumaforge. What was supposed to be a quick hello turned into dinner, drinks and hours of geeky conversation about shared storage, the industry, and the needs of colorists and finishers.
Having talked to a lot of storage companies over the years, Sam’s attitude about shared storage was refreshing and aligned very much with my views.
Flash forward a year or two – I have a Jellyfish Mobile in the office and at home cranking nearly 24 hours a day.
In this series, I want to explore the Jellyfish Mobile and why I think it’s a fantastic solution for solo operators with multiple computers, small facilities and even departments within a larger organization.
In part 1 (this article) we’ll explore the basic design of the Jellyfish Mobile, basic connectivity and if you’d like, explore connectivity on Windows & Mac as an addendum to the main article.
In part 2, we’ll explore the admin side of the Jellyfish Mobile and setting up a Resolve shared Postgres SQL database right on the Jellyfish. Finally, in part 3 we’ll take a look at the Jellyfish in action as part of a real world HDR project I’m grading (the editorial team is also using a Jellyfish).
*For legal purposes: Lumaforge provided me a 48TB Jellyfish Mobile for the purpose of this series. I’ve also purchased a second Jellyfish Mobile with my own funds.
The Lumaforge Philosophy
There are server companies that have gone into the movie business, and then there are movie people who’ve gone into the server business… we are the latter – From About Us Page www.lumaforge.com
When you start looking into shared storage solutions for your facility/team you are quickly assaulted with IT terms, benchmarks and a million acronyms that you need a decoder ring to understand.
Don’t get me wrong, the technical side of a shared storage system is very important, but the learning curve is steep and like most creatives you’d probably rather spend your time grading, editing, mixing and doing creative tasks to tell great stories than messing around in the terminal, adjusting block sizes, storage pools and permissions.

Unlike a lot of shared storage companies that talk a good game when it comes to creative workflows, almost every member of the Lumaforge team IS a creative. Lumaforge CEO Sam Mestman is the founder of We Make Movies – a member-owned and run film collective helping filmmakers from all background and genres. Other members of the Lumaforge team are also making content on a daily basis.
The focus on shared storage empowering creativity with teams vs. the focus on the shared storage itself informs Lumaforge and the way they sell to and support customers. In other words, they want to do everything in their power to make owning and running shared storage just as easy as booting up your computer and running your favorite NLE or grading tool.
In my initial discussions about Jellyfish systems with Lumaforge, not once did processors, ram, or network adapters come up! Lumaforge’s focus was on what I do, how I want to collaborate with my team, how I envision things working. Of course, because I’m a geek at heart, I eventually dove into all the technical aspects of the systems I was going to use, however I’m convinced that I would have received systems that did everything I needed without once talking tech.
Many of you reading this will want to get into the nitty gritty with Lumaforge – don’t worry they’re happy to do it, but it’s refreshing that in the storage sector of production & post they’re so focused on creative needs.
As you’ll see in the rest of this Insight and in future installments, making the operation of their shared storage products seamless and easy to use for even the most tech-phobic editor or colorist to use is at the core of everything Lumaforge does.
Why Shared Storage?
For small workgroups and continually growing facilities, shared storage used to be technology that was lusted after, but never obtained because of the cost factor. These days small work-groups and facilities ask themselves a different question – ‘How did we live without shared storage?’
Indeed, shared storage is so intrinsic to the multi-room/multi-operator setup now it’s not even optional anymore – it’s simply a requirement to work efficiently.

The value of shared storage like the Jellyfish Mobile should be pretty self-explanatory to small work-groups and facilities, but what’s the value proposition of shared storage to the solo operator?
Here a few ways of looking at it:
- Multi-machine setups – many solo operators I know have multiple computers for different things – FTP, Compression and deliverables, and if on PC a Mac as a ‘ProRes Dongle’. Shared storage allows these machines to all be connected to the same storage pool and allow you to avoid slower traditional network file transfers (1Gbe) or using ‘sneakernet’.
- Remote Rendering – even if you don’t need a ‘ProRes Dongle’, shared storage allows you to take advantage of Resolve Remote Rendering. on another machine without having to move media around and allows for massive throughput performance compared to slower network connectivity. Remote rendering, in general, can save you hours each week by not tying up your main machine.
- Collaborator/Client Connectivity – Being able to quickly allow collaborators (including Resolve Collaborators) and clients (yes, I know I’m crazy for letting clients on my shared storage) can be a workflow benefit. I actually keep an extra Thunderbolt 2 and Thunderbolt 10Gbe adapter around to allow for quick connectivity. Just last week I had a client pop in with 300GB or so on his laptop and not on an external drive. He was able to quickly copy to the Jellyfish without having to first copy to an external hard drive.
While it might seem that shared storage is only for work-groups and facilities, it has tangible benefits for solo operators as well.
Why 10GBe? And What Other Speeds Are Available?
Simple answer? It’s fast and very common (cheap).
In my early experience in shared storage, Fiber Channel was really the only way to go, but in the past decade, the Fiber Channel first mentality has given way (at least for many setups) by the use of Ethernet connectivity. (note: 10GBe can use optical/fiber connections but the protocol is different than Fiber Channel)
If you’re new to shared storage you might be thinking how is ethernet fast enough to support media workflows? You’re most likely thinking about the Gigabit (1000 Mbps) connections that are ubiquitous on nearly every computing device out there. While Gigabit or 1GBe can be used for simple file transfers, it’s not really fast enough to support the needs of high-bandwidth post-production workflows.
- 1GBe Max Transfer Rate – 1000 Mbps or 125 MB/s
- 10GBe Max Transfer Rate – 10,000 Mbps or 1.25 GB/s
- 25GBe Max Transfer Rate – 25,040 Mbps or 3.13 GB/s
- 40GBe Max Transfer Rate – 40,000 Mbps or 5 GB/s
- 50GBe Max Transfer Rate – 50,000 Mbps or 6.25 GB/s
- 100GBe Max Transfer Rate – 100,000 Mbps or 12.5GB/s
So, 1GBe can offer a max bandwidth of 125 MB/s which for HD compressed media could be fast enough to support shared storage, but that calculation (in addition to all of the others above) assumes no overhead and with all Ethernet connectivity there is overhead which means less usable bandwidth.
In addition, overall computer performance, drive performance, drivers. etc., can all play substantial roles in real-world throughput. This is why you’ll typically see 1GBe transfers of 90-100 MB/s instead of the max throughput. It’s also why real-world performance of many 10GBe shared solutions top out around 750-950MB/s.
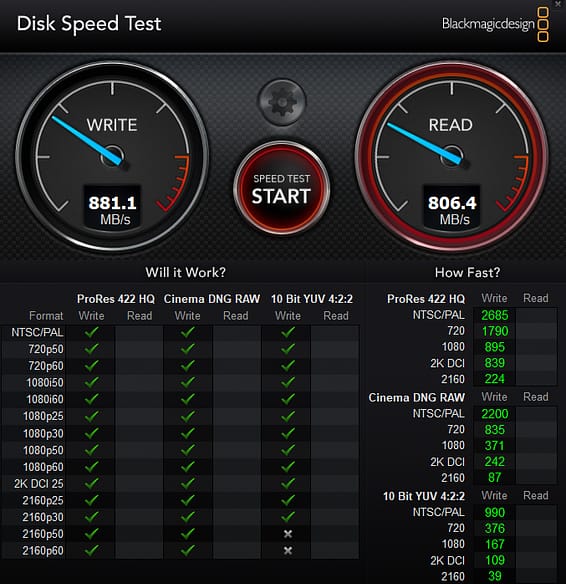
As you can see, 10GBe is significantly faster than 1GBe and very affordable compared to faster Ethernet connectivity (although 25/40/50/100 are getting cheaper).
Even factoring in overhead, 10GBe can easily support nearly any compressed video workflow as well as commonly seen Raw files.
Don’t forget that like any other storage solution connectivity is only one factor (and often a limiting one) and you can see massive overall benefits in throughput with more drives or faster drives (SSDs).
In other words, you might be able to get better speeds over 10GBe connecting to storage full of 8 SSDs instead of mechanical drives, but the connectivity then becomes the limiting factor. That’s why once you get a taste of Ethernet shared storage like the Jellyfish Mobile you’ll quickly want to explore 25/50 GBe solutions, SSDs, and more drives!
Adapters, Tuning & Cabling
Ethernet adapters (connectivity from your computer or in the shared storage) play a huge role in overall performance with a shared storage solution like the Jellyfish mobile.
In general, you get what you paid for. Super cheap adapters tend to be that – cheap, and won’t offer a ton of tuning ability, and can often have problems with heat.
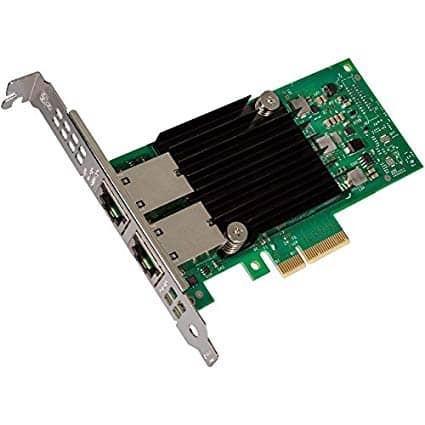
One of the biggest problems when it comes to choosing an adapter is that there are just so many of them to choose from! In my setups I’m using:
- Intel x540 (RJ45, PCIe)
- Intel x550 (RJ45, PCIe)
- Intel x550 T2 (RJ45, PCIe)
- Mellanox Connect X3 Pro (SFP+, PCIe)
- Intel V710A-DA1 (SFP+, PCIe)
- Promise San Link 2 & San LInk 3 (RJ45, Thunderbolt 2 and Thunderbolt 3)
For me, all these adapters work well. But your mileage may vary. The team at Lumaforge can help walk you through options that will meet your needs.
One thing that might be new to you is SFP+ transceiver modules often used for fiber optic connectivity (copper cabling can also be used) in 10Gbe solutions instead of the standard RJ45 style Ethernet connectors (these modules are also used in Fiber channel solutions). While there are cables and adapters to go between standard RJ45 and SFP+ modules, you’re better off deciding what setup you want at the start.
Also, keep in mind when you start exploring faster connectivity like 25GB, SFP28 connectivity is often used (which looks the same as SFP+ but supports 25 GBe) for even faster solutions QSFP (quad SFP), CFP, & CFP2 are often employed. Here is a great guide to these connectivity options and cabling.
Any adapter needs to be ‘tuned’ to work optimally for what it’s connected to and how it needs to perform. While this sounds scary (and it can be) often there are just a few settings to change – MTU or Jumbo frames between set to 9000 for 10GBe adapters being a key option.
Any company selling shared storage (including Lumaforge) should be able to help you with tunning options for your particular adapter(s).
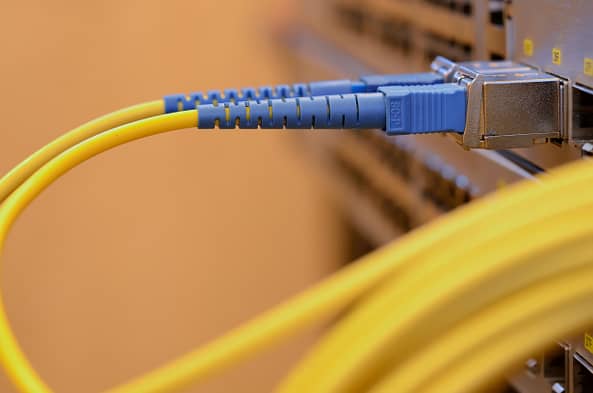
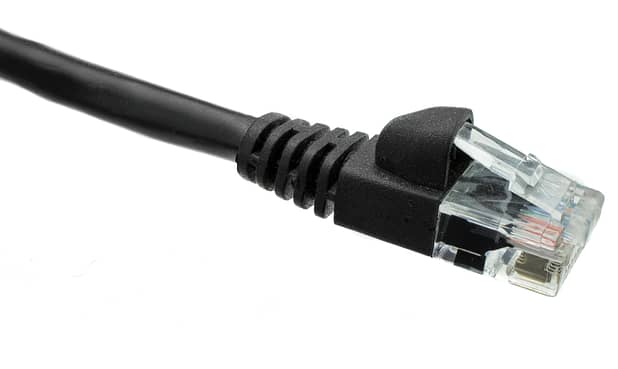
Finally, cabling matters! For 10Gbe connections using traditional RJ45 connectors, you’ll want to use Cat 6/6a or Cat 7 cabling. For SFP+, SFP28 and other transceiver modules of that type, copper cabling can be used, but more often, OM2, OM3, or OM4 multimode fiber cabling is used and terminated in LC Duplex type connectors to fit into the SFP+ transceiver module.
The Jellyfish Mobile Hardware
Lumaforge has 3 separate products in the Jellyfish line – the Jellyfish mobile (the focus on this series), the Jellyfish Tower and the Jellyfish Rack. For Enterprise users and large workgroups they also have the Sharestation.
The Jellyfish Tower and Jellyfish Rack are larger units with more drives (greater total bandwidth of 4400 MB/s) and support for more on-board high-speed connections (20) but being larger units, they’re more expensive, louder and maybe overkill for a small studio’s needs.
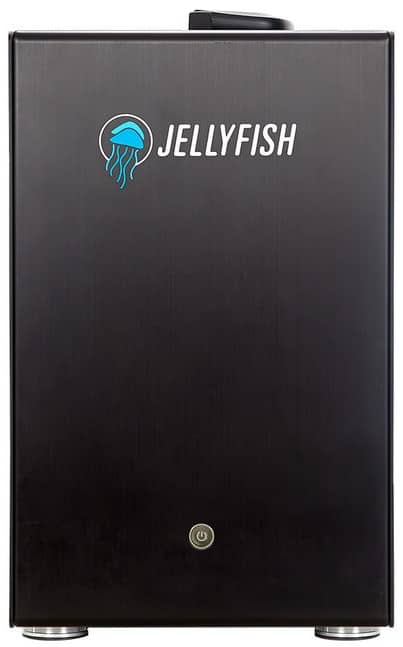
The Jellyfish Mobile setup (available in black or silver cases) is a relatively small unit (17in L x 7.75in W x 12.5in H) and very mobile at roughly 35lbs with a built-in handle at the top.
The fans on the Jellyfish Mobile are quiet but not silent. If you’re in a very quiet room with the Jellyfish you’ll hear a gentle whirl, but nothing that I would think most people would think as objectionable.
Ports & Adapters
All Jellyfish Mobile units have 2 x 10GBe/1GBe built into the motherboard. You can add an additional 10GBe ports with up to 2 additional PCIe adapters (which adds 8 additional ports for 10 total). If you think you’ll ever want to expand the capacity of the Jellyfish mobile, you can configure the system with one additional 10GBe adapter (for 6 total 10GBe ports) and add a 12G SAS expansion card, which allows you to add an additional Jellyfish Mobile unit but have it be a part of the same storage pool.
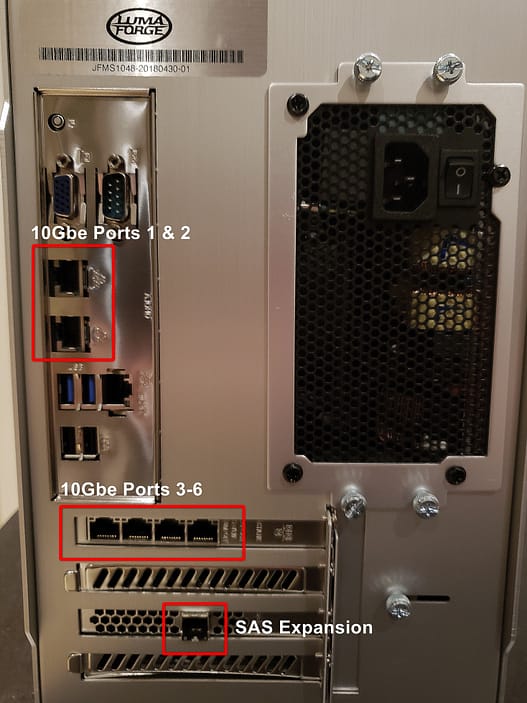
One really important thing – because of the relatively limited bandwidth of the Jellyfish Mobile (still huge) – although you can have (10) 10Gbe physical ports, Lumaforge limits the Jellyfish Mobile to a maximum of (6) 10GBe connections at any time. If your Jellyfish is maxed out with additional PCIe adapters, you can, as mentioned run 6 10Gbe connections or (8) 1Gbe and (2) 10Gbe connections at any one time
Note: 25GBe, 40GBe, 50Gbe and even 100GBe adapters are available for the Jellyfish Mobile & your workstation(s) discuss with Lumaforge if these adapters would benefit your workflow.
Ports are ordered sequentially with port 1 and 2 being the two built-in 10Gbe ports and then the uppermost PCIe card (if equipped) going left to right making up 3,4,5,6 then the second PCIe card (if equipped) making up 7,8,9,10.
Capacity
In terms of capacity, the Jellyfish Mobile is available In the following sizes (using 8 enterprise spinning hard disks):
- 32 TB Raw – 23TB Available
- 48TB Raw – 35TB Available
- 64TB Raw – 46TB Available
- 80TB Raw – 58TB Available
Every Jellyfish is configured with what Lumaforge calls a virtual RAID5. The idea is that you can lose one drive without data loss. A storage pool can also be configured like RAID 6 so that two drives can be lost without data loss.
If your workflow requires it, the Jellyfish Mobile can also be built with SSD drives, while those configurations will have considerably faster performance (they’ll also need to use faster adapters to realize that speed) potential capacity is greatly diminished as 4TB SSDs are the largest size currently available. Also, SSDs will considerably add to the base cost of a Jellyfish Mobile system ($8,995).
CPU, RAM & OS
You might think of a shared storage solution like a Jellyfish Mobile as a ‘RAID’ or a ‘hard drive’. Of course, on some level that’s true, it’s a network storage appliance but it’s really a server that’s sharing its storage over the network.
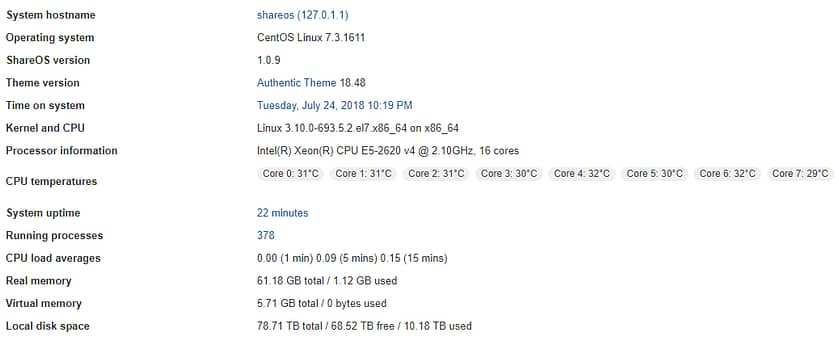
To do so without lag and as quickly as possible a beefy system is required.
All Jellyfish mobile units feature a 2.10 GHz 16 core Xeon E52620 CPU and come loaded with 64GB or 128 GB of system Ram. Ram is quite literally the fastest thing in any computer and it’s leveraged significantly in a Jellyfish mobile system to support read/write cache operations in tandem with additional SSD caching drives in the unit. The Lumaforge team can advise what’s the best amount of RAM for your particular setup.
Jellyfish Mobile systems run Centos Linux (version 7.3 or later) and have a customized back-end admin GUI called ShareOS.
The Jellyfish Mobile comes ready to support SMB, NFS, CIFS, iSCSI protocols as well as FTP and SSH login for remote connectivity.
Coming Up In Future Parts: Essential Admin & The Jellyfish As Resolve Postgres Database Server
Now that we’ve explored the essentials of the design of the Lumaforge Jellyfish Mobile, in future parts we’ll take a look at the back end of a Jellyfish system. While Lumaforge does a tremendous amount of work to preconfigure and help you avoid even having to go the backend in the first place there will be times you’ll want to dive in to adjust some settings.
What’s great is that the back-end is clean, simple and intuitive.
One of the specific things I want to discuss about the back end of a Jellyfish is setting it up to act as a Resolve Postgres Database server.
Yes! That’s right – in a shared environment, you don’t have to dedicate a workstation or an additional computer like a Mac Mini (discussed here) for a database server. The Jellyfish can act as your database server streamlining shared databases and Resolve collaborative workflow.
However, probably before that we’ll explore how the Jellyfish plays a central roll in facilitating a multi-location Resolve workflow for my company.
If you’re looking for more information about connectivity with the Jellyfish Mobile, please see the sections after the break below.
As usual, if you have any questions or something to add to the conversation please use the comments below.
-Robbie
Addendum: Getting Connected To A Jellyfish – A Quick Guide For Jellyfish Mobile Owners
Rather than bang non-Jellyfish owners over the head with step by step instructions on connectivity to the Jellyfish Mobile. I thought that I’d add on to the end of this article a detailed step by step guide to connectivity.
By no means, if you’re just scanning through the article are you required to read these sections, but to new owners, this info can help you get setup quickly.
Setup On Windows
These days, I’m mainly a Windows user so let’s start there with the setup of a Jellyfish.
In this section, I’ll discuss setup a Jellyfish manually on a Windows system as well as via the Share Client application.
In talking to the Lumaforge team, over the next year they are really going be developing their Windows application to be more cosmetically similar to the Jellyfish Mac application (discussed later) but also to do some level of the adapter tuning that they do with the Mac app.
Regardless, if you’re using the Jellyfish application or setting up manually, the process is straightforward.
Using The ShareClient Application
After registering for an account at jellyfish.support you’ll be able to download the ShareClient application for Windows – this is a different application than is used on the Mac.
On Windows, the setup application essentially configures you’re chosen adapter with IP information like you’d do in a manual setup and tests basic connectivity to the Jellyfish itself. At this time, it doesn’t provide additional adapter tuning.
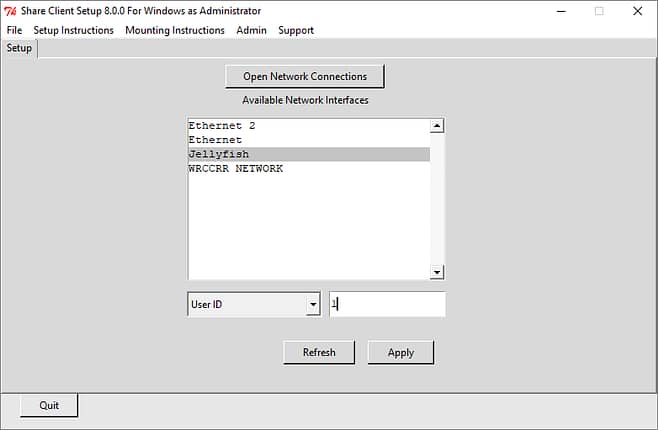
So, if you use the Jellyfish application to get set up on Windows you’ll still need to tune the adapter a bit – see below on some basic adapter tuning steps.
- After unzipping and launching the ShareClient application, you’ll be presented with a window that lists your available network adapters. Hopefully, the 10GBe adapter is easy to locate from this list alone. If not, you can also click the Open Network Connections button to view which adapters are plugged in and get more information on them (more info on this is the next section on manual setup).
- After identifying the correction adapter, the easiest way to configure the adapter is by User ID which just means the port you’re plugged into. Remember, each port on the Jellyfish is numbered sequentially from top to bottom/left to right on each adapter card.
- At the bottom of the ShareClient application window click in the pulldown and choose User ID, then in the field next to this box type the port you’re plugged into.
- After entering the user ID, press the Apply button. In a terminal window behind the ShareClient application window, you’ll see a flurry of activity. If the Jellyfish has been connected properly, you’ll see a small message at the bottom of the application window that the Jellyfish was found.
Setting up IP connectivity is only part of the equation on Windows. You’ll need to also to tune the network adapter for performance & mount the Jellyfish which after talking about manual IP setup we’ll do.
Manual Network Setup
Manual IP setup with a Jellyfish is pretty easy – admittedly, Microsoft could reduce the sheer number of dialog windows involved for GUI users (like me), but I don’t think we’ll get that to change any time soon!
- Right-click on the Windows icon in the start bar and choose Network Connections & then under the Change Your Network Settings category click Change Adapter Options.
- Locate the adapter you’re using to connect to the Jellyfish in the list of adapters displayed – plugging a cable into that adapter after arriving on this screen can help identify the adapter if it’s not obvious by name or subtext.
- To avoid adapter confusion in the future, the first thing I do is right click on the adapter used for the Jellyfish and choose Rename. On all my systems I’ve labeled this connection Jellyfish NAS, but you can name it whatever you’d like.
- Double click on the adapter to open a new dialog and then click Properties at the bottom of that dialog.
- Locate the property labeled Internet Protocol Version 4 (TCP/IPv4) and double-click its name. Yet another dialog box will pop up.
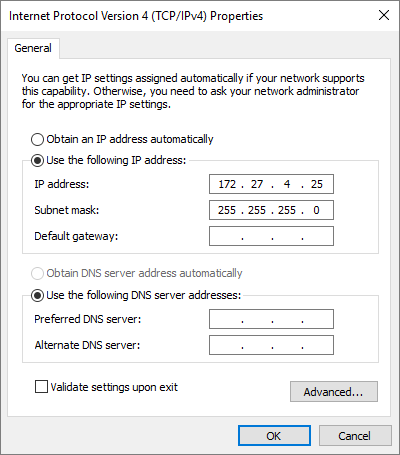
- Click the radio button in this dialog for Use the Following IP Address (this sets a static IP).
By default, the Jellyfish Mobile uses an IP that starts with 172.27. The next number is the port you’re connected to and the last part of the IP is generally 25 but can really be anything between 1-249. - Each adapter in the Jellyfish Mobile is set up with a default IP of 172.27.X.250 where X represents the number of the port you’re plugged into. So if you’re plugged into port 4 like I show in the screenshot above, you’d enter 172.27.4.XXX where XXX can be anything you want between 1-249 (not 250 because the Jellyfish is using that). To make things easy to remember, I usually enter 25. So it’d be 172.27.4.25. The important part is that you match the number of the port you’re connected to.
- In the subnet mask field enter in 255.255.255.0 then press ok.
- Back in the Main properties dialog for the adapter, turn off Internet Protocol Version 6 (TCP/IPv6) so there are no conflicts with IPv4 and on most adapters, I’ve gotten into the habit of turning off QoS (quality of service) Packet Scheduler. On many adapters, I’ve found this option significantly slows down connectivity.
- Your mileage may vary here, but at this point, I click OK to save those settings. Once I’ve clicked ok I once again double-click on the adapter to bring up the properties dialog. I know, seems like a redundant step, but I’ve had situations where my previous changes were not saved before moving on to the next step.
At this point, basic network setup is done but there is some tuning to be done for the adapter to get optimal performance. Just note: regardless of if you’re using the Jellyfish setup application or the setting up the adapter manually, you’ll need to do these tuning steps on Windows.
Adapter Tunning
As you can imagine there are millions of different setup possibilities with network adapters and the various tuning options for each one. It’s impossible to detail all the settings each adapter has so I’m going to keep this section to high-level tweaks. Of course, Lumaforge can not only recommend adapters but help you with tuning as necessary.
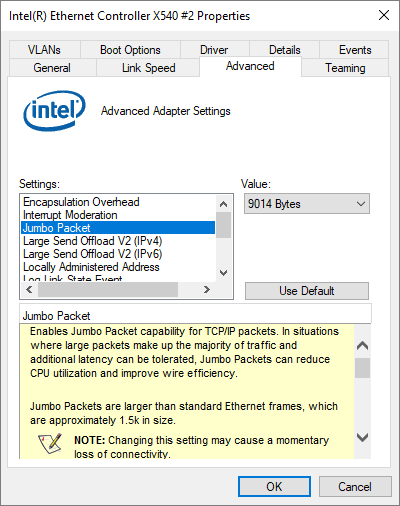
In the system I’m using for this article, my adapter on my Windows system is an Intel X540 – an older, but popular, single port RJ45 10GBe adapter. Specific options will be different between different adapters, and possibly located in slightly different places.
- With the adapter properties dialog still open in the upper section of the dialog, click Configure. In this dialog (I know another one!) Click Link Speed. Here you want to make sure you’ve selected either Auto Negotiation or 10Gbps Full Duplex so the adapter can operate at full speed.
- Click on the Advanced Tab – this tab contains most of the options you’ll need to tweak.
- Look for a setting labeled Jumbo Packet, this might also be labeled as MTU. You want to make sure Jumbo Frames are enabled and then you have this option set to 9000 or 9014. This option will allow the adapter in your computer and the adapter in the Jellyfish Mobile (also set to Jumbo Frames with an MTU of 9000) to communicate at very high speeds.
Among the plethora of tuning options, Jumbo Frames or Jumbo Packet or MTU setup is key to overall performance. For optimal 10GBe performance setting this option to on and choosing 9000 or 9014 frames is the correct option. - Look for an option called Maximum Number of RSS Queues or just RSS Queues. RSS (Recieve Side Scaling) queues can help speed up transfers, but with the downside of slightly more CPU utilization. I’ve never found this to be an issue and set RSS quest to it’s highest setting.
- Finally, look for options labeled Receive and Transmit Buffers (on the Intel x540/550 these are found in a Sub Category called Performance options). Set both of these options to their highest values. Doing so consumes a bit of system memory but not enough to be an issue on a modern workstation.
- Click ok on each of the dialog windows to back out and save settings.
With the tuning done you can map network mount as detailed in the next section.
Map Network Drive
After setting up IP connectivity to the Jellyfish either through the ShareClient application or manually, the last step is to actually mount the Jellyfish so you can use it as a volume on your system.
Because the Jellyfish is a NAS this is done via the Map Network Drive option in Windows.
Please keep in mind every Jellyfish Moblie unit comes pre-configured with both CIFS/SMB & NFS Volumes. Windows isn’t compatible with NFS, so SMB is really the only choice. On Linux CIFS/SMB works just fine and on recent versions of Mac CIFS/SMB also works great. However, as mentioned later in the Mac section, if you’re team is Mac only you could use NFS.
In my facility, I’m using CIFS/SMB, which is the right choice for a mixed platform setup.
Open a Windows Explorer Window and in the left-hand pane locate the category labeled Network.
- Right click on Network and from the contextual menu choose Map Network Drive…
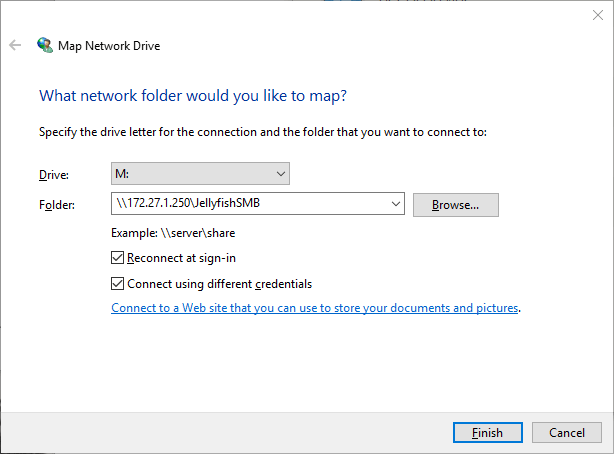
- In the dialog that opens, choose a Drive letter of your choice – I like ones like M for Media, N for Network but it’s up to you.
- In the field for folder type the following: \\172.27.X.250\JellyfishSMB where X is the port you’re plugged into on the Jellyfish. That port has a default address of .250 as the last part of the IP address. JellyfishSMB is one of the default Volumes that every Jellyfish ships with.
- Underneath the Folder field, be sure to check Reconnect at sign in so the Jellyfish is mounted everytime you restart the computer. Also, check the box for Connect Using Different Credentials – while you can configure new users on the Jellyfish, there is a default SMB user.
- Click the Finish button. Yet another new dialog will open allowing you to enter user/password information. The default user is SMB. The default password is also SMB.
If everything worked as it’s supposed to, in just a moment, the Jellyfish will mount and be ready for use.
Setup On Mac
Lumaforge has strong roots in the Mac community. So it makes sense that setup on a Mac is a piece of cake.
Similar to a Windows machine, there are two methods of connecting a Jellyfish Mobile – using the Jellyfish Application and manually setting up the Jellyfish.
I’d highly recommend using the Jellyfish application – besides making it simple to connect to the Jellyfish unit it also does some under the hood adapter tuning, and if you’re using the SMB volume, SMB performance tuning.
Using The Jellyfish Application
After downloading and installing the Jellyfish application, launch it from your applications folder.
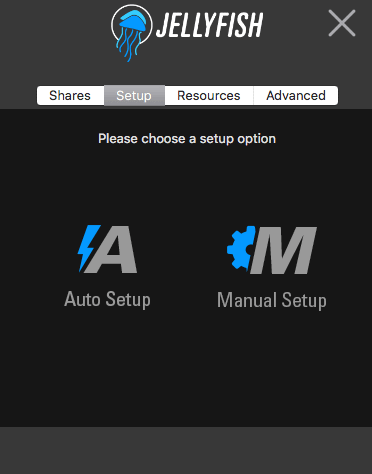
- Once you open the application the Jellyfish menu bar item will appear. Click on the menu bar item and then click on the Setup Tab.
- In the main part of the window, you’ll see two icons for Auto Setup and Manual Setup. Click Auto setup.
- If you are connected properly to the Jellyfish, after a moment, the unit will be found. You’ll be prompted to enter the password for your Mac user, and then the app will take you to the shares tab. If you’re in a Mac-only environment, NFS is probably the best option, however, if you’re in a mixed Mac/Windows/Linux environment choose to mount the SMB share.
You can also choose to have the volume automount on startup which is a nice feature. Done automatically in the background is tuning of your adapter.
If for some reason automatic discovery doesn’t work with the Jellyfish app, you can also use the app to do a manual setup.
- As before, launch the app, click into the menu bar item and choose the Setup Tab.
- For manual setup click the manual setup icon.
- Choose which of the available interfaces.
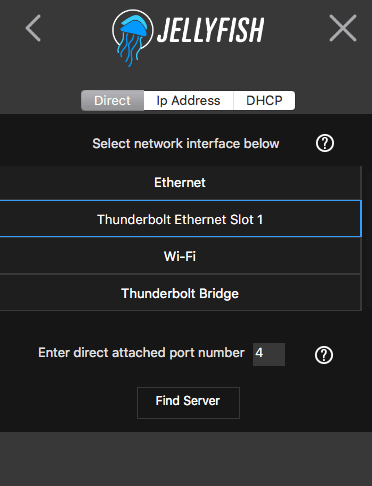
You can still utilize the Jellyfish app for manual setup. Shown here is the direct connection option that lets you choose an interface and choose a port that you’re connected to on the Jellyfish mobile. You can also connect directly via IP or if you’re behind a DHCP router the DHCP option will let you sort that out. - Then in the port number field, enter the number of the port you’re connected to on the Jellyfish. Remember Lumaforge numbers ports top to bottom, left to right.
- After entering the port number, click Find Server. After discovering the Jellyfish you’ll be prompted to enter your user password and then as before, you’ll be taken to the shares tab. Repeat connecting to an NFS or SMB share.
Manual Network Setup
If you’ prefer to forge (sorry for the pun) your own path in respect to connectivity to a Lumaforge Jellyfish Mobile you can easily do that on a Mac too.
- Open Up System preferences and choose the Network pane.
- Locate the Network device that is connected to the Jellyfish. In the main part of the window choose to Configure IPv4 Manually.
- Enter the IP address using the following formula 172.27.XX.25 where XX is the port number you’re connected to on the Jellyfish and where the last part of the IP address is 1-249
- Next, click on the Advanced radio button at the bottom of the dialog. Navigate to the hardware tab.
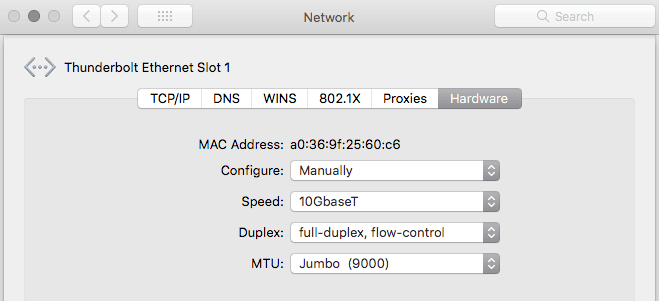
- Choose Manually from the Configure pulldown, choose 10GbaseT from the speed pulldown, full-duplex, flow control from the Duplex pulldown and Jumbo (9000) from the MTU pulldown.
- Click Ok at the bottom of the window.
- From the Finder, Choose Go > Connect To Server. Enter 172.27.XX.250. Remember XX is the number of the port you’re connected to on the Jellyfish Mobile.
- Finally, enter the default username & password for connecting to the Jellyfish.
Keep in mind, this method doesn’t do any additional adapter tuning, or SMB tuning that might be necessary to optimize your setup. Those things can be done in the terminal, but require an understanding of the right commands – Lumaforge can assist with this if for some reason you can’t use/install the Jellyfish application.
Additionally, there are altnerative setup steps for both Mac and Windows if you’re connecting through a switch or have to use DHCP. Jellyfish support offers more information on these kinds of setups.

