How to create Photoshop Channel Masks in DaVinci Resolve: Part 2

Adapting Photoshop ‘Channel Masks’ to DaVinci Resolve

September 6, 2018

Are you trying to do Photoshop's Channel or Luminosity Mask techniques in DaVinci Resolve? Learn how, by simplifying the workflow.


Series

Part 2: Refining Our Channel Mask & Completely Rebuilding It, Resolve-Style

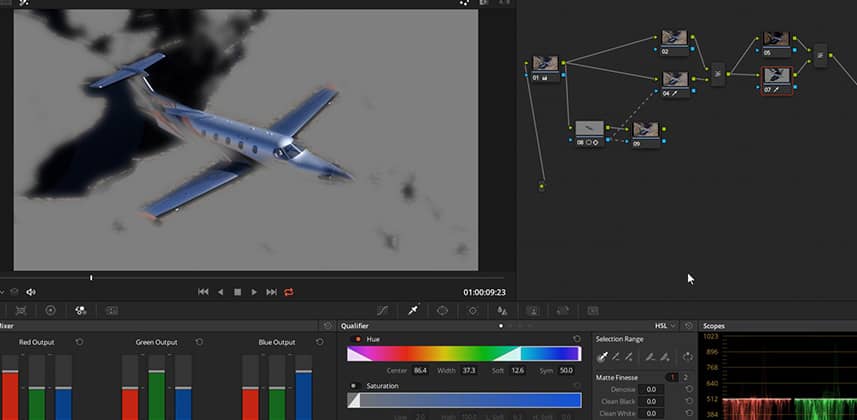
In Part 1 of this series, we used a question (plus terrific footage) from Mixing Light member Mike Fizer. He’s an aerial photographer moving from stills to moving images and is trying to replicate a common and useful Photoshop technique; combining Channel Masks with blending modes. We built a DaVinci Resolve node tree, that isn’t intuitive – but does the job. In this Insight we’re simplifying the Channel Mask and adapting this technique to the strengths of DaVinci Resolve.

Simplifying the Channel Mask Workflow with Photoshop’s ‘Color Range’ type Masks

You going to learn three things in this Insight:

  1. How to replace the Splitter node with Resolve’s RGB Mixer: This allows you to quickly target just the RGB channel you want use as a mask. It also cleans up the node tree by eliminating the Splitter. You learn how to get a perfect Red, Green, or Blue channel in the Key Mixer.
  2. How to invert your color channels using Custom Curves: In the comments to Part 1 of this series, Mike said he inverts the Red channel before applying the composite mode. You learn how to do that in this Insight.
  3. Think: Resolve – Or why it’s faster to not replicate Photoshop’s workflow: It takes much more effort to replicate Photoshop in Resolve than it does to just ‘let Resolve be Resolve’. I suggest you completely bypass the external RGB masks and use the internal keyer to achieve largely the same result – but with more speed, more flexibility, and greater simplicity.

Errata In This Video

While editing this video I realized I made two mistakes:

  1. Hightlight Mode: Shift+H – For some reason, in the first 5 minutes I kept calling out the Highlight Mode keyboard shortcut incorrectly. The correct shortcut (for both Mac and PC) is Shift+H.
  2. Color Range (not Color Key) – At the end of this video I talk about Photoshop’s ‘Color Key’ tool. What I’m really talking about is the ‘Color Range’ tool – which is part of the Channels / Luminosity toolset in Photoshop. The equivalent to that in Resolve is the Qualifier.

Questions? Use the Comments!

Ask a question. Get an answer 🙂 Sometimes, like Mike, you’ll even get an Insight or two in response!

Enjoy!

-pi

Member Content

Sorry... the rest of this content is for members only. You'll need to login or Join Now to continue (we hope you do!).

Need more information about our memberships? Click to learn more.

Membership options
Member Login

Are you using our app? For the best experience, please login using the app's launch screen


Comments

Homepage Forums Adapting Photoshop ‘Channel Masks’ to DaVinci Resolve


  • Abodh G
    Guest

    Great insight Patrick,

    Guess what I am in the same boat, I have been using Photoshop since 15 years now.

    The techniques you demonstrated were leading towards the right direction of creating luminosity masks, and I was so excited until the final part where you showed how to create a red channel luminosity-mask by simply selecting red color.

    In my opinion the point of using any channel masks is just to create a luminosity-mask; which is nothing but a black and white version of the entire image, which can be used as a mask to perform drastic adjustments and still look completely seamless just because it is not a selection of specific portion of the image where the mask is complete white or black, but a seamless transition between them, so that the mask contains the whole image with all the details/texture still in place, leaving no jitter or harsh borders. Any of the Red/Blue/Green channel is a perfect example of a luminosity mask, now when we create a mask by selecting R/G/B colors in the image, and compare it to the respective R/G/B channel, it becomes clear that these two things are completely different.

    By using R/G/B channel masks, I get the luminosity masks which hides/shows/partially-shows different parts of the image with black/white/gray while still containing all the details/texture of the image. The part of the image where I need to target the adjustment can either be completely black/white/gray in the R/G/B channel masks, so I chose the channel mask accordingly and make minute brightness contrast adjustments without losing the details/texture of the mask. And use this luminosity mask along with one more restrictive mask just like what you showed.

    This technique is mainly used to blend multiple exposure images together to create a seamless HDR which is hard to distinguish from a single image edit.
    But when used to adjust luminance contrast or color contrast or even saturation, the results are simply beyond something that can be accomplished using normal feathered selection masks.

    .

    .
    In Photoshop I rarely move the highlights/shadows/midtone sliders which tend make the overall image flat and muddy. I only use luminosity masks with brightness/saturation/hue adjustments layer.

    .

    .
    If you could show us how to achieve this in part 3 of this series, It would be a game changer!

    Thanks,
    Abodh


  • Rodriguez
    Guest

    A log image, when it makes my selection difficult, I sometimes try this path, create a tree in the Add Source, only tree of chavese pulling to the fixed tree. Can this be a valid process?. Sorry for my English. https://uploads.disquscdn.com/


  • Pat Inhofer
    Guest

    Abodh – I’ll take a look at this and see if I can translate it to Resolve 😉


  • Matthew C
    Guest

    Does anybody know how to replace the blue channel data with the green channel’s data?


  • CHRISTOPHER F
    Guest

    Hi Patrick, I think this insight is a little bit confusing, because you seem to be saying that the qualifier with 6-vector red will give you the same selection as the splitter node or the RGB mixer technique. But these obviously give massively different results, so if you’re wanting to replicate Mike’s workflow, you need to stick with the RGB mixer or the splitter.

Log in to reply.

1,000+ Tutorials to Explore

Get full access to our entire library of over 1,100+ color tutorials for an entire week!


Start Your Test Drive!
Loading...