| Series |
|---|
Updated August, 2018: I’ve added a section on describing Photoshop masking and embedded a YouTube video explaining it.
Part 1: Replicating a common Photoshop workflow – using DaVinci Resolve
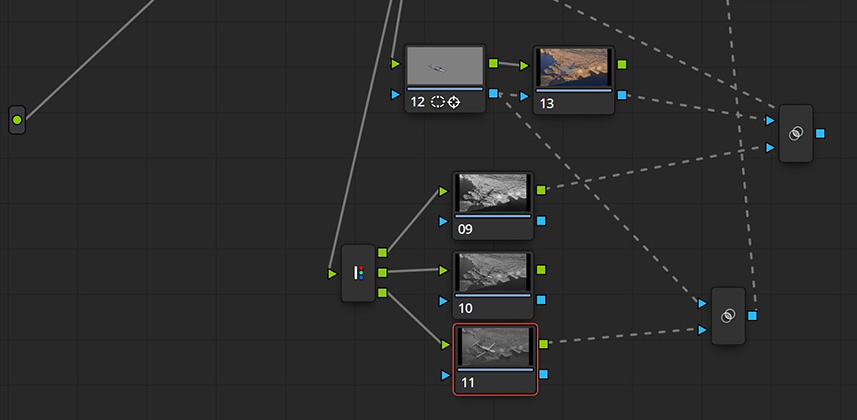
A Mixing Light member recently wrote in asking about replicating a ‘Channel Masks’ workflow for digital video. Channel masks are a common Photoshop technique closely related to its Luminosity Masks workflow. This workflow can be replicated in DaVinci Resolve – but is more complicated than it is in Photoshop. If you’re a Photoshop user who wants to use your tried-and-true Channel Masks within DaVinci Resolve, then this Insight will show you one technique for doing this – using Resolve’s RGB splitter node. But before we get started, let’s read the question.
The specific workflow we are mimicking in this Insight
This question comes from Mike Fizer, a Mixing Light member. He’s a licensed pilot and shoots (among other things) aerial B-Roll. He’s a stills photographer transitioning into video and learning DaVinci Resolve. He explains the workflow he’s trying to replicate:
In aircraft “air to air” photography, the aircraft almost always has a different quality of light than the landscape it’s flying over. Due to atmospheric conditions, the landscape is commonly lower in contrast and saturation than the aircraft. In Photoshop I create a backplate folder masked for the landscape, then a folder above it masked for the aircraft, then grade accordingly for each.
My go-to solutions are a blue channel mask with Multiply blending mode for highlights. For shadows, it’s a red channel mask with a Screen blending mode.
How we’re solving this Channel Mask workflow (using aerial footage provided by Mike)
Mike pulled for us a (beautiful) shot I can use in this Insight to demonstrate how to solve his challenge (thanks Mike!). I’ve labelled this Insight Intermediate, because you need to understand how these nodes work:
- Layer Mixer node (including accessing Blending modes)
- Splitter / Combiner nodes
- Key Mixer Node
Technically, you don’t need to know how to use the Key Mixer – I use it in this Insight to add additional power to the holdback mask we create. And the Splitter node isn’t the only way to achieve the same effect. But this is where we’re starting here in Part 2.
As I say in this video: Before I show Mike (and you) how I’d normally solve his problem, I’m showing Mike how to replicate what he normally does in Photoshop. And because we’re working in DaVinci Resolve, it’s not exactly a clean 1:1 translation. What is simple in Photoshop takes more energy in DaVinci Resolve… if you want to mimic Photoshop’s paradigm of working with Channel Masks.
What are Channel (and Luminosity) Masks in Photoshop?
If you’re not familiar with Photoshop techniques, Channel Masks are a specific type of luminance key, pulled from the color channels. You use these masks to restrict your corrections to the brightness values of a specific color range. Experienced Resolve colorists may watch this Insight and say, “There’s a better way – why go through this hassle?”
My answer: First – I want to replicate the workflow that Photoshop users are familiar with. Then, in Part 2, I’ll show how Resolve colorists are more likely to handle this. But remember: If you’ve got 2 decades of experience working with Photoshop – you may actually prefer the more complicated node tree I show here in Part 1… because it’s how your brain thinks about breaking down images and executing your favorite techniques.
Explaining how to execute Channel, Luminosity, and Color masks in Photoshop
This video from the PiXimperfect YouTube channel does a great job breaking down Photoshop’s approach to the problem we’re solving. And the 2nd half of this video, using Color masks, is precisely where we’re going in Part 2 of this Insight.
Coming up in Part 2
In the next Insight in this series, you will learn how to take the node graph we build in this Insight – and simplify it by avoiding the Splitter node (yet achieving a perfect replica of the individual Red, Green, & Blue channel masks). Then we’ll eliminate the Channel Mask mentality completely, and solve this problem using Resolve-think; resulting in a simpler, cleaner (and hopefully) faster workflow.
Questions, Comments, Node Tree Screengrabs? Use the Comments below!
In Part 2 I’m replacing the Splitter with another technique for recreating a perfect replica of RGB Channel masks. Can you solve it before moving on to Part 2? Post your Node tree and explanation down below!
And if you have any questions or comments, add them below as well.
Enjoy!
-pi
Member Content
Sorry... the rest of this content is for members only. You'll need to login or Join Now to continue (we hope you do!).
Need more information about our memberships? Click to learn more.
Membership optionsMember Login


