| Series |
|---|
How to auto-animate unrelated properties using Expressions
Recorded with Fusion 9
In this Insight I’ve moved over to the standalone Fusion 9 because I’ve found it to be much more reliable than the Fusion Page in Resolve 15 at the moment and performance is also better. If you feel your system can handle it then you could try all techniques used here in Resolve Fusion. There are a few differences in the interface and Resolve doesn’t currently have/need a Saver tool, it has the MediaOut instead.
How do you move a Fusion flow out of Resolve and into the stand-alone version of Fusion (or vice-versa)?
If you’ve started working in Resolve, you can select all the nodes (tools) in the Flow and Copy/Paste them into the stand-alone version. After a little re-piping of inputs and outputs, Savers and MediaOut etc, it’s quite possible to move between the two applications. Another method to move from Fusion 9 into Resolve Fusion is to use File>Import Fusion Composition while in the Fusion Page. This will remove all the default tools in the Flow so you’ll need to manually add back a MediaOut1 tool (Add Tool>I/O>MediaOut). Loaders can actually work in Resolve Fusion but it’s easier to access your media directly by dragging from the Media Pool.
Flying the Camera past pictures in 3D space
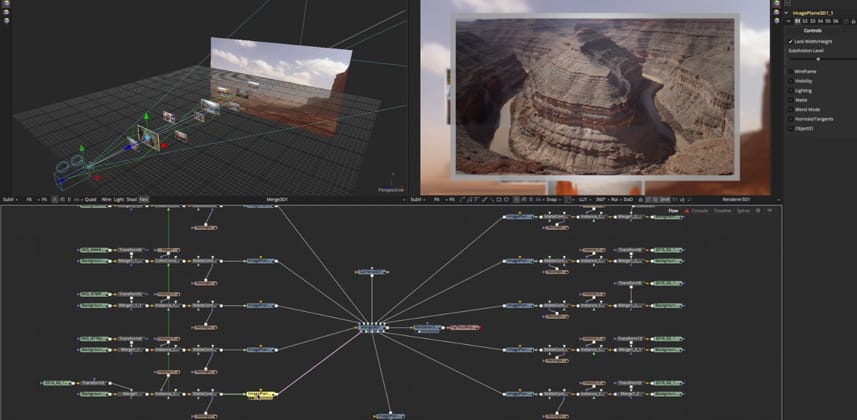
In this example we’re going to look at how to:
- Animate a Camera past some pictures arranged in 3D space.
- Import pictures of different resolutions and give a photograph style border and vignette.
- Use Shift+cmd+v to paste an Instance rather than a Copy of a selection of tools.
- Use an expression to drive the opacity of the photographs as the camera moves past.
Key Take-away: Build one section, then copy it
Although I work through the finished project here, there are certain things which will help when building this from scratch. Ideally you’d create everything you need for one picture (Loader, background for the border, mask, vignette, ImagePlane3D, etc) then when you’re happy with that you copy and paste it. Then reposition it in 3D space and replace the picture file.
Key Take-away II: Use the Instance tool
The Instance tool is Fusion’s version of Resolve 15’s shared node. In order to get the benefit of using an Instance of a tool (in this case the mask for the vignette) you need to actually delete the mask made by the normal Copy operation. Then, select the original mask tool, Copy and Shift+cmd+v to paste an Instance (Shift+ctrl+v on Windows). Then insert this Instance into your newly pasted branch of the flow instead. Now when you adjust any one of the Instances, they all get adjusted. It’s extremely powerful option in all sorts of situations!
Copy / Pasting Expressions
Another advantage of creating everything for one section and then copying that section of the flow is that any expressions you’ve created get renamed accordingly. For instance, in this expression the opacity parameter of an ImagePlace3D get’s its name updated every time you copy and paste it to a new ImagePlane3D tool.
min(((Camera3D1.Transform3DOp.Translate.Z)-(ImagePlane3D1_1_3.Transform3DOp.Translate.Z)-CustomTool1.NumberIn1),1)
All this is doing is fading out the opacity of the Image plane as it gets close to the Camera3D so that there’s no need for manual key-framing.
In order to see where the Plane of Focus for the Camera is you need to go to the camera controls and turn it on under ‘Control Visibility’.
Depth of Field is enabled in the Renderer3D under Accumulation Effects – The settings I used were Quality set to 10 and Amount of DoF Blur to 0.026. Motion Blur for the 3D scene is also set in the Renderer3D tool under the Common Control tab (all tools have this Common Controls tab and this is usually where you’ll find motion blur, along with R,G,B,A channel enables and a Blend control for the tool, if applicable).

You can temporarily disable these features by click the ‘HiQ’ (High Quality) and/or the ‘MB’ (Motion Blur) buttons to the right of the timeline controls in Fusion or right click underneath the timeline for similar options in Resolve Fusion.
Premium Members: Download This Project
If you’re a Mixing Light Insights Color Library Premium member, I’ve exported part of this comp as a .txt file. A neat thing about the way Fusion works is if you copy an item(s) in the Flow, then you can actually paste it as text anywhere else.
I’m including part of this comp as a .txt file for anyone who’d like to download it and paste that back into Fusion:
- Premium members can download the Additional Download for this Insight and unzip it.
- Open the .txt file, select all, and copy
- Switch to Resolve (or the stand-alone version of Fusion)
- In the Fusion page, click an empty area of the flow and Paste.
- I’ve included four pictures and each of the Loaders. These need to be relinked to the correct file path.
- In the File tab of the Loader, Filename>Browse.
Have fun!
Questions?
Use the comments below! I’ll get to them as soon as I can.
Member Content
Sorry... the rest of this content is for members only. You'll need to login or Join Now to continue (we hope you do!).
Need more information about our memberships? Click to learn more.
Membership optionsMember Login
Additional Downloads
Sorry... downloads are available for Premium Members only.
Become a Premium Member

