Working with the Tangent Ripple In Premiere Pro and DaVinci Resolve
(plus–how the Tangent HUD is a terrific extension)
In the film Minority Report, Tom Cruise is seen using augmented VR to quickly navigate through reams of audio, video and text information using his hands and voice. At the time of the film’s release (2002), it was a vision of the future that felt like it was only 5 years away. Almost 15 years later, it still feels like we are only 5 years away (but not a day closer) from that User Interface dream. That is unless you’re a colorist using the Tangent Ripple (or any other colorist control surface). Then we’re right there with Tom Cruise!

This Insight shows you how the Tangent Ripple works with Premiere Pro and DaVinci Resolve.
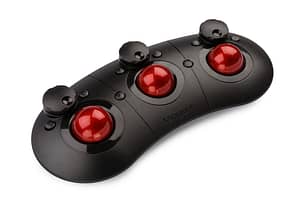
The Ripple is the entry-level control surface from Tangent (you can check pricing or purchase it here from B&H Photo). It provides functionality where you want it most, manipulating RGB values across three tonal ranges (shadows, midtones, highlights). Colorist control surfaces encourage experimentation with multiple different corrections very very quickly. As the image updates immediately in front of them the colorist having to take their eyes off the image.
The Ripple is considered entry-level because it’s a minimalist design, purely to keep the costs down
As you’ll see in the video below, the Ripple is extremely lightweight and portable. Its simple design makes it easy to master. Its streamlined size allows it to fit on the crampest desktop (or DIT cart).
If you’re a part-time colorist, the Ripple is your no-brainer add-on purchase. For a very low cost of entry, you get a huge boost in productivity. And because there are so few buttons, you won’t be overwhelmed with controls.
But its minimalist design also threatens to be a curse
To keep the cost of the Ripple well below the $400US threshold, it doesn’t have any kind of alphanumeric readout. Which means, for all the part-time colorists who are most attracted to this device—the few buttons it does have, it’s easy to forget what they do.
Also – the Lumetri Color panel has a TON of controls that the Ripple could be programmed to manipulate. And out of the box, the default settings have the Ripple constantly changing what its controls manipulate. Normally, you’d get lost remembering the Ripple’s mappings without extensive practice; which gets us to a new software feature from Tangent, the HUD.
This Insight will demo a new feature designed specifically for the Ripple—the Heads-Up Display (HUD).
Currently, the best app to see the new HUD in action is in Premiere Pro CC 2015.3 (or later). You’ll also need to download the latest Tangent HUB drivers if you want this feature to work.
Basically, the HUD is an on-screen display that shows you precisely what your controls will do as you work your way through Premiere Pro. It’s way easier to show you than to explain here, so be sure to watch this Insight’s video and see it in action. You’ll also learn how you can customize the HUD’s display and why the HUD is not useful in DaVinci Resolve.
Note: The Ripple is not yet directly supported in Final Cut Pro X.
When the Tangent Mapper starts to work properly with FCPX, I’ll be sure to do an Insight to show you the possibilities in that app with the Ripple.
More information on Mixing Light about the Tangent Ripple:
- How to Optimize Control Tangent Control Surfaces for Premiere Pro – As I mentioned several times in this Insight, you can re-map the controls on the Ripple the same way I show in this Insight for the Tangent Element.
- Color Correction Gear Head: The Tangent Ripple – Robbie offers his initial observations on the Tangent Ripple in this roundup of gear he’s been using.
Enjoy!
-pi
Member Content
Sorry... the rest of this content is for members only. You'll need to login or Join Now to continue (we hope you do!).
Need more information about our memberships? Click to learn more.
Membership optionsMember Login


