Do you have a moment that you wished you had captured in ‘slow motion mode’ in your camera, but didn’t? Or did you capture video at a high frame-rate but can't figure out how to make it play back in slow motion?
If that’s you and you want to figure out how (or IF) you can do it in DaVinci Resolve after-the-fact then you're at the right place! DaVinci Resolve offers several methods for achieving the ‘slow motion effect’. Which method you choose will depend on if you want a ‘variable speed effect’ (or not), if the quality of the effect meets your approval, and if you have the paid version of DaVinci Resolve (named
All slow-motion effects rely on changing the frame rate of the shot to something slower than the frame rate of the camera recording. If you recorded at 24 frames per second (fps), you would change the playback rate of your shot to 23 fps or slower. The software will duplicate or recreate the missing frames, creating a slow-motion effect.
The ‘slow motion’ workflows in DaVinci Resolve (from simplest to most advanced) are:
Method 1: Directly setting a clip’s frame-per-second playback rate using ‘Clip Attributes’
Did you record your shot at a high frame rate (say, 120 frames per second) but want to override the clip’s playback rate to 24 frames per second so it always plays in slow motion?
- In the Media Pool, Cut Page, or Edit Page, right-click on the clip in a bin and choose ‘Clip Attributes…”.
- From the ‘Video’ tab use the ‘Frame Rate’ pull-down to choose your desired frame rate.
- Press ‘OK’ and your clip will now always playback at the new frame rate.
- Note: If the clip is already edited into a Timeline, this modification may adversely affect that instance of the clip and you may need to replace that shot in the timeline, each time the clip appears. It’s best to make this change before you start editing the shot into a timeline.
Method 2: Using the ‘Fit to Fill’ command to set a constant frame rate speed effect (on the Edit Page)
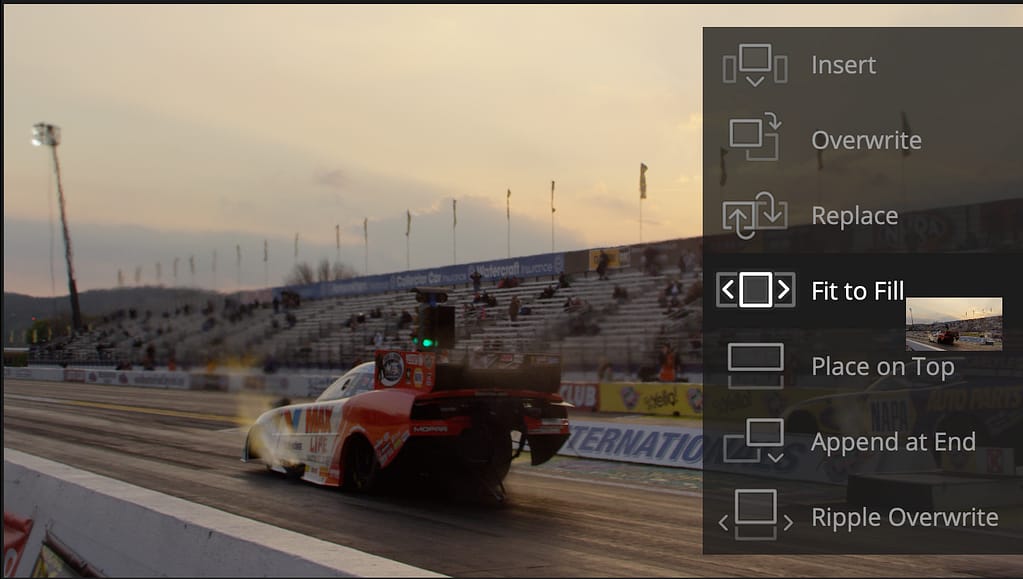
If you want to ‘fit’ a short clip into a longer duration (or if you want to ‘fit’ a longer duration shot into a short duration) on your timeline then ‘Fit to Fill’ is the classic editing command you want to use.
- On the Edit page, enter both an In / Out point on the source footage.
- Enter an In / Out point in the Timeline for the duration you want to ‘fit’ the source footage into.
- Either drag the clip from the source window onto the record window and select ‘Fit to Fill’ from the graphical menu or use the Edit > Fit to Fill menu command
Method 3: Setting a constant frame rate slow motion on the Cut Page
Did your record your shot at ‘normal‘ speed but now want to slow it down in the timeline? This is the most basic form of the slow-motion effect, where you set a single frame rate for the length of the shot. This workflow is for setting a constant speed slow motion in the Cut page.
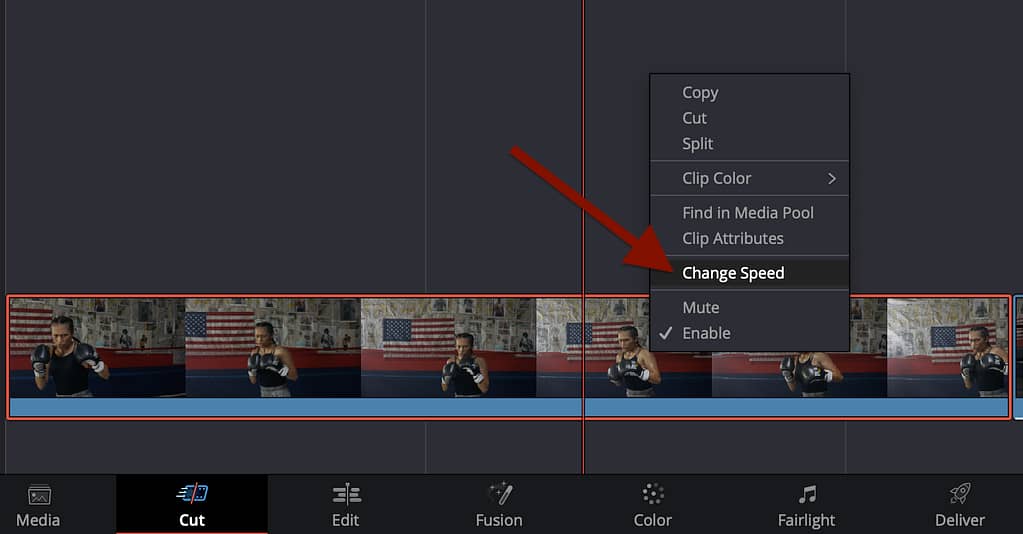
Either right-click on the clip or use the ‘Clip’ pull-down menu and then choose: ‘Change Clip Speed’.
- The viewer now changes to reveal the ‘Tools’ menu, directly underneath the viewer, with the ‘Speed’ controls active.
- Speed: Hover your mouse over the speed text box and click-drag to the left to slow down the shot for a slow-motion effect.Notice that the clip Duration changes as you make changes to the speed of the clip. In the timeline, the clip gets longer as you slow it down. You may also directly input a number into the Speed text box. To reset your speed, hover over the speed icon and click to reset.
Check out our one-stop solution for you:
The DaVinci Resolve Accelerator Plan
5 training courses, 2 color grading practice projects, 1,100+ tutorials, and a private community to ask your questions.
Method 4: Setting a constant rate slow motion on the Edit Page:
For more control over your slow-motion effect, switch to the Edit Page.The Edit Page provides several advanced controls not found on the Cut page, for more refined choices.
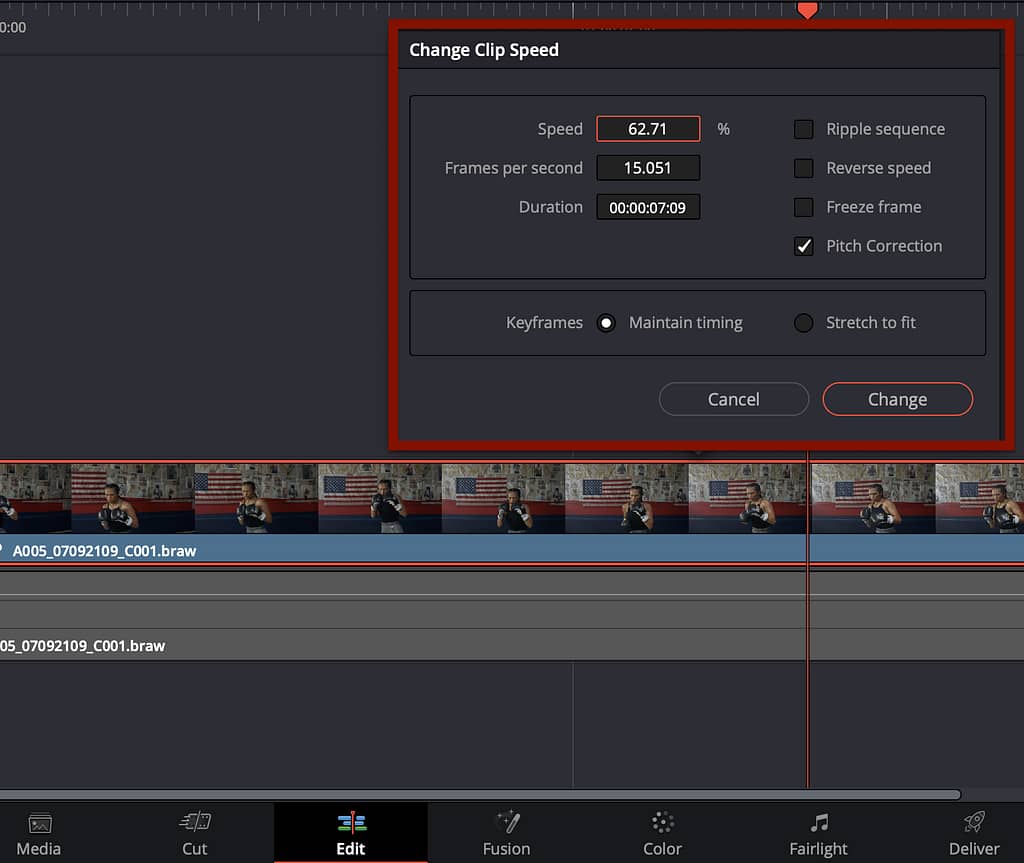
Either right-click on a shot in the timeline or highlight the clip in the timeline and select from the ‘Clip’ menu the command ‘Change Clip Speed’.
- This opens the ‘Change Clip Speed’ menu offering a variety of options not available on the Cut page:
- Speed / Frames per second / Duration: These three inputs interactively affect each other. 100% speed is the base frames per second (FPS) of the clip, displaying the default FPS and duration of the clip.You can directly input numbers into the text boxes. You may also hover your mouse over the Speed/Frames Per Second text boxes and click-drag to the left/right to increase or decrease the playback speed of the clip.
- Freeze Frame: For an instant freeze frame, pause on the frame you want to freeze, open the ‘Change Clip Speed’ menu and choose the checkbox for ‘Freeze Frame’. The entire clip is now frozen. This command is also found in the ‘Clip’ menu and by default, DaVinci Resolve assigns a Freeze Frame keyboard shortcut.
- Reverse Speed: If you want the clip to play at normal speed but in reverse, this checkbox automatically reverses playback of the clip.
- Ripple Sequence: Do you want to slow down the speed of your clip but keep the current first and last frame of the clip, making the clip longer? Then enable the ‘Ripple Sequence’ checkbox. The entire timeline after the clip will be pushed back to make room for the longer duration of the slow-motion clip. If you do not enable ‘Ripple Sequence’ then the duration of the clip stays the same and the slow-motion effect starts from the first frame of the clip.
Method 5: Variable-rate slow motion on the Edit page (retime effect)
Do you want a ‘slow-motion ramp’ effect, where the clip plays normally and then smoothly slows down (and maybe speeds back up again? Then you’re looking for DaVinci Resolve’s ‘retime’ controls.
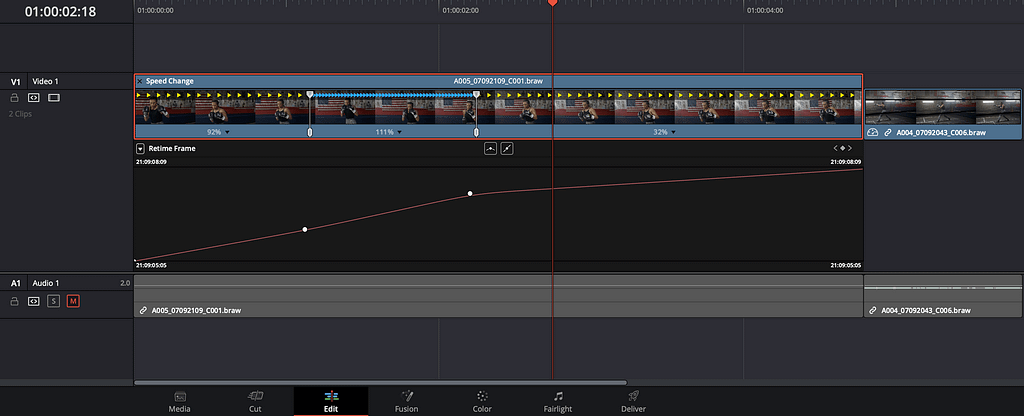
To activate ‘retime’ select the clip in your timeline and choose ‘retime’ from the right-click menu or from the ‘Clip’ menu. Using the controls on the clip itself in the timeline:
- Park the timeline on the first frame where you want the ramp slow-motion effect to begin. Use the pulldown menu on the bottom of the clip in the timeline and choose, ‘Add Speed Point’.
- On either side of the speed marker are pulldowns allowing you to set the speed of the clip before and after the marker.
- To enable the variable transition between each Speed Point, right-click the clip and choose, ‘Retime Curve’. A large curves interface is exposed.
- Click on the keyframe of the Speed Point. A box at the top of the curve is highlighted. Choose and highlight the alternate box, which changes the curve to a bezier.
- Pull the edge of the bezier to shorten or lengthen the time of the transition from normal speed to slow-motion.
- Experiment with the pull-down choices, adding additional Speed Point, click-dragging speed points, and click-dragging keyframes (including the graph endpoints) up/down to completely customize your variable rate slow-motion.
Learn DaVinci Resolve with our Training Courses
Is DaVinci Resolve Frustrating You?
Is DaVinci Resolve Frustrating You? DaVinci Resolve Fundamentals 101: The Quickstart Stop the struggle. Mixing Light’s introductory course (with downloadable practice footage) teaches the core logic behind any version of...
DaVinci Resolve Fundamentals 102: Learning to Edit with DaVinci Resolve’s Cut Page
Is Resolve’s Cut Page mystifying or illogical? DaVinci Resolve Fundamentals 102: Learning To Edit On Resolve’s Cut Page& Speed Editor Does editing in the Cut Page feel overly difficult and...
DaVinci Resolve Color Page 102
Is Resolve’s Color Page intimidating to you? Are you unsure which controls are most important, where you should begin, or how to effectively use the Node Graph? DaVinci Resolve Fundamentals...
All-Access: The DaVinci Resolve Accelerator
Are you constantly searching the internet to get DaVinci Resolve to work as you think it should? We have a better solution… The DaVinci Resolve Accelerator Access everything on Mixing...
Releated Tutorials From Our Insights Library
How To Professionally Work Between Multiple Editing Platforms
Special Guests Scott Simmons and Jonny Elwyn join Joey D'Anna and Patrick Inhofer to discuss moving between NLEs as a professional editor.
Advanced Finishing Techniques - Dealing with Picture-In-Picture Effects
How do you color correct Picture-In-Picture effects in DaVinci Resolve, when all you have is a single rendered movie of the entire timeline?
Multiple Aspect Ratios
Learn an innovative approach to framing filmed images for multiple aspect ratios. Also - how to view these framings inside DaVinci Resolve.
Look Setting Review & Approval With Frame.io
Frame.io provides a ton of tools for collaboration including some great ways for a colorist to interact with their client. Learn more...
Mastering DaVinci Resolve Cloud, Point Trackers for Shapes and OpenFX
If you want to master DaVinci Resolve's Color Page then you need to master its Cloud and Point trackers. This Insight sets you on that path.
Mastering DaVinci Resolve's Stabilizer and Classic Stabilizer
Learn DaVinci Resolve's Stabilizer and its legacy 'Classic Stabilizer'. This Insight is pulled from our Courses with a new introduction.
The Fundamentals of DaVinci Resolve's Gallery and Memories
Learn how to use Resolve's Gallery for comparing and sharing color corrections or nodes between different shots.
Hundreds of Tutorials
Get full access to our entire library of 1,000+ color tutorials for an entire week!


