Re-Revisiting Multi-Channel Output In DaVinci Resolve Part 1

March 24, 2018

No, that's not Déjà vu! We're re-revisiting multi-channel audio output in DaVinci Resolve! In Part 1 of a new series, we'll explore the essentials of multi-channel output including using the 'Timeline Tracks' method, The Link Group behavior, and basic bussing.


Yet Another Look At Multi-Channel Audio Output In DaVinci Resolve

Okay!  I admit it. I’ve been procrastinating for the longest time about revisiting the subject of multi-channel audio output in Resolve 14!  This was in part because I needed to learn (and play) with the new Fairlight integration, partly because the audio engine in Resolve 14 has been/is still very much a work and progress, and partly because I was struggling to figure out how to approach what seems like a straightforward topic but has become much more complicated than previous versions of Resolve, and probably more complicated than it should be!

The integration of Fairlight and the rejiggering of audio in the general sense in Resolve 14 has left a lot of longtime users frustrated (rightly so) and has interrupted many people’s button-downed workflows.  I think BMD must be aware of this and working on changes to audio workflows for future versions of Resolve.  That’s not to say that user frustration/confusion is not warranted, but Resolve is morphing into a postproduction super tool and with that, some growing pains should surely be expected.

This new series marks the second time I’m revisiting multi-channel audio output and I mentioned that I was struggling with the how to attack the issue(s) of multi-channel output and workflow in Resolve 14. So I’ve come up a with a plan for a series instead of trying to cram everything into one super long Insight.

Part 1 – Essential Multi-Channel Output (This Insight)

If you’re like a lot of colorists and finishers, you get a folder of audio stems and get asked to marry them to your color correction work and make a final output.  Easy right?

In Part 1 (this Insight) we’ll cover making multi-channel outputs with stems provided by a client or audio mixer.

We’ll start by exploring making an output using ‘Timeline Tracks’ on the audio tab of Delivery Page settings.  We’ll do this with six mono surround stems + a stereo mix, as well as with an interleaved 5.1 mix and a stereo mix. But this method is also very useful for outputting traditional splits i.e. stereo full mix, mix-minus, M&E and other combinations.
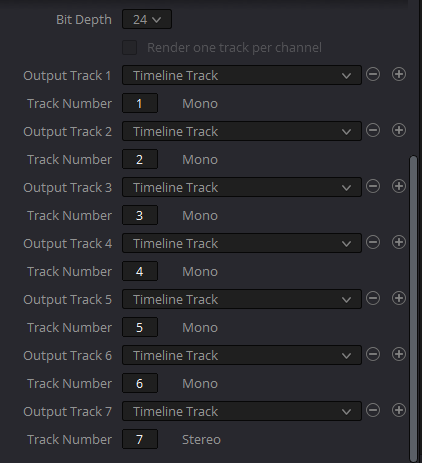
Timeline Track Setup
The Timeline Track output method is a super simple way to output your timeline tracks exactly as they’re set up on your timeline – which may be fine for some situations but many times you’ll need to have separate tracks in a ‘group’ which takes a little more work.

While the ‘Timeline Tracks’ method works well with stereo mixes and interleaved surround mixes, if you have separate mono surround tracks delivered to you by a mixer or client, this method will create 6 separate channels which might not be what your deliverables require.

Ready to get a little complicated?

In order to make an output that has a 5.1 mix as ‘track 1’ in the output and the stereo mix as ‘track 2’, we need to explore the Fairlight page Link Group behavior and some basic bussing (routing) in the Fairlight page mixer.

I need to be explicit about something: There are many ways to accomplish the things I’ll show in Part 1.  The methods I’ll show have gotten me through dozens of broadcast shows over the past year and while not exactly ‘one button’, I’ve found the workflow I’ll show to be straightforward and easily repeatable with minimal hassle.

In Part 2 – Surround Sound Monitoring, More On Bussing & Alternative Routing Techniques

Maybe you want to be able to properly configure your suite to monitor surround sound so that you can listen to, and QC the file you’re given?  There are a couple ways that you can setup the physical part of a surround sound setup, but you need to also configure somethings in DaVinci Resolve 14.
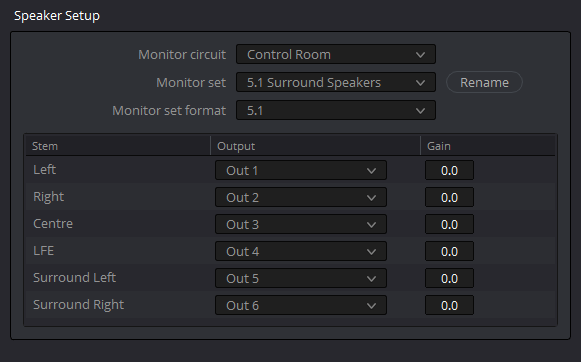
Resolve 14’s speaker setup preferences allow you to configure your monitor setup in Resolve. These preferences play into monitoring audio and we’ll dive into them in more detail in Part 2 of this series.

In Part 2, we’ll dive into Speaker Setup in Resolve’s System Preferences and how to utilize the speaker setups you’ve configured on the Fairlight page.  In addition, we’ll explore more on bussing and some alternative ways to accomplish the routing shown in Part 1.

In Part 3 – Editing & Working In Surround In Resolve

While I went to school for audio, I’m a colorist, not a sound designer or audio mixer.  In part 3, we’ll welcome a new Mixing Light contributor – Jeremy Guyre.  Jeremy is a good friend, super talented mixer/sound designer and has a way of making the complex seem super simple.

In this part, Jeremy will explore mixing a short piece in surround in Resolve and how to setup bussing, effects and more to work the most efficiently.

Video: Essential Multi-Channel Output

Don’t have surround files? No problem, for premium members I’ve provided a download zip of the mono surround stems and stereo mix shown in the video. Just be warned… what you’re getting are the sultry sounds of yours truly identifying each channel!  These files are meant to help you quickly check your routing (and listen to that routing if setup with a surround speaker setup). Please note, these tracks are recorded at a low level – I did this on purpose – I tend to be very loud and the last thing I want is to blow your speakers saying ‘Left Channel’…

If you have any questions or have more to add to the discussion please use the comments below.

-Robbie

Member Content

Sorry... the rest of this content is for members only. You'll need to login or Join Now to continue (we hope you do!).

Need more information about our memberships? Click to learn more.

Membership options
Member Login

Are you using our app? For the best experience, please login using the app's launch screen


Additional Downloads

Sorry... downloads are available for Premium Members only.

Become a Premium Member
Comments

Homepage Forums Re-Revisiting Multi-Channel Output In DaVinci Resolve Part 1

Page 1 of 2
  • I’ve tested the “group” workflow to turn 6 mono channels into an interleaved 5.1 output more than once and noticed a problem. For no clear reason that I could find, in the resulting interleaved file, each of the channels was 3dB hotter than the source mono track. Makes me think there is something about grouping in Fairlight that is automatically adding gain when the channels are grouped. Have you noticed this too?


  • Marc Wielage
    Member

    Thanks for delving into this, Robbie — the Fairlight aspects of Resolve are still a bit cryptic for me, despite 15 years as a Pro Tools user. Now, I have to digitally erase what I knew about that system and embrace Fairlight instead. Your tutorial is a big help in that direction.


  • Robbie Carman
    Guest

    Hmm that certainly is strange. 3db makes me think its like a mono summing issue but there shouldn’t be any summing with the group and surround bus.

    No, I’ve not experienced this at all – I’ve tested the outputted file in Audition, Protools and Switch and my levels are exactly the same between those apps and consistent with the source files.

    I’ve attached a few screen shots showing amplitude analysis on the test files used. For the screen shots I used Audition, but the results are the same in other dedicated audio applications

    First – a amplitude analysis of just the left channel mono file:

    https://uploads.disquscdn.com/

    You can see it’s peak is 15.52db

    Second – the Interleaved file I show (created from Protools):
    https://uploads.disquscdn.com/

    Again that channel is exactly the same level 15.52db

    Third – the grouped and sub bus output made from Resolve (including the stereo mix). https://uploads.disquscdn.com/

    While this one has the addition of the stereo mix you can see that all channel levels match the interleaved and that the left channel matches again (Sorry I exported this 16bit vs 24 bit, but that shouldn’t be an issue)

    Not shown here – but I did test it, I took all of the mono stems and tested those to see if the a) lined up with the interleaved file and b) if they lined up with the Resolve output – in both cases they matched exactly.

    Finally, I did bring the output file back into Resolve – but since the meters are so small in Resolve and they don’t provide actual level values I didn’t include a screen shot, but the eye test showed the same levels in the rendered file vs the original mono+stereo setup, the interleaved + stereo setup and the grouped setup

    One thing to note – analysis gets screwy with MXF files in Audition – it shows all of the channels with the exact same statistics! Of course that’s not correct, so i simply rendered at ProResHQ file with the exact same audio config as shown in the video to grab the last analysis screen shot.

    So, all and all I’m not sure what’s up with the behavior that you’re seeing. What version of Resolve are you on? Is it possible you’r adding another track(s) into the group? Where are you testing that the rendered file is now 3db hotter?


  • Patrick Inhofer
    Guest

    In addition to Robbie’s excellent answer – there have been versions of Resolve 14 where Dim seemed to effect the levels of audio renders. Fairlight is getting better (for instance, Timeline Track was the default audio setting in the Deliver page for a version or two… but is now set to Main 1, which is much more appropriate for most situations) and it’s worth revisiting if the latest version fixes this problem for you.


  • rneil@rneilphotog.com
    Guest

    Great job, Robbie. Still not clear on when to choose the simple interleaved or bus mode, but … I’d know how to set them up now. And this seems a bit simpler than doing so in the programs I’m used to.


  • Simon Tingell
    Guest

    Thank you, thank you, thank you!!


  • Evan Anthony
    Member

    Thank you Robbie! This helps a lot for us color heads.


  • Patrick Inhofer
    Guest

    Your deliverables will dictate which ‘flavor’ of 5.1 they want. It’s not so much a choice but an expectation. Just like much of the advice we give… start with the deliverable and work your way backwards.

  • Thank you Robbie and Patrick for the responses! I was on the latest version of Resolve, so it could be some kind of user error on my part (though I followed the same workflow you outlined) or it could be something weird on my system. There have been a lot of other weirdness in various apps recently as well so I’m wondering if it’s my system. Today I’m going to wipe my boot drive and start from a completely clean install. Then I’ll retest and see what happens.


  • Sebastian Leitner
    Guest

    this sadly changed so much again in v15 that it is now a real hassle to map surround from mono channels and to monitor it correctly, even if it’s just having surround meters. why are we back in the stone age? it’s so simple in FCP and was rather simple in v14 like you show it here. also: when speed-changing audio (say 25p to 24p): why does this not work as a batch operation and why is the out-point not prolonged so that one has also to change length for each file manually? /rant (do you have any insight into this? also why audio meters seem off by 6db and are usually showing audio as too loud when it really is not?)


  • Robbie Carman
    Guest

    monitoring has changed a bit for sure. I’m overdue for the next part in this series – but I’m planning on hitting that in early September.

    As far as audio metering have taken a look at your audio metering options in Project Settings > General > Audio Metering? Everyday I’m outputting stuff from our audio team – and I always check levels – seem good for me


  • Sebastian Leitner
    Guest

    thanks for the swift response, robbie! let me just say this: v15 is insanely over-complicated and you have to adjust bus-type, bus-link and bus-group just to be able to map 6 mono channels to working 5.1 incl. visual representation (monitoring).

    v14 had right audio level meters. in v15 they are off by 6-9db (too high). i do not understand why anyone should need to go to project settings and adjust mystical values (it’s set up to satisfy European broadcast levels as standard, not so many people use that). you can shift metering levels there, but why on earth is resolve the only app showing false levels in standard config? most people do not do audio broadcast work in it and it’s a gamble to change values since it’s not well documented.


  • Scott A
    Guest

    Huge lifesaver! Are the other 3 videos in this series on the site yet?


  • Robbie Carman
    Guest

    Hi Scott – thanks!

    No I have not got back to the series yet – but thank you for the kick in the pants – we’ll move this series back up near the top of the queue!


  • Scott A
    Guest

    Thanks Robbie! We built a brand new Finishing suite and we are having issues MONITORING 5.1 – exporting has been fine but we really want clients to hear it in all of its glory ha ha looking forward to the next video! Thanks for all the great advice as always

Page 1 of 2

Log in to reply.

1,000+ Tutorials to Explore

Get full access to our entire library of over 1,100+ color tutorials for an entire week!


Start Your Test Drive!
Loading...