Are you thinking about updating to DaVinci Resolve 16 Public Beta? Read our updated article about working with Beta software and how to safely work with Resolve 16 Public Beta.
DaVinci Resolve 15.0 is released! But how do you upgrade safely?
After eight Public Beta versions of DaVinci Resolve 15, Blackmagic has released the official shipping version of DaVinci Resolve 15. About 3 months ago I wrote an article on how to properly beta test DaVinci Resolve15. Now that the beta period is over, this article covers how to properly (safely) upgrade from earlier versions to the shiny happy DaVinci Resolve 15.
Whether you’re beta testing or updating to the lastest shipping version, many of the same rules are in place. And here’s the golden rule of updating production software:
Thou shall ensure you can downgrade gracefully (and quickly), if necessary.
In other words: You need to be 100% confident that if you need to roll back to the earlier version of software, you can. And with software as complicated (and professional) as DaVinci Resolve, there are multiple ways upgrading (and then downgrading) that can ruin your day. This Insight is here to help you minimize those mistakes.
NOTE: The steps outlined in this Insight are often identical to those in my original Insight on beta testing Resolve 15. But I’ve added a few more bits advice that others have suggested. And I’ve cleared out the whole section that’s specific to Beta Testing.
Quick Aside: Blackmagic posted a few items that you’ll find interesting as you get ready to upgrade to DaVinci Resolve 15
- New v15 Features since NAB: This post lists features that didn’t exist when Resolve 15 was released in April. There are substantial new features for specific workflows. Check it out!
- Blackmagic eGPU FAQ: This Frequently Asked Questions document authoratatively answers a range of questions I’ve seen asked on a variety of forums and social media. If you’re thinking of buying the eGPU then this is a must-read.
- DaVinci Resolve 15 Configuration Guide: This document hasn’t been updated since the Public Beta 1 in April. But if you’re just now paying attention to DaVinci Resolve 15, then check out this document to make sure your hardware is properly spec’ed out.
What can go wrong when migrating between versions of DaVinci Resolve?
In my previous Insight on this topic I shared a comment from Mixing Light member Dmitri. That comment is still a good example of what can happen when you fail to upgrade with a plan:
Dmitri offers one of many ways an upgrade can go wrong. And that’s why it’s important to have an Upgrade Plan.
Part 1: How to wisely upgrade to DaVinci Resolve 15 (for the first time)
Before we begin, here are just a few observations, so you understand my approach:
- Some of my steps are overkill: After almost 30 years of upgrading software, I’ve experienced it all. From catastrophic crashes requiring full Operating System re-installs to minor annoyances. These steps have proven to be the most reliable method to ensure one thing: If the new software has a problem then it’s likely not the fault of how you’ve gone about upgrading the software.
- Some of my steps are DaVinci Resolve-specific: Since Resolve relies on a database architecture, there’s an extra step or two that you don’t have to worry about with software from other developers.
- This workflow is designed to work for any major update on any software: If you skip over the Resolve-specific steps then this workflow should apply to just about any software updating to a new major version.
With my disclaimers out of the way, let’s take a look at my multi-step workflow for delving into Beta software. And here’s the quick summary of my workflow:
- Set aside time to do this properly & methodically
- Back up the computer
- Export projects and databases I’m going to upgrade
- Back up custom / 3rd party LUTs*
- Export Power Grades*
- Export Keyboard Shortcuts*
- Begin the update routine
- Uninstall Resolve
- Uninstall Desktop Video app (if you have Decklink or Ultrastudio hardware)
- Reboot
- Install Desktop Video app (if necessary)
- Reboot
- Install DaVinci Resolve 15
- Reboot
- Launch DaVinci Resolve 15
- Create a fresh database
- Import Projects
- Re-install custom / 3rd Party LUTs
- Import Power Grades
- Rebuild (or Re-Import) Keyboard Shortcuts
- Get to work
Holy smokes that’s a lot of steps! Yup. And below is my rationale for each step, plus some pointers and refinements.
*Special thanks to Marc Wielage for these suggestions over on LiftGammaGain.com
Step 1: Set aside time for a methodical update
DaVinci Resolve 15 is a MAJOR update to DaVinci Resolve. The audio subsystem of Resolve has been enhanced and refined significantly from Resolve 14 (and completely rewritten from Resolve 12.5 and earlier). Plus the new Fusion page has added a major new workflow that gets injected in the middle of Resolve’s image processing pipeline. Separately, these new enhancements are major architectural changes to a very mature software platform.
Do NOT assume your upgrade will go smoothly! Do NOT assume that your workflow is generic and is automatically supported. Do NOT assume every feature you’ve been using will work precisely like it has in previous versions of Resolve.
Chances are – there won’t be problems. But you need to assume there will be problems and set aside enough time to find and fix those problems.
Do NOT upgrade 30 minutes before your client walks in the room to start a session! Leave yourself breathing room. You’ll want at least a half-day.
Step 2: Have a backup plan
If you don’t have a backup plan then now is the time to devise it and execute it. This is non-negotiable. If you don’t have a plan to completely back up (and then restore) your computer then you’re setting yourself up for failure. What I’m about to detail is the rough outline, not a step-by-step of how to create a backup routine for a production computer (on Mixing Light we have a Mailbag Podcast that covers how to back up your computer and databases).
Basically, there are two variations on this theme when it comes to major software updates:
- Use backup software: And you’ll want to back up your entire OS – not just your User folder. Remember, software like Resolve installs OS-level components. You need to reinstall the OS-level components from the back-up if you want to roll back to a update state. That means, back up the entire boot drive.
- Have a secondary boot drive for updating the software: In this workflow you set up a dual boot; you have two hard drives but only one has the updated software on it. Rolling back to the previous version is a simple re-boot into the original hard drive. If the update goes well, then the secondary boot drive becomes your primary boot drive.
Step 3: The Pre-Installation Routine
A. Decide what you’re going to do with existing projects and databases
- Are you going to upgrade active or recent projects? If so, then before upgrading you need to export those projects. And then NEVER upgrade the original project! You will only ever import that exported version of the project, always leaving the original intact and untouched.
- Are you going to upgrade an existing Database, with existing projects? If so, then export that database and NEVER upgrade the original database. The key is to always leaving the original intact and untouched.
If our friend Dmitri had followed this first, simple rule then he wouldn’t have had a problem rolling back to his previous, working version of Resolve. Instead, he’s stuck using software that broke an essential peripheral – and is annoying the heck out him (and slowing him down).
B. Double check the Minimum Requirements for your drivers and Operating System, then update as necessary
Open the Read Me for DaVinci Resolve 15 and look for System Requirements. It’s at the bottom of the Read Me. Make sure every ‘requirement’ for that software meets your computer’s capability. Update accordingly. It’s shocking how few people on the forums ever double-check system requirements.
And it’s even more shocking how many people are in denial that their systems don’t meet the stated minimums. And then moan about it. If your computer doesn’t meet the minimum specs, then no one can help when the software doesn’t work. Complaining is futile. Just make plans for upgrading your hardware – or move on.
To save you a click, here are the new minimum requirements for Resolve 15:
Minimum system requirements for macOS:
- macOS 10.12.6 Sierra
- 16 GB of system memory is recommended and 32 GB is recommended minimum when using Fusion
- Blackmagic Design Desktop Video version 10.4.1 or later
- CUDA Driver version 8.0.63
- NVIDIA Driver version – As required by your GPU
- RED Rocket-X Driver 2.1.34.0 and Firmware 1.4.22.18 or later
- RED Rocket Driver 2.1.23.0 and Firmware 1.1.18.0 or later
Minimum system requirements for Windows:
- Windows 10 Creators Update
- 16 GB of system memory is recommended and 32 GB is recommended minimum when using Fusion
- Blackmagic Design Desktop Video version 10.4.1 or later
- NVIDIA/AMD/Intel GPU Driver version – As required by your GPU
- RED Rocket-X Driver 2.1.34.0 and Firmware 1.4.22.18 or later
- RED Rocket Driver 2.1.23.0 and Firmware 1.1.18.0 or later
Step 4: Back Up Custom / 3rd Party LUTs
If you follow my routine of NOT installing DaVinci Resolve 15 directly over previous versions then you’re going to lose any LUTs you’ve added to DaVinci Resolve. This is the time to open up the LUTs folder and copy its contents to a safe location. You only need to copy the LUTs you added, since Resolve will reinstall it’s core base of LUTs.

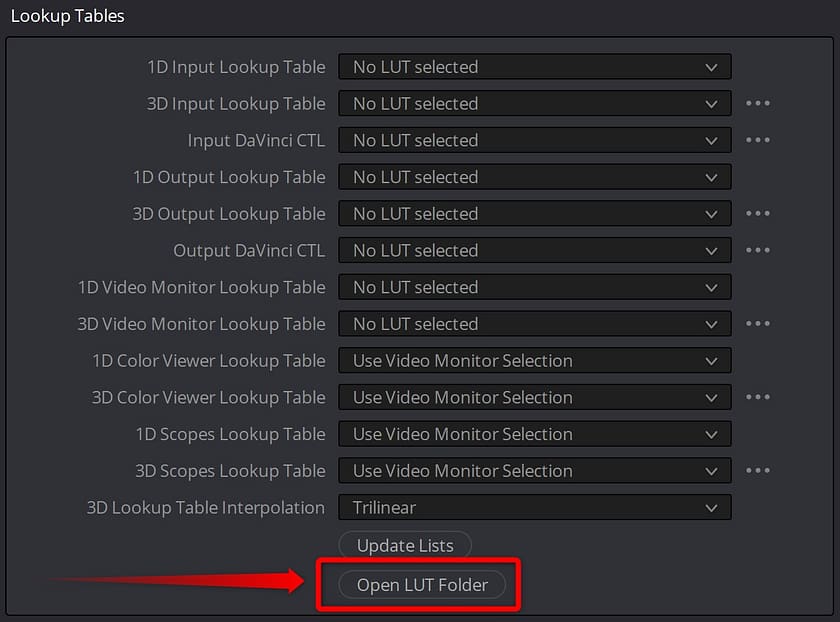
If you’re not sure where your LUTs folder exists on your system: Go Project Settings > Color Management and press the ‘Open LUT Folder’ button.
Step 5: Create a Power Grades Project (and export it)
On Mixing Light we’ve talked about migrating a Power Grade library for nodes structures you re-use (PowerGrades are one of the keys to being fast at DaVinci Resolve). But when you uninstall your current version of Resolve or create a new database (this Insight has you doing both) you lose access to those Power Grades.
To re-gain your current set of Power Grades at the end of this process you should first:
- Create a new project in the database with the PowerGrades you want to keep. Name it something like ‘My PowerGrades’
- Move the stills from your PowerGrade folder to an empty Stills folder
- Open the Project Manager window
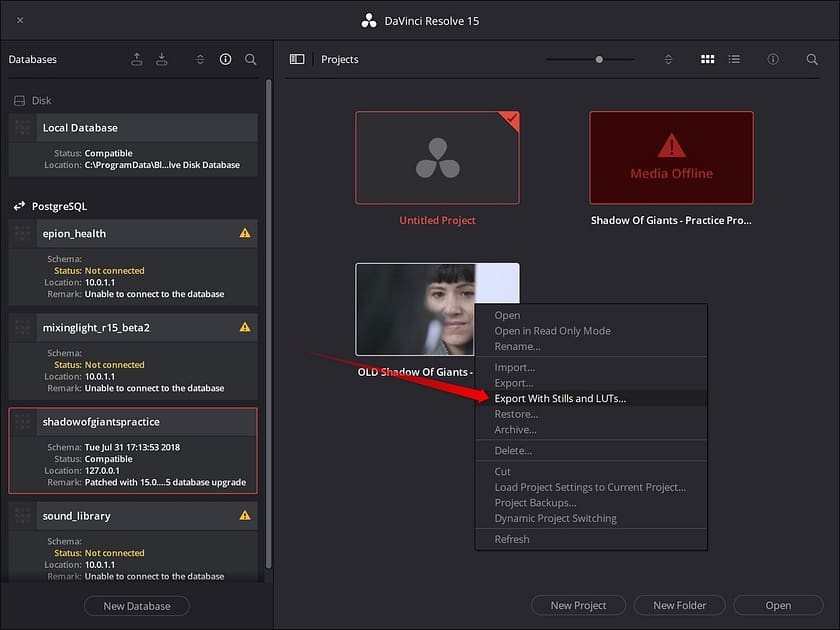
- Right-click on the ‘My PowerGrades’ project and choose ‘Export with Stills and LUTs’

The .drp you create in this Step is reimported into DaVinci Resolve 15 at the end of this process.
What about simply exporting your PowerGrade stills?
You can definitely do a simple stills export. But if you’ve neatly labelled all your stills, those labels get stripped when exporting. Using this method, you get to keep those names and save yourself a lot of time (and headache).
Step 6: Export your keyboard shortcuts
I always recommend customizing your keyboard. Each of us have our preferred commands and remapping them as shortcuts makes us faster and more efficient. But if you’re not careful, you’ll lose those shortcuts when updating to a new version of DaVinci Resolve.
To protect yourself, export your keyboard shortcuts and reimport them after installing DaVinci Resolve 15.
Step 7: Pat’s (Annoying) Installation Routine
I’ll point out a few overkill steps in this section – and why I do them anyway. But by now you need to make sure your computer is backed up, your essential drivers and operating system is updated, and your LUTs, PowerGrades, and keyboard shortcuts are saved off. Now we get to the really annoying part.
Just remember – this routine is designed to ensure HOW you’re installing the software update doesn’t create problems on its own.
A. Uninstall your existing Resolve build, using Resolve’s uninstaller:
Technically, this step is overkill. As Robbie has reminded me, DaVinci Resolve installers have always uninstalled existing software – before installing the new software. BUT – a few years ago I found some bugs from a bad installer that left behind old components, which caused crashes. So… my advice… don’t trust the installer. For the best experience and cleanest upgrade, do an uninstall using the existing uninstaller.
- On Mac: The uninstaller is located in the same folder as DaVinci Resolve in Applications > DaVinci Resolve
- On PC: Go to Windows > Apps and Features, select DaVinci Resolve and choose uninstall
- On Linux: If you need me to tell you, then stop right here.
I always uninstall the Blackmagic Control Surface app, as well.
B. Uninstall Blackmagic’s Desktop Video app (if you’re using Decklink or Ultrastudio gear)
This one is easy to overlook and you probably haven’t updated it in a while. But if you have Decklink or Ultrastudio gear, this is a good time to get the most recent version. And always reboot your computer after uninstalling the Desktop Video App. Low level components are always running after the uninstall. Before re-installing, a reboot clears them out.
C. Restart your computer
Why? Because sometimes, low level files get ‘stuck’ in RAM and don’t get overwritten by the software installer – and this can cause problems that the developers can’t re-create. I know it’s a pain… but I consider the restart a small price to pay.
D. Install the Blackmagic Desktop Video app & restart
I’ve always found DaVinci Resolve works most reliably if I install Resolve AFTER the Desktop Video app is installed and the computer is rebooted. So I install the Desktop Video app first, then restart, then I install DaVinci Resolve. It might be voodoo – but I’m sharing my workflow. And if you don’t own Decklink or Ultrastudio gear… skip this step.
E. Install DaVinci Resolve 15
Tip 1: Only install the components you need
In Resolve 15, not only can you install the SQL database items, Resolve 15, and the Blackmagic Control Surface App there’s now an option for a Fairlight Hardware Accelerator app.
If you don’t own a Blackmagic control surface and you don’t have any Fairlight hardware accelerators, skip those installs. Why give yourself unnecessary points of failure?
Once Resolve seems to be running well for you, you can consider installing those components in future updates.
Tip 2: Do NOT run two versions of Resolve side-by-side
Even if Rohit or Peter (the Lead Software Developer and Product Manager) tell you it’s okay to run Resolve 14 alongside Resolve 15 (which they don’t)… ignore their advice. Don’t do it!
Again, if the installer messes up or if the software gets confused because the two versions are side-by-side – you’re going to need to uninstall both and do a completely fresh install simply to troubleshoot it!
Focus on testing the functionality of your shiny new software and give up on the ease-of-use to switching to the earlier version of software. If you MUST retain an early version of DaVinci Resolve, then go the dual-boot method.
So, no. Do not run two versions of Resolve side-by-side no matter what anyone tells you (even if it’s also Robbie or Dan 🙂 )
F. Restart your computer
Restarting after installing Resolve 15 is one of those ‘overkill’ steps. But it’s a habit of mine that seems to minimize problems with the external Decklink cards.
G. Launch Resolve 15, create Or Restore a new database
Seriously, don’t update existing connected Databases straight upon first launch. Create a brand new one. Or if you’re working in an existing database restore it from a ‘.resolve.backup’ (if a PostGres database) or a ‘resolve.diskdb’ (if a disk database). THEN you can update that database to the new file format in Davinci Resolve 15.
Once again: You only update imported databases! Don’t update an existing database already connected to Resolve, in case you need to downgrade and want to use it in the earlier version. Database updates are irreversible.
You want to make it easy to roll back to the earlier version. And once rolled back, you want to be sure you’re running on the original database that you know is working.
Also, this routine verifies you had a good database export and if there’s a catastrophe with the export, you still have the original, untouched database.
H. Import your .drp’s into the new database
If instead of exporting databases you exported projects, now is the time to import those projects into fresh, new databases created by DaVinci Resolve 15.
Step 8: Add Your Custom LUTs
From Project Settings > Color Management, press the Open LUT Folder button. Place your custom LUTs back into this folder.
Tip 1: Don’t overwrite Resolve’s default LUTs in Resolve 15 with those same LUTs in earlier versions. If Blackmagic has updated them, then you’ll most likely want those updates.
Tip 2: In Resolve 15, LUT functionality has been updated. In fact, as detailed in this Insight, you can open the LUT folder and refresh that folder from directly in the LUT browser on the Color Page.
Step 9: Import Your Keyboard Shorcuts
I’m of two minds about this step. Resolve 15 has made big changes to how keyboard shortcuts are handled. It also updated many keyboard shortcuts to accommodate new features.
If you import your keyboard shortcuts from earlier versions then you alter Blackmagic’s approach to driving Resolve 15. And I think you may find yourself better served learning Resolve’s new shortcuts – modifying as you go.
But if you extensively changed your shortcuts – I can see (and accept) the argument that you want your custom shortcuts and don’t want to put in the time to re-enter them. So I leave this to you to decide how you want to handle it.
From here on out – it’s time to start working! Yea!
Part 2: What do you do with later updates?
What happens after you’ve successfully upgraded to DaVinci Resolve 15 and new updates are released? I generally follow these exact same steps. In other words:
- Don’t upgrade willy-nilly
- Set aside time
- Back up the important stuff
- Uninstall/reinstall the software
- Reload your usual resources
The once difference is how you handle backing up Databases
I usually skip exporting databases unless the new version of Resolve requires a database update. In that case, I follow the rule of never updating the original database; I’ll export the database, re-import it, and update the import.
But always back up your Projects before opening in a new version of Resolve
Traditionally, Resolve doesn’t update your Project files until you open them up. But once opened and saved, you’ve committed that project to the new version of Resolve. If you downgrade the software then the Project may act buggy. So always, always back up your Project files before opening them in a newly minted update of Resolve!
Now, enjoy the new software!
Seriously. Have fun discovering the new features and workflows. Use this time to crack open the Resolve 15 New Features PDF and look for the little things that might seem useful to the work you do. And then start working.
Addendum: Report crashes and bugs
Finally – if the software breaks on you, then report it. Don’t just moan about it on Facebook or Twitter. Don’t complain in forums. Contact Blackmagic and give them the chance to replicate and fix your problem.
How do you report crashes and bugs in DaVinci Resolve?
Easy. Before reporting your first bug, read this article on How To Report Bugs to Blackmagic. It’s written by the Product Manager for Resolve. If you follow the steps he outlines then you vastly increase your chances of having Blackmagic solve the problem (and maybe get back to you).
The primary way to contact Blackmagic is to use the DaVinci Resolve forum for reporting. They have a good track recording of responding to bug reports, assuming you follow the outline in the article on how to report bugs.
-pi


