| Series |
|---|
Step-by-step for legacy Resolve configurations
Do you struggle to move projects from Resolve to Resolve. Use memory sticks, constantly exporting projects or just don’t know how to move projects around? Upgrading and enabling DaVinci Resolve database sharing will change your life. At my company we have 4 Resolves and within 3 clicks I can open up any project from any machine and work on it. Even machines that are rendering!
This will work on the Mac, Linux and Windows platforms, I am using the Mac version for this tip.
This is a slightly more advanced Insight but I’ve tried to break it down into as many stages as possible to make it clear and easy to follow for you guys.
Update 2018: In Resolve 14 and later, database sharing has gotten MUCH easier using the Davinci Resolve Project Server app. Mixing Light is getting ready to do an Insight on using this app and we’ll add a link here when it’s live. If you’re running Resolve 12.5 or earlier, then you’ll need to set up your server using the instructions in this Insight.
Important: Please Back Up Your Database Before Trying This!!
If you need any help backing up please see the tutorial I created on backing up, Three Strategies for Backing Up DaVinci Resolve.
- You need the paid version of DaVinci Resolve to use the shared database functionality.
- You need to make sure you are using the PostGres database instead of the Disk database! It is the PostGres database server that allows multiple Resolves to share their projects.
Now, it’s time to get sharing!
Prepare to Share
Setting up a shared database in Resolve can be quite a scary prospect. But it can be a quick and easy process and provides you with great return on convenience and time-saving.
This is the most confusing part of the whole process. We will need to use Terminal to edit a file called “pg_hba.conf” This file decides if your database will allow in external computers.
Here is the extra fun bit. You can’t access this file using finder or edit it using notepad as it is locked to protect the database from getting damaged. The only way in is to use the Terminal, change to root user and use the VI Editor. I know the last sentence just dropped a lot of heavy words so I’m going to break it down a little further.
Enable the Root User
The Root user is an Access All Areas pass to your system. It lets you tell the OS “I’m the boss let me do what I want!” you will need to enable this on your system. The best place to go for this is Apple Support they have a guide on how to enable the root user on all recent os versions.
Opening Terminal and switching to the root user
You will need to change to your root user to gain access to the Postgres folder so lets start by changing user :
In your terminal type in the command
su
It will then ask you for the root user password hopefully you know this and if not please follow the steps from the link above, type it in and press return
You should then see the command line has changed from your username to
sh-3.2.#
Congratulations you are now the root user!
Finding The Configuration File
Now that we are the root user lets navigate to the folder containing the pg_hba.conf file
The file will be at the path : /Library/PostgreSQL/8.4./data
The easiest way to get to this folder is to use the following command:
cd /Library/PostgreSQL/8.4./data
To make sure you are in the right folder type in the command
ls
You should then see something like this:

Editing The Configuration File
This section is easier than you think but I’m sure not many people have used the VI editor before so it best to do this section slowly and carefully.
Lets open the configuration file. Use the following command
vi pg_hba.conf
You will notice that you have now opened the conf file and can read the text inside. The good news is you can ignore all of it and scroll down to the very bottom! To scroll down use the arrow key to move the cursor all the way to the bottom of the text until you see the line:
#IPv4 local connections
host all all 127.0.0.1/32 mdf

All we need to do is change:
127.0.0.1/32
To:
0.0.0.0/0
This changes the permissions from allowing local only to any IP address.
Changing into Insert Mode
Press the A key
This activates Insert mode and allow you to type and revise the document.
Change 127.0.0.1/32 to 0.0.0.0/0
Press the ESC key
The change is now accepted.
Press the : (colon) key
A : (colon) appears at the bottom of the terminal
Press the W key
Then press Return
The message “pg_hba.conf” appears.
Now lets exit the VI editor
Press the : (colon) key
Then press the q key
Then press Return
The VI editor is now closed.
Thats it!
Confirming Your Changes
To make sure our change has been written correctly run the following command :
cat pg_hba.conf
Do you see your newly edited line 0.0.0.0/00 applied? If so, close the terminal you are finished!
Connecting to your new shared database
Now that the hard work is done, it’s time to connect to this database from DaVinci Resolve. Follow these steps:
- Launch Resolve
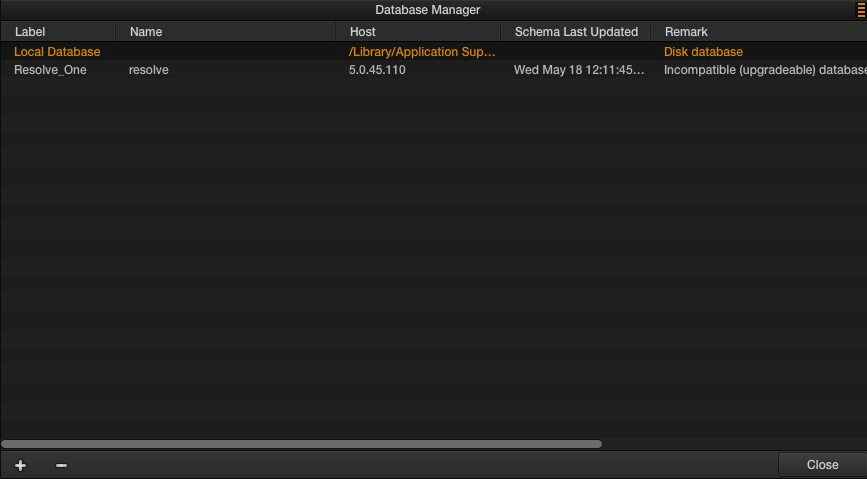
- On the login screen open the database manager (this is the stack of disks icon on the Project Manager page.
- Click the command to connect to a database.
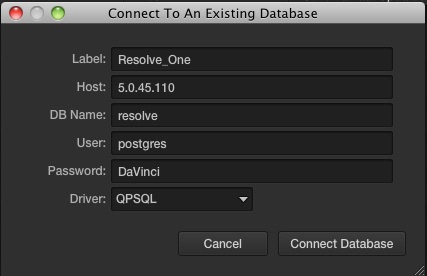
This will open your connect menu.

Here’s what these fields mean:
- Label field: This is how the database appears when browsing from your current Machine. We normally label ours with names and numbers like Resolve_1 and Resolve_2 for the main grading suites and Resolve_Assist_1 and Resolve_Assist_2 for our conforming mac systems. Feel free to use a naming system that makes sense to your team.
- Host field: Enter the IP address of the machine you are connecting to. In my case: 5.0.45.110 (yours will almost certainly be different).
- DB name field: This needs to match the name of the database you are connecting to. It is normally “resolve” by default. But if you have multiple databases you need to check the name of the database you are connecting to and then enter it here.
After filling out these fields, click Connect Database.
You are now connected!

Browsing Remote Databases
After connecting to your database you can browse, open, and import these remote projects.
This is probably some of the most difficult How To articles I have ever written. So congratulations to you (and me) on getting all the way to here. You’ve earned your new shared database system!
-Dan


