Team Mixing Light Note: We are pleased to welcome Scott Stacy CSI to our roster of Contributors, here on MixingLight.com. He kicks us off with a great article & video on creating a popular look using popular workflows. Please join us in welcoming him to Mixing Light, in the Comments below! You can find out more about Scott (and all of our Contributors) on our About Us page.
How do you grade underneath a Film Emulation LUT?
In this Insight, you’re going to learn how I grade with log controls and Printer Light Hot Keys under a Color Space Transform Node and film print emulation LUT. Or, you can bypass the LUT and use your own custom film emulation that you’ve saved as a PowerGrade.
The Journey
I underwent an interesting process when trying to establish a look for a film shot by Isaac Alongi.
My goal was to make Red footage look like Vision Color Print Film/2383. I have rarely used film print emulation LUTs. They’ve gotten a bit of a bad rap due to the potential for clipping and the contrast can be bit heavy.
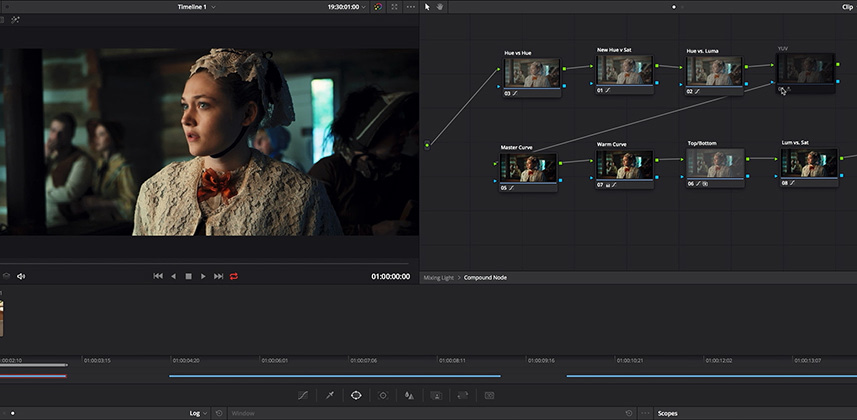
Because of these critiques, I embarked on creating my version of a Koji 2383 look by conventional means in Resolve. This involves using customs curves, hue, sat, and luma curves. Plus, YUV color space adjustments to effect luminance value shifts of the red / cyan and blue / yellow axis. When trying to go for a “near perfect” match then the YUV color space helps you get there. This color space can be a very interesting, creative place. But while it can get you close on the chart, it potentially introduces unpleasant artifacts under certain conditions. This is where one starts to appreciate the virtues of a film print emulation LUT. A solidly built film print emulation LUT, vetted by Jason Bowdach’s stress test, can be a very useful tool.
Now, a well-constructed PowerGrade can get you close to a film print emulation LUT. However, you will come up against some of Resolve’s limitations when trying to create the texture, contrast, and hues produced by a well-designed film print emulation LUT. In other words, high quality film print emulation LUTs are different than the questionable look LUTs you’ll find out there in the wild.
Down the Rabbit Hole
The task of trying to create a Koji 2383 print film look in Resolve is a rabbit hole. It has you pushing and pulling on multiple nodes to try and emulate the thousands of hue and contrast points. Given the number of variables contained in a film print emulation LUT, makes creating an exact replica in Resolve impossible from a technical standpoint. One tweak to dial in one correction can break previous accurate moves. If you’re a perfectionist, you will drive yourself nuts – and that’s what happened to me for a while. In truth, I wasn’t able to construct the PowerGrade to my liking prior to starting in on the grade below. So, I stuck with the Koji 2383 LUT and liked it quite a bit.
Occum’s razor: the simplest solution tends to be the right one.
I came back to working on the PowerGrade when I was done grading the project; and, here is where I ended up:


If you like, you can download my Koji-Inspired 2383 PowerGrade.
PowerGrade Production Sidebar
A couple weeks before I finished my PowerGrade, Juan Melara announced that he had built a Kodak-Inspired 2383 PowerGrade and was going to release it in a week. You can find that PowerGrade for download and watch his video on how to use it. I liked his design and sent my Koji-Inspired 2383 PowerGrade off to him for critique.
Juan ended up tweaking it into his order of operations and you can download his MixingLight-only version. Using Juan’s version involves employing the same method he uses for his Kodak-Inspired 2383 PowerGrade. Make sure you check out his video to understand his workflow and node tree design.
My design is a bit different than Juan’s and goes to show that you can get close to this look by various means. Be sure to digest the Read Me file with my download. Using my PowerGrade involves feeding it with a color space transform.
In the video below, when I get done with the shot breakdown I plug in my PowerGrade and we compare it to the standard Koji LUT.
Creating a Western Look: Let’s get to the Color grading breakdown Video
There are a couple of things to pay attention to in the video below that deviate from a traditional lift, gamma, gain workflow. Robbie has an excellent Insight that’s a great introduction to using log controls. Check it out as a adjunct to this Insight.
- Grading happens before the Color Space Transform and the LUT with log controls and printer lights. You can use lift, gamma, gain controls but they won’t work as expected. Grading before the LUT helps to prevent clipping, because you are working with contrast and a large amount of color manipulation as an end product of the node tree – small moves go a long way fast when you’re working under the LUT and transform nodes.
- Using log controls and printer lights have a very different feel and involve different techniques than traditional lift, gamma, gain and color wheel controls. If you give log controls and printer lights (the latter which use the number keypad when enabled) a try, you might be discouraged at first, but stay with it. These are good skills to learn. If you’re wondering how I’m manipulating the log controls using Printer Light Hot Keys, watch this Insight by Dan Moran. The ability to blend and position shadows, midtones and highlights and colors with Low Range/High Range log controls can add focused control over your image. Just know that Primary color wheels and lift, gamma, gain controls will apply wider brushstrokes of color/luminosity across the footage.
- I am using a Color Space Transform Node and converting Red footage to Cineon Film Log before the LUT. Using the Color Space Transform at the node level can allow you to use mixed footage (say Red and Alexa) and come to a very similar Cineon output to feed the LUT. There’s a slight difference between using a Color Space Transform Node prior to the LUT than just feeding the LUT with RedLogFlim from the raw tab. The Color Space Transform allows you to introduce a Rec.709 color space into the mix and this adds a bit of saturation that looks better than tweaking the traditional saturation control in a log space.
- You learn the benefits of using predefined node tree based on the hero shot so as to keep one’s order of operations consistent throughout a project. I have a few other default node trees that I use and I just turn nodes off that I’m not using. If I need to add a new node, I can just turn one on in the appropriate order of operations. This workflow keeps a project orderly and consistent.
- I find myself using the Resolve Face Refinement OFX a lot these days. So, we will look at how I used this tool in this Insight. Just remember, a little goes a long way.


