Day 19: 24 Insights in 24 Days New Year Marathon
You can now use Fusion to create ‘plug-ins’ for Resolve’s Edit Page
In this Insight, we re-visit – and build upon – a previous Insight about re-using Fusion setups. You can now apply these techniques in Resolve 17 and, effectively, create your own plug-ins for DaVinci Resolve.
Resolve 17 has a new category of effects called Fusion Effects which are effects created using, of course, Fusion. Fusion Effects may be applied to any clip in the Edit page. They can also be applied to stacked clips that are collapsed into a new ‘Fusion Clip’.
In this Insight:
In the embedded video below you’ll get a walk through of this process. The text is in this Insight is a recap and I provide more details that may be tough to get from the video.
- How a Macro was modified by editing the .setting file to make it into a Group for easy manipulation
- Use expressions and Paste Instance to link parameters together
- Create a new macro and check which controls will appear in the Fusion Effects tab of the Edit Page
- Assign a Layer number to each MediaIn node in a multi-layered Fusion Clip
- Save the macro into the Effect folder
1. It’s a macro within a macro, saved as an effect
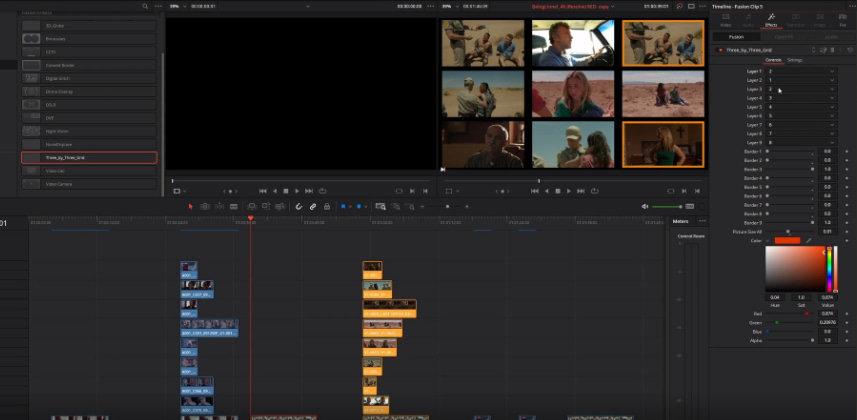
In the first example, we look at how to make a multi-layered grid of pictures (a kind of fake-Zoom screen set up) from stacked video layers in a timeline on the Edit Page.
After the Fusion Clip, you’ll see how to use a macro – which I made some time ago. You’ll also learn a very simple ‘hack’ (by opening the .setting file in a text editor and changing the macro from MacroOperator to GroupOperator) allowing you to see the tools within the macro.
The user macros are stored here:
Windows: C:\Users\YOUR_USER\AppData\Roaming\Blackmagic Design\DaVinci Resolve\Support\Fusion\Macros
MacOS: /Users/YOUR_USER/Library/Application Support/Blackmagic Design/DaVinci Resolve/Fusion/Macros
The expressions used in this example are:
Expressions (Size): 1/ceil(sqrt(n1))
Position (Center X): ( (1*n3)/2+( (n1-1)%ceil(sqrt(n4))+1 -1)*(1*n3) )
Position (Center Y): -( (1*n3)/2+ceil(( n1/ceil(sqrt(n4)) )- (1/n3+1) )*(1*n3) )
2. Connecting controls by linking parameters
Next, we add other tools for size control and tools to make a colored border for each layer. When you want to have parameters in one tool to be linked to those in another, you can do it in several ways.
- One quick way is to use a ‘pick whip‘ – create an expression and drag from the + sign over to another parameter in order to create the link. If you need to pick whip to a different tool to the one that you have selected then you’ll need to pin one of the tools in the Inspector so that the controls for both tools always remain visible there.
- Another way to link parameters is to use the Paste Instance feature (Shift+cmd+V). We looked at this in a previous Insight on Fusion’s 3D Camera. When you paste instances it means that any control in any of the pasted instances will affect that control in all the other instances. That is unless you specifically choose to de-instance a particular control.
3. Make a macro and save it as a Fusion Effect
Once you’re happy with the whole comp in Fusion, the next thing to do is to create a macro. It doesn’t matter that we already used another macro within this comp, that will get included in the new macro. The Create Macro tool lets you select and name the parameters which you want to appear in the Edit Page Inspector. Once the new macro is created, it’s a good idea to add the macro back into the flow of your current Fusion comp – just to check that you’re happy with the tools it’s showing.
When you’ve made your macro you can then move or copy it from the Macros folder to the Effects folder in your system and restart Resolve. New in Resolve 17 is a folder for placing all the Fusion .setting files for custom Fusion Effects.
Windows: C:\Users\YOUR_USER\AppData\Roaming\Blackmagic Design\DaVinci Resolve\Support\Fusion\Templates\Edit\Effects
MacOS: /Users/YOUR_USER/Library/Application Support/Blackmagic Design/DaVinci Resolve/Fusion/Templates/Edit/Effects
4. Creating and applying multiple Fusion Effects
In the last part of this Insight, you’ll see how to build a sphere as a quick example of how to apply multiple Fusion Effect simultaneously.
Final thoughts and two more things…
I’m interested to see how this new Fusion Effects feature is going to be developed by the Resolve community? I think we’re going to see more and more 3rd party Fusion Effects made this way. And another good thing? Any user who can use Fusion can now build out their own Fusion Effect.
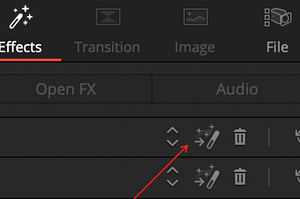
1. It’s also worth mentioning what happens if you push the magic wand button (on the Effects tab in the Edit Page’s Inspector) of a clip with a Fusion Effect applied…
… the Fusion Effect is opened in the Fusion Page. It can be quite handy for trouble shooting (but may be of limited use in some situations if all it shows you is a single macro tool).
2. Are you interested in learning more about writing expressions? A good resource which I’ve used for some of the syntax used in Fusion Expressions is page 500 of the Fusion 9 Fusion Tools manual, available here: https://documents.blackmagicdesign.com/UserManuals/Fusion9_Tool_Reference.pdf
NOTE: The new Video Collage Resolve FX in Resolve 17 now makes my ‘Grid_Transform’ much less useful! But it’s still good to know how to make your own tools, whatever they are.
NOTE: Premium members can download my example .settings files. The .zip contains: Grid_Transform (Macro), Three_by_Three_Grid (Macro/Effects template). 360Globe
Member Content
Sorry... the rest of this content is for members only. You'll need to login or Join Now to continue (we hope you do!).
Need more information about our memberships? Click to learn more.
Membership optionsMember Login
Additional Downloads
Sorry... downloads are available for Premium Members only.
Become a Premium Member


