Screwing Up Footage Can Be Fun!
As a colorist, you’re probably used to trying to get footage to be as crisp, clean and as perfect as possible!
Understandably, when a client asks you to create something like an old, beat-up looking TV look for a recreation or a surveillance scene in a project, you probably turn your nose up a bit.
But trust me! Making footage look terrible is really fun!
I work on a lot of cable tv shows that feature a lot of recreations and thus the need for this type of look.
While in recent years I’ve been using 3rd party effects for this type of thing, this past week I was working on a project where the client didn’t like the ‘over-processed’ nature of some of my go-to 3rd party tools.
Instead, the client, in a round about way challenged me to create a “Bad TV” look with a little elbow grease and the built-in tools that I had in Resolve. So, what I’d like to share with you in this Insight is a bad TV look with no 3rd party effects.
While Dan has covered some of these techniques in various look Insights that he has done, I thought I’d offer up my take for the essentials of creating a Bad TV look that you can, of course, adjust to taste, and to the specifics of your project.
Blanking, Cropping & Positioning
With the idea in place that you’re attempting to add problems to a shot to create the bad TV look, the first place that I start is with blanking cropping and positioning.
Have you ever digitized something off tape or received footage with thin black lines on one of the sides of the image or on top or bottom?
That blanking is perfect for creating a Bad TV look. Creating that blanking is simply either by using your positioning controls on the edit page or adjusting input sizing.
This small adjustment gives the audience the feeling of an unaligned bad video signal.
While blanking is useful when I think of a Bad TV look or something like surveillance video I think 4×3!
In Resolve, there are few easy ways to create a 4×3 look
- Output Blanking – Choose Timeline > Output Blanking and then 1.33. The downside with this method is that it will affect everything in your timeline, which is not ideal for most projects.
- Output Sizing – Really the same thing as choosing Output Blanking from the timeline menu, but if you want manual control simply type in 1680 for right edge blanking and 240 for left edge blanking (assuming 1080 timeline).
- Cropping Controls – Selecting a clip on the Edit page and opening up the Inspector reveals the cropping controls. To create a 4×3 crop on 16×9 timeline type in 240 for both the left and right crop.

Remember, using the inspector, you can crop with multiple clips selected. Creating a compound clip (nest) is also an easy way to quickly crop a group of clips.
Positioning, more specifically animating positioning slightly can also aid in the bad TV look.
Remember tracking from your old VHS player? That’s one kind of positioning animation that’s pretty easy to create with a few simple keyframes. Other snapping type movements can also help. I’ll show you a few I have in mind in the video below.
Split, Change Position, Combine
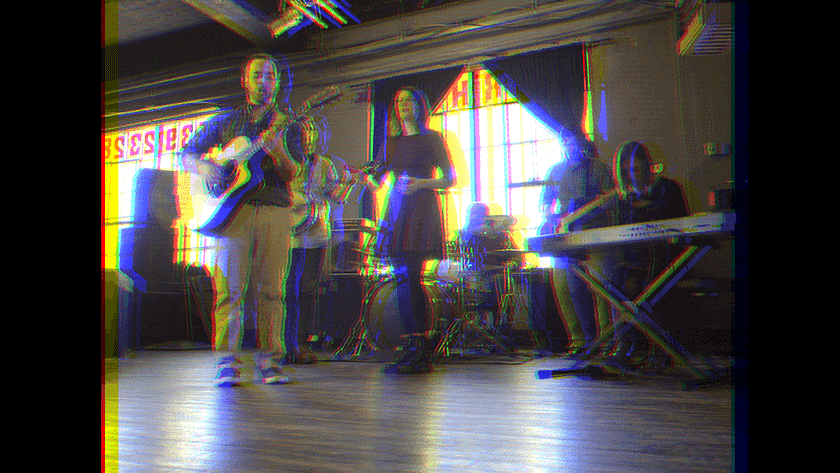
One thing that really sells the Bad TV look to me is RGB misalignment.
Think about OLD CRT projectors or tube cameras that have slight edge or separation of different color channels you can see.
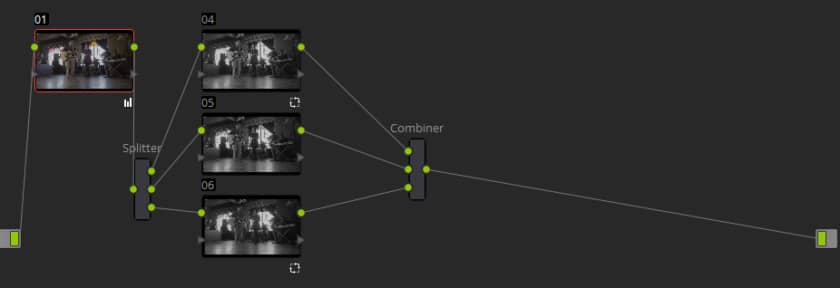
There are a ton of different plugins that provide this look, but you already have it built into Resolve with the splitter combiner node.
When you add a splitter combiner the image gets split into R, G, B channels that then end up getting recombined. The trick is scaling, positioning or otherwise altering one of the color channels before they’re recombined. To really sell the Bad TV look be sure not go super psychedelic, but rather shift color channels just slightly to create a bit of RGB channel blur.

There are quite a few 3rd party packages that can create a split effect for you, but knowing how to do it yourself makes the effect way more customizable, not to mention more fun.
When combined with the cropping there is one additional consideration about edges that I’ll explain in the video.
Adding On
After getting the building blocks of the Bad TV effect in place, the next step is to add on it to really make it work.
Here are some things that I usually turn to:
- Blown Out Highlights Or Crushed Shadows – Exposure issues help audiences buy into the Bad TV look, things that you’d normally shutter at all help with this look.
- Scan Lines – I used to work with a DP that loved getting up close to interlaced screens so those lines rolling (he’d purposely adjust the shutter to make them more noticeable). I think layered scan lines help this look at a lot.
- Macro Blocking – Another thing that helps the Bad TV look is macro blocking. Again, something you typically hate! Resolve 12.5 has a fantastic JPEG damage effect that you can use for this purpose.
Really, your imagination is the limit with the adding on – grain, blurs, etc., can all work. As always, just remember a little goes a long way and the story comes first.
Have a few ideas to contribute? Please use the comments below.
-Robbie
Member Content
Sorry... the rest of this content is for members only. You'll need to login or Join Now to continue (we hope you do!).
Need more information about our memberships? Click to learn more.
Membership optionsMember Login


