Update July 2018: Are you using Premiere Pro CC 2018 or later? The workaround in the Featured Comment below is covered fully in our new article, Permanently Adding LUTs To The Lumetri Color Panel: 2018 Update. We recommend reading that article for the most current workflow.
Update April 2018: It looks like Adobe has addressed the problem being solved with the ‘workaround’ in this Insight. But it only works with versions of Creative Cloud released in 2018. The workaround is at the Featured Comment, down below!
Get Fast Access To LUTs Without Having To ‘Browse’
As you might know, I’m a fan of the Lumetri Color Panel in Premiere Pro CC 2015.
It’s not that it’s the end all, be all tool for Premiere Pro users wanting to do color natively in their NLE – but it is a major jump forward by Adobe and how they can handle color correction tasks in their NLE.
There are some fantastic tools in the Lumetri Panel, but there are also some issues (excessive highlight/shadow roll off for example). With that said, one of my favorite features is how easy it easy it is to work with both technical & creative LUTs.
Built-In & Browse
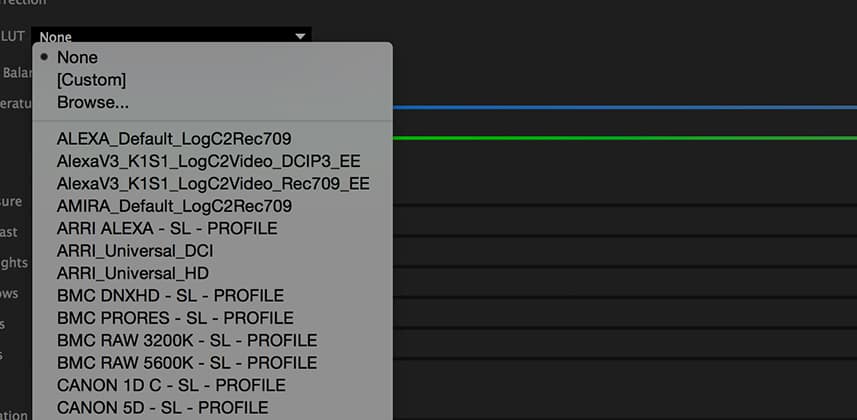
Adobe ships Premiere with many technical transform LUTs (found in the Basic section/Input LUT pulldown) as well quite a few creative LUTs (found in the Look pulldown in the Creative section of the Lumetri Color Panel). These LUTs provide quite a few options, but you’ll probably eventually want to use your own technical & creative LUTs.
No problem!
To use your own LUTs, you can simply click the Browse option in either section’s LUT pulldown and navigate to a LUT of your choice.
Here’s the thing – using the Browse option nearly every LUT (in a variety of formats, and a variety of sizes) works well. However, when you want to audition different LUTs, having to click Browse and then navigate to a new LUT of your choice can quickly become tiresome.
The solution?
Add your own LUTs (or those you’ve purchased) to the pulldown menus in the Basic Correction & Creative sections of the Lumetri Color Panel.
But how do you do that?
PLEASE NOTE: The methods described here aren’t supported at all by Adobe. They’ve been tested on a single workstation, using Premiere Pro only. Adobe stores LUTs in different locations, so simply adding your own to the locations noted may break interoperability with other Adobe applications. Please test this workflow thoroughly on your own system. You’ve been warned!
EDIT: October 2017. As Mixing Light member Paul points out in comments below when rendering to AME the LUTs would have to be located in the AME LUT folder as well.
The Work Around
The LUTs that ship with Premiere Pro and are accessible in the Lumetri Color Panel have to live somewhere, right? That idea got me doing a little investigating and I was able to quickly find them.
Mac: Applications/Premiere Pro CC 2015/Show Package Contents/Lumetri (note show Package Contents is a right/ctrl click option on the application itself).
Windows: C:\Program Files\Adobe\Adobe Premiere Pro CC 2015\Lumetri\
Once you’re in the Lumetri folder you’ll want to look for the Looks and LUTs folders.
As you’ll see in the video below, it’s a pretty straightforward process to add technical LUTs to LUTs > Technical.
But, when it comes to creative looks things get a bit more interesting.
The gist – any creative look you may have won’t work when added to LUTs > Creative!
You have to add creative LUTs to Lumetri > Looks > Cine Looks and then you have to keep in mind the LUTs have to be in the .Look format.
But…
Simply converting .cube, .3DL and other LUTs to the .look format with a LUT converter like Lattice doesn’t seem to work! At least for me.
I’ve only had success adding creative LUTs by ‘washing them’ through Adobe Speedgrade. What I mean by that is adding a LUT to a shot in Speedgrade and then exporting a new .look file.
What’s the difference between a converted LUT to a .look and one ‘washed’ with Speedgrade?
I HAVE NO IDEA!
I’ve tried various LUT sizes, Export vs. Save-As, and other techniques – only to have the same result. Very frustrating indeed!
My conclusion is that there is some sort of metadata being written in the .Look file by Speedgrade that a converter tool like Lattice doesn’t support.
Workflow Boost, But Not Perfect
Clearly, being able to add LUTs to the Input LUT pulldown of the Basic Correction section or the Look pulldown in the Creative section is a workflow benefit.
But the hoops you have to jump through (currently) to get your own creative looks to work in the Creative Look pulldown does make the ‘Browse’ option for creative looks a bit more attractive at the moment.
I’m hoping (and guessing) that this simply a programming issue with the Lumetri Color Panel – after all, you can browse to nearly any look you want – no matter the format.
If you are able to figure out a work-around other than the one I show in the movie below, PLEASE let me know by using the comments below!
– Robbie
Member Content
Sorry... the rest of this content is for members only. You'll need to login or Join Now to continue (we hope you do!).
Need more information about our memberships? Click to learn more.
Membership optionsMember Login


