
An Easy Way To Alleviate A Big Concern About Moving To Windows
This week I got an email from a new Mixing Light member who was busy watching, listening and reading her way through the Insights Library.
She asked:
‘In one of the MailBag episodes I listened to, you said you use a Mac as a ‘ProRes dongle’ when you’re working on Windows. Could you explain that a bit more?’
I’ve used that phrase quite a bit over the past year or so to describe a workflow(s) for rendering ProRes from a Windows machine.
Up until Resolve 12 & 12.5 what I meant was opening up a Resolve project on a Mac and render to ProRes from there.
This is a simple workflow that benefits greatly from a shared SQL database as well as shared storage accessible to the Windows machine and the Mac.
While I still occasionally work the way I just described, Resolve 12/12.5 Studio (feature not available in the free version) has a feature called Remote Rendering, which makes this workflow more streamlined. I want to show you how to set this up in this Insight for the purpose of using a Mac for ProRes rendering.
What You Need
First and foremost, you’re going to need two dongles to run Resolve Studio on two different machines.
As of this writing, remote rendering is not a feature that is available on the free version of Resolve.
Only Resolve Studio supports collaborative features like remote rendering because it supports the use of shared SQL databases, which make those workflows possible (more on that in the next section).
Your remote rendering machine should also be capable.
In other words, the machine should be set up according to the BMD configuration guides.
Don’t get me wrong – you don’t need to replicate your main workstation, but don’t try using a 5-year-old Mac Mini either, unless you like slow slow slow renders.
While remote rendering is not limited to the Mac platform (you can use a Windows box too), obviously to get native ProRes encoding (without other 3rd party software) you’ll want this machine to be a Mac.
In my suite, this is the latest generation 5k iMac with the top video card and 32GB of Ram.
Benefits Of Shared Storage & Databases
While you could get away with exporting and importing projects between two local databases – that’s a pain.
Syncing media up between two machines is in a similar fashion, can sometimes be troublesome.
To really get the benefits of a remote render workflow you’ll want a shared SQL database setup – which I’ve previously detailed HERE.
You’ll also want shared storage.
Right now, my facility is using a 10gbE solution from Small Tree. It works well. If you’re new to the shared storage game, take a look at friends of Mixing Light Luma Forge and their range of products as well.
The whole idea behind a shared database and shared storage is that the remote rendering computer has access to everything without you having to do anything fancy.
Projects open, media relinks and if you have saved render cache files to shared storage those will also reconnect.
Setup
Setting up remote rendering is easy, but it does probably mean you’ll have to use a few options you might not have used before.
The first place to start with a remote rendering setup is with the remote machine itself.
- Start Resolve – make sure you have the shared SQL database loaded that contains the project you want to render. Also, be sure that the remote system has access to the media and or render cache files used in the project.
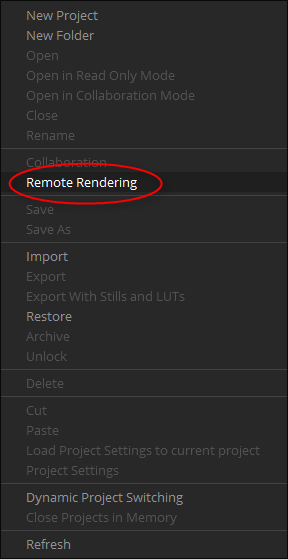
- Don’t Open Any Projects – the ‘old’ way of using a secondary machine for rendering was to simply open up the project on a different machine. To enable remote rendering, right-click in the gray area of the Project Manager window and choose Remote Rendering from the contextual menu.
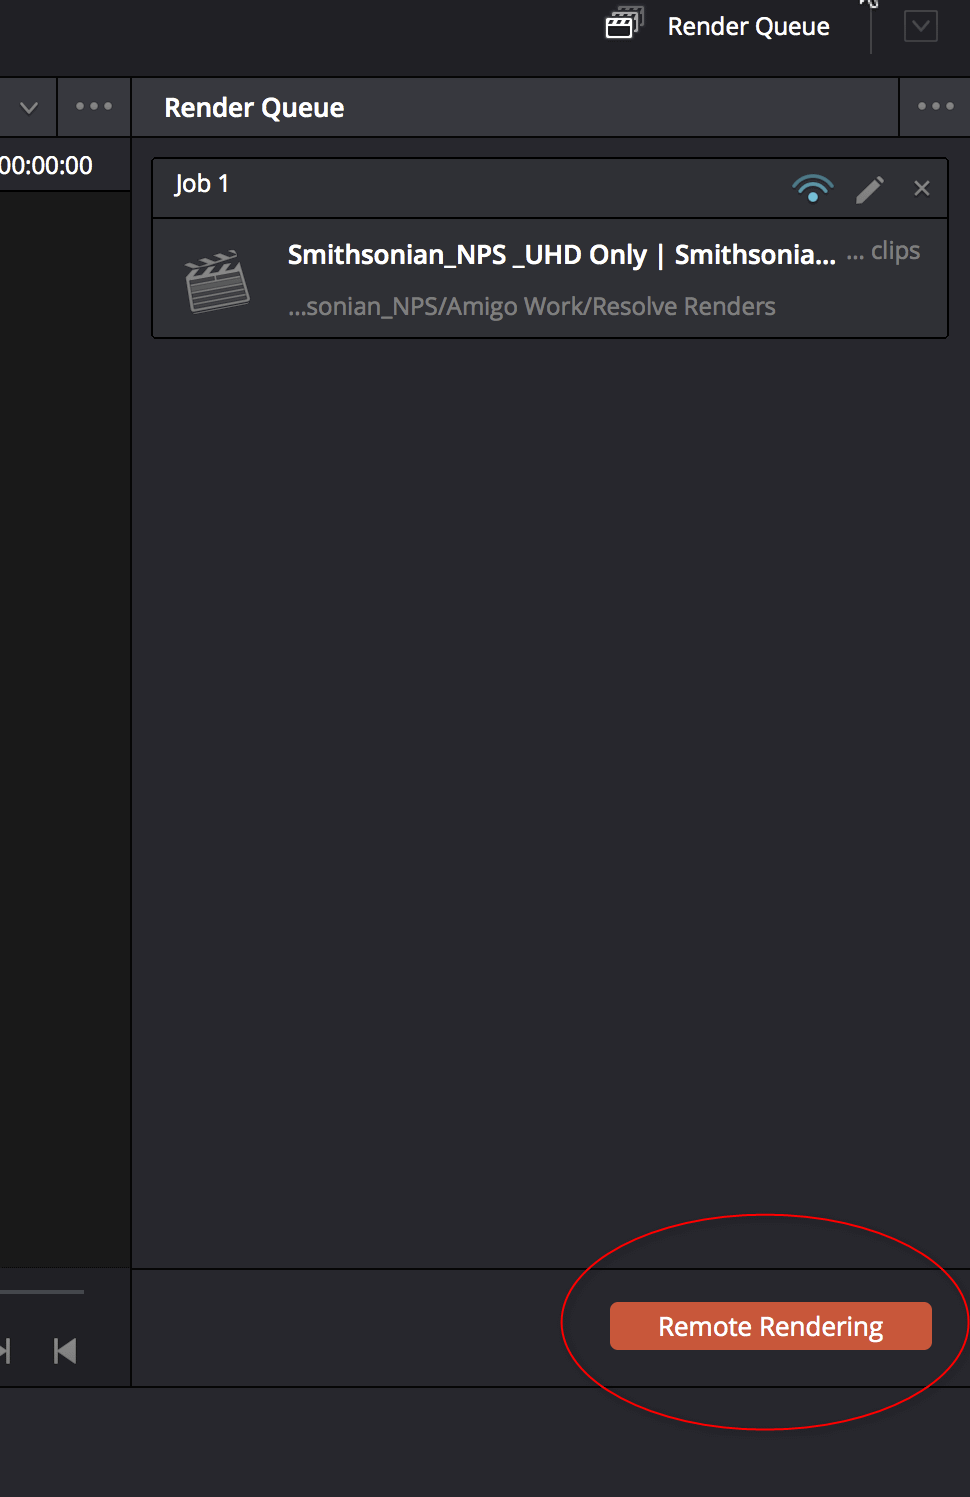
- Yes, it’s a simplified interface – after choosing the Remote Rendering option, Resolve opens directly to the Deliver Page and that’s all you can get to! Other Resolve tabs and pages are inaccessible. You’ll also notice that where the Start Render button is usually located, there’s now a bright Red button labeled Remote Rendering. This obviously lets you know you’re in Remote rendering mode
Next, let’s configure the main Resolve workstation for Remote Rendering.
After opening up Resolve and the project you want to work on/render, head over to the Deliver tab.
- Viewing Additional Render Formats – since for the purposes of this Insight we want ProRes rendering initiated from a Windows machine, you won’t, by default, see any ProRes options if you choose QuickTime as render format from the Windows machine. Clicking the sideways three-dot menu (panel menu) at the top of the render options panel will reveal an option to show additional render options on remote render machines – in this case, that means all the flavors of ProRes.

- Enable Remote Rendering – After configuring your render options including choosing ProRes for the remote render, add the job to the render queue as you normally would. The job will appear in the Render Queue. Have you noticed that little radar button a job in the Render Queue before (it looks like a WiFi icon)? Clicking this button will let you choose an available machine on your network for remote rendering. Choose the machine you’ve set up to be the Remote Rendering system.
- Submit The Job – Once you submit the job a couple of interesting things happen – first your main workstation shows the progress of the render in the Render Queue, but unlike a normal render you won’t see frames fly by. Actually, you can continue to work on the currently open project or any other project you want. The render tasks are now completed by the remote machine. When you hit submit the remote machine also springs into action. The project is opened on that system, a job is added to the Render Queue and the project starts to render based on the settings you chose on your main workstation.
Pretty simple right? It is.
As I mentioned before, the simplicity of this workflow really depends on shared storage and obviously a shared SQL Resolve database. If everything is set up correctly this workflow is seamless.
It’s also worth mentioning, a remote rendering workflow can actually get cooler!
A few weeks ago I wrote an article about using Bit Torrent Sync and a VPN to facilitate remote workflows (grading at home, but still accessing media and databases that I use at work). Well as it turns out when using the VPN I can get all the same benefits of remote rendering that I do in the office.
What I mean is that I can, through my VPN, access my shared SQL database in the office and because I’ve synced media via bit Torrent Sync and have set up the proper mount mapping in Resolve, I can actually fire off jobs at home to render at the office or vice versa. The workflow benefits are really nice.
Running Headless
As I mentioned in the steps in the previous section, setting up a remote rendering machine opens Resolve into a remote mode.
But one very cool way of working with a remote render machine is to set it up headless. If you’re not familiar with the term headless it basically means that Resolve can run in the background with no UI present.
There are lots of reasons to do this, but for me, it just streamlines the process and it’s always nice for my Mac to be a little less UI cluttered.
Huge hat tip to my good friend, soon to be Mixing Light contributor & frequent collaborator Joey D’Anna for documenting these steps.
Here’s how you set up Resolve to run headless:
On a Mac, open a terminal window and run:
/Applications/DaVinci\ Resolve/DaVinci\ Resolve.app/Contents/MacOS/Resolve -rr (yes, the forward & backward slashes are correct).
After entering this command you will see the Resolve icon bounce in the Dock, but there will be no UI window, and the machine will be available for remote rendering. Also, the Terminal window will display a string of commands letting you know that Resolve has been launched (see screenshot).

Just keep in mind if you close the Terminal window or quit the Terminal app you’ll kill the process – meaning you’ll also quit Resolve.
On Windows (yes I know, this Insight is about ProRes rendering, but this can come in handy!):
Right-click on the start menu and choose Run, then type “cmd” to open a command prompt and run:
“C:\Program Files\Blackmagic Design\DaVinci Resolve\Resolve.exe” -rr (don’t forget the quotes – the Windows command line isn’t so smart with spaces in filenames.)
On Windows, you basically get no feedback showing Resolve is running!
The Command Prompt doesn’t tell you anything, and no windows or dialogs appear & nothing shows up in the Task Bar – but if you look in Task Manager you will see Resolve.exe running, and the machine will be available for remote rendering. If you’d like to quit the background version of Resolve, simply end the process from the Task Manager.
One more thing!
I mentioned if you quit the terminal on the Mac you’ll also kill the process, thus shutting down Resolve.
That’s why I prefer to run the background renderer inside a screen session, which lets it continue to run even if you close the terminal you started it from.
To run Resolve in this manner, when you launch the Terminal, type screen.
After reading about how awesome ‘screen’ is, press return and then run the Resolve -rr command detailed above.
Then you can close the Terminal window (or quit the Terminal app) and the session (as well as Resolve) will continue running in the background.
You can quit Resolve from the Dock or the Activity Monitor.
Limitations
Remote rendering seems pretty cool and useful, right? It is! But there are a couple of limitations you need to take note of.
Probably the single greatest potential limitation is the CPU/GPU power of the remote rendering machine.
In my studio, my remote rendering machine is the latest generation 5k iMac. While plenty powerful its 4GB GPU is still kinda crappy compared to 4 Titan X in a Cubix of my main rig. So tasks that are done at render, like full quality debayer, full quality sizing, or normal rendering tasks like noise reduction (assuming you’re not using a shared render cache) can be significantly slower.
To give you a real-world measure of this – last week did a test rendering a 24 min broadcast show on my main rig with no render caching – ProRes 1080i60 source. I got 100-130 frames consistently on rendering and the whole timeline took about 6 or 7 min to render.
I remote rendered that to my iMac (remember shared database and shared storage) and that number was significantly slower. I got about 40-50 frames per second and the total time was just shy of the total program length. That’s a big difference!
The upside, of course, is that I can continue to work on other projects on my main rig as the project renders remotely. While the time difference with rendering is significant I have to say I haven’t been terribly bothered by it as I’ve been busy moving on to the next project.
The next limitation is OFX.
If you grade a project and are reliant on 3rd Party OFX then you’ll need to have those effects also on the remote render machine.
With Blackmagic adding more and more effects in every release there is less dependence on 3rd party tools. But if you use Neat Video, Film Convert, Boris FX and others then you’ll need to consider adding an additional license for your remote render machine.
A Local Render Cache Is Not Shareable
Like many of you, I often utilize a local render cache, writing to fast SSDS. If you do this as well, you need to consider the fact that render cache is not shared with the remote rendering machine.
What this means is that you’ll either need to render without reading from the Render Cache files or you’ll need to re-render the render cache to a shared location.
While I love my fast local render cache drives, I’ve recently been rendering my cache files back to my shared storage so I don’t run into this limitation and so that I can read from the cache file(s) for much faster rendering on the remote machine.
Closing Thoughts
Also, be sure to check out the video below where I put (most of) this into action.
As always, if you have questions or something to add to the conversation please use the comments below.
-Robbie
