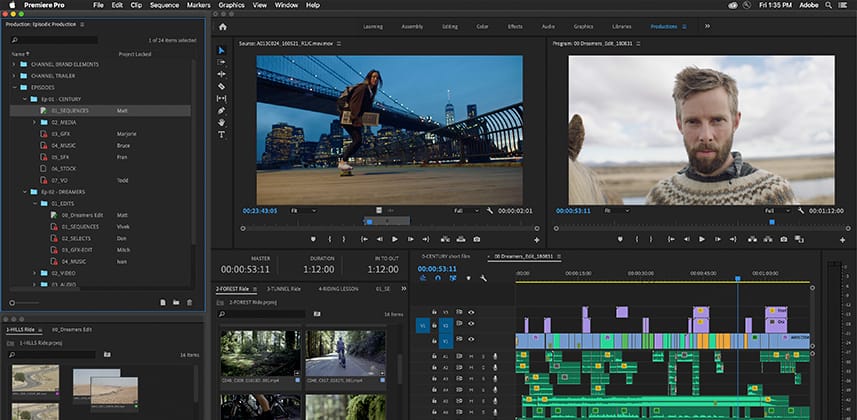
Beat The Project Bloat Blues!
Premiere has been noted for its difficulty in working with large projects that cause lag and unstable performance. Yet the number of ‘major’ films being edited on Premiere is jumping up quickly these last couple of years. Do the Hollywood folks know something we ‘regular’ users don’t? Or did they have access to something in Premiere we didn’t?
The answer to both questions is: YES.
Adobe’s newest version of Premiere, released April 14, 2020, includes Premiere’s new Production workflow. In this Insight, I’d like to provide you an overview of how Adobe is positioning Production and the essentials of how it works. In future Insights, we’ll explore in depth everyday workflows using this new functionality.
The Types Of Premiere Pro Projects
Before we dive into the particulars of Productions with Premiere Pro, let’s quickly recap and clarify the different types of Premiere Pro projects. It’s important to understand that though Production is a completely new way of working, the Production workflow doesn’t supersede other types of project workflows within Premiere Pro:
Stand-Alone Projects
The traditional .prproj file type
This is the traditional Premiere Pro workflow, where each project is completely contained in one .prproj project file.
Within the standard project, Premiere creates a ‘master clip reference’ for every individual ‘clip asset’ such as video clips or audio files used in that project. Everything Premiere needs to know about that asset from bit depth, frame-size, audio tracks/Mhz – everything – is tracked in the .prproj project file for each master clip reference. This includes the raw or source settings for raw media such as ArriRAW, RED, BRAW, and other metadata-dependent camera media.
The user typically organizes assets used in a project into Bins within the project itself. Bins are an internal organization tool and do not reflect any folder structure on the computer drives or storage systems. In reality, the more bins in a project, the more metadata the project file has to create and track for the organizational details of that project.
However – Premiere’s need to have a master clip reference within every project for each individual asset is problematic. Why?
- Resource Bloat: Project file size and computer resources – In Premiere stand-alone projects, every master clip asset used in a project loads into RAM (or, when RAM runs out, it also loads into “temp” cache files on disk). If there are thousands of different assets with master clip properties in a project … every one of those references gets loaded into temp files or RAM. If the project grows into tens of thousands of assets that is an incredible load on the computer – even before a single button is pressed. This is why it takes Premiere a significant amount of time to load a project file before you can start working. This causes poor performance and instability on large projects. There are workarounds for large projects, for example splitting them into smaller projects. But the moment you re-combine those projects for final delivery? Bloat rears its ugly head.
- Multi-project asset management breakdowns – On large projects that split themselves into different stand-alone Premiere projects, re-used assets can be a headache. What if one project changes the master clip data, but another project doesn’t change the master clip data for the identical asset? When those projects are combined, which metadata change should supersede? How do you get master clip data changes rippling through to the various stand-alone projects that reference that asset? (Answer: You don’t.)
The strength of the stand-alone .prproj is its simplicity. On complex projects, that’s also its downfall.
Team Projects
.prproj files in the Cloud, for collaboration
Adobe created the Team Projects workflow to allow users in different locations to collaborate in a single project file. Essentially a Team Project is a specialized .prproj that is stored in a user’s Creative Cloud account. A project manager (or lead) creates a Team Project project file and adds assets to it while organizing the project via bins as if they were working in a stand-alone project on their own machine. The project file is stored on the CC Cloud, and the master clip asset references are all linked to the media on the project manager’s machine.
The project manager then delivers the media and all other assets to other users via file transfer, shipping drives, or shared CC Libraries to all members of the Team. Then the manager uses an option in Team Projects (TP) to invite others to join that particular TP by messaging via their Adobe ID. Every invited user can access the Team Project via their CC Cloud account. But all media and other assets for that project must be linked to media and assets that are stored on each artist’s machines, locally.
There are very specific requirements for every user to either replicate the original file structure on disk or use the Team Projects asset location tool which will link to the assets on their local machine.
- Team Projects is a very slick process for many small to medium jobs – Multiple users can work within the project simultaneously, and ‘push’ their work up to the Cloud in new versions. The process for accepting changes or creating alternate versions of sequences, for example, is very robust and stable. I have worked with an editor/VFX/audio artist from Capetown, South Africa on several projects. We tried pushing multiple versions at each other as fast as we could trying to ‘break’ the change/versioning system, but we couldn’t.
- Team Projects is very useful for collaboration with others NOT in your facility – Mo (my Capetown artist) and I could form a production company working from Oregon and Capetown and collaborate seamlessly together using Team Projects.
- Media management is a pain-point for larger projects/teams – Yes, shipping boxes of disks or maintaining constant streams of modified media forth and back via file transfer services is painful.
- Team Projects do NOT solve project file bloat and slowdown – Teams has the same issues with project file size as stand-alone project files do. Teams just allows stand-alone project files to exist remotely with multi-user access control.
Team Projects is a very useful collaborative tool especially for small to medium projects with users from around the planet. But it’s not a solution for Premiere’s dreaded Project Bloat.
Production Projects
.prodset manages many .prproj files for enhanced stability and local collaboration
Adobe has a ‘Hollywood’ production team – as you may have realized if you’ve seen any live or online presentations by Karl Soule. Karl has explained that the Adobe development team spent time working in-house and along-side several productions doing long-form movies.
In combination with those creative teams, Adobe created specialized meta-tracking and other processes that were needed for these massive and complex projects. In doing this work, Adobe realized it had to come up with a completely new process to serve these clients. They had to find a way to get away from the file bloat, lagging, and instability issues with stand-alone Premiere .prproj files.
Enter, Production.
This workflow is new for us ‘general’ users but is being used by Adobe’s in-house Hollywood team. Production has been battle-tested by several major films. Terminator: Dark Fate and Dolemite Is My Name were both produced with versions of Productions. Mank is currently using this new workflow.
The Production workflow is completely new and represents a totally different way of working with Adobe Premiere Pro. This new process pushes most of the asset metadata management from within a .prproj project file into what’s known as the Production Folder Structure and its .prodset file. A single Production can have multiple individual .prproj files which themselves refer back to the Productions .prodset file for understanding the assets in each .prproj file.

Here’s the concept:
- When you create a new Production project, Premiere creates a new folder on your hard drive. That ‘production folder’ contains the .prodset file.
- You organize your assets by adding folders and subfolders to the Production project. All subfolders created in a Production panel (within Premiere Pro) also creates those folders on your hard drive, mirroring the Productions panel.
- You create individual .prproj files by right-clicking a subfolder within Premiere and adding it. A new Premiere Pro project file is created on your actual hard drive, in the same subfolder as viewed in the Productions panel.
The previously single controlling .prproj project file that contained an entire project is replaced by the Productions workflow, with a Productions panel within Premiere Pro that mirrors its structure on your hard disk.
All the organizational work of the project is now done in a Production’s panel. Adobe even recommends that users discontinue creating bins for organization purposes and simply use this new folder/subfolder structure!
Within the Productions structure, folders are for organizing the overall project. Project files … the old .prproj files … are used like bins for storing assets and sequences.
Yes, you read that right.
In the Productions workflow, Project files are used like bins for organizing assets and sequences. Not storing, well, an entire project!
And at first, it’s confusing. In fact I had to re-think how I thought of the terminology. When dozens of projects are created to replace bins you end up with projects here, projects there, projects everywhere! … I was initially SO confused and you might be at first too – but hopefully this Insight will bring you some clarity.
After working with Productions for a while, I realized … if I gave up the old ways, if I gave up the old terminology and mental concept of a project … and instead thought of a Production NOT any single project file as the job. Guess what? Productions work just as Adobe intended!
Why Is Production A Big Deal?
In short, Production represents a radical change/addition in the way that Premiere can track and work with multiple project files and all their assets. Individual Premiere Pro projects can now track the presence (and use) of media and other assets within a Production folder.
Here’s Adobe’s example of a typical Productions folder, with a Finder (Mac) view of that same folder on disk:
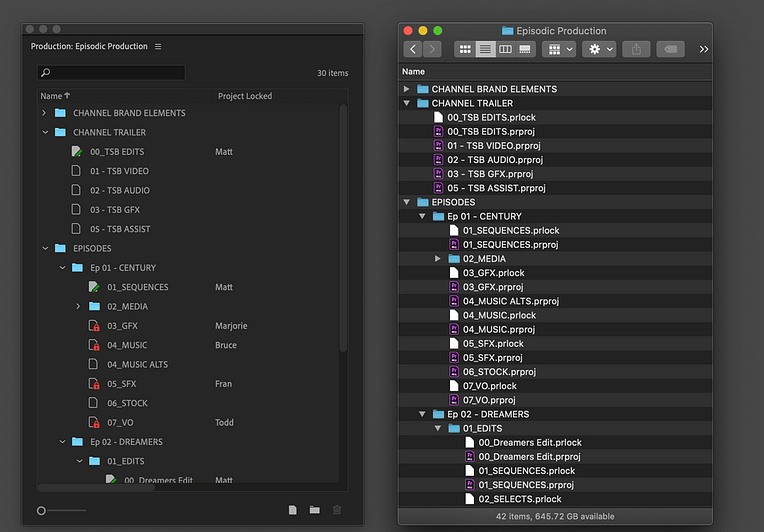
The key to utilizing Productions is understanding the massive paradigm shift this brings to working in Premiere.
In current ‘stand-alone’ projects, Premiere uses a ‘master clip’ for all media used in a project in that project’s project file.
That ‘master clip’ is the reference where Premiere stores all the relevant metadata for that clip. It does this for every asset in the project. When you copy a sequence from one project to use in another project, Premiere copies those clip references into the second project. This results in a Premiere project completely duplicating all the asset metadata from the original project file into the new one (note: this does not duplicate media on disk).
In projects with a ton of assets … most professional work, really! … this is a huge headache because it causes project file bloat and a host of performance issues – which we discussed in the introduction.
Key Features & Benefits Of Using Productions
I’ve been testing Productions for the past several weeks. I think they’re an amazingly powerful new workflow. Let’s take a look at some of the great benefits of using Productions and some ‘gotchas’ in the sections below.
Memory Hog Days (May) Be Gone!
Remember how I said that Premiere loads all metadata from a project file into memory when it opens a stand-alone project. Adding more assets to a project forces Premiere to store more and more data into memory. The result is Premiere starts hogging RAM and starts caching files – not to improve editing speed but simply for storing data for immediate recall, whether you need it now or not.
Productions are different. It starts with something Premiere has never had … a linked folder on disk (shown in the image above)!
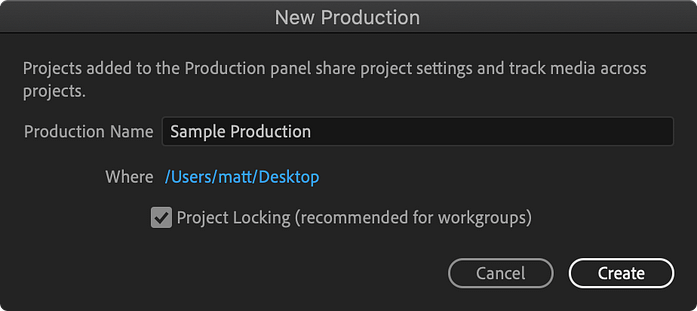
When you create a new Production via the File > New Production command, Premiere asks for a name and a location on disk. It creates a folder with that name, at that location, and that folder contains all future project files and folders.
This brings us to another radical change that resides within the Production workflow: Stand-alone Premiere projects only store the metadata of the media imported into it. If media from another project is added into a sequence, the sequence references back to the original project for Master Clip metadata. Master Clip references exist only once in a Production workflow/folder structure, they don’t duplicate themselves.
No More Dupes!
Dragging a sequence from one open project to use in another, within a Production folder, doesn’t import anything other than the requested metadata into the second project. This keeps individual project sizes smaller, faster to use, and the overall experience is much more stable and responsive.
Understanding all the implications of Master Clips is crucial in this new Productions workflow. But – knowing when you need to duplicate a Master Clip, and when you don’t, is important, since making a bad choice can screw up a project.
The Production Workflow: My Use-Case
Adobe’s also expecting this workflow will be used differently by different shops and users. From massive “Hollywood” projects down to individuals like me.
And yes, I’ve started completely rebuilding my Premiere practices around using the Production folder as the center of all my Premiere work. In the screenshot below you can see this is where I’m at from just a few minutes adding projects and assets into my Production folder:
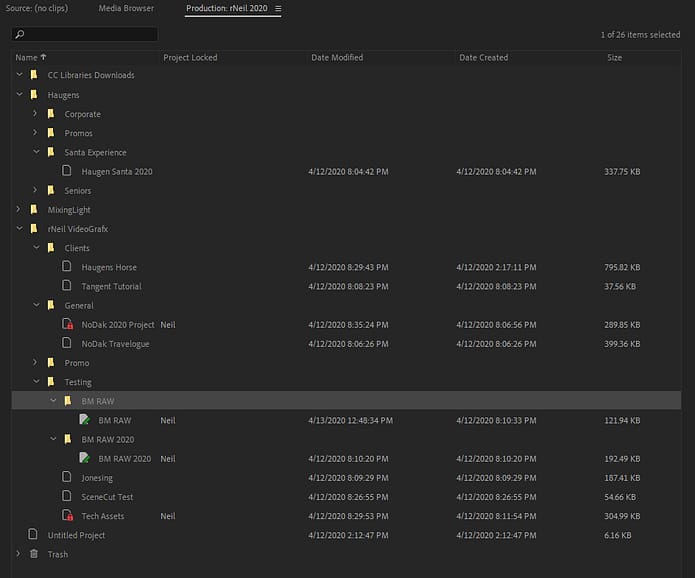
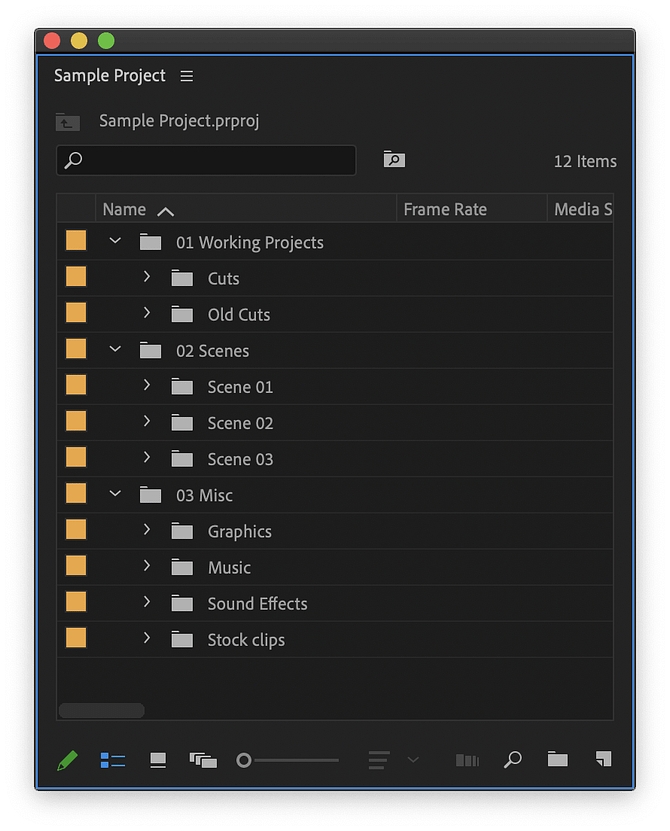
The yellow icons are all physical folders on the disc. The outlines are all project files that have been “added” to my rNeil 2020 Productions folder (the tab at the top of the Project Panel) by simply right-clicking and selecting ‘add project’. It provides a box to navigate to a current stand-alone project and copy that into the proper sub-folder of the Production folder.
As you can see from what I’ve started to set up here, I loaded work specifically from my wife’s portrait studio. I also loaded work from my own rNeil brand, some testing assets for the pushing of pixels, outside client projects, and my MixingLight work.
What I’ve done is to create one Productions folder for my work in the year 2020. Maybe I’ll make new Production folders for each “model year” of Premiere? Though I could easily create separate Productions folders for each of those clients. Or even, if the projects are large enough, a separate Production folder for each major project. But my standalone projects rarely get over 500 assets so I’m not worried about any of those choices – they all can work equally well for me.
Organizing Tips For Large Productions
Adobe’s main recommendation for larger shops, or those projects with thousands of assets, is to change the way you think through your project organization.
First, create a Production folder for each major project. Say for a season of an episodic show, or for each feature-length film or documentary you’re working on.
Then within that Production folder – make sub-folders for each major part of the project. You can, of course, create sub-sub folders to your heart’s content and organizing to make it work for you.
So for example, for an episodic show, a subfolder for each episode, and then within each episode, another set of subfolders for each act or scene. This will be reflected in the organization of the project on disk – meaning there will be a folder on disk for every folder you create in Premiere, holding whatever you put into that folder.
A Bin-less Workflow?!
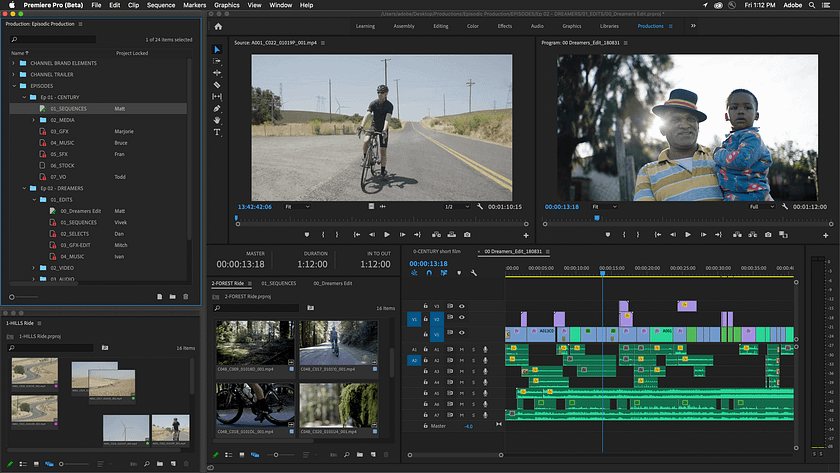
Adobe even recommends you rethink your bin layouts. In a Productions workflow, use projects as you previously used bins. As weird as that sounds, it is actually smart to use projects to hold individual asset types!
Right-click in a folder, create a new project, named as you would have named the bin, and import the media or other assets into that project. Look at the image above … not a single bin in sight!
This type of layout keeps the sub-projects from holding massive amounts of different media – which need to be loaded into active RAM. They are smaller and lighter to load and use. If you are working on the rough-cut sequence for Day 3, you are only loading the project files for Day 3’s media … not for every clip in the thousands of clips in every episode of the show. If you break the projects down further, they could select Day 3 Morning. Or just the ArriRAW of Day 3 Morning.
The smaller the sub-projects, the easier it is to mix and match them within the project you are working on at the moment – without slowing your machine down. Premiere can work with a very large total project list within a Production folder, with ease. Even on lesser machines that would have otherwise choked on such a bloated stand-alone project.
Work Simultaneously With Many Small Project Files, Rather Than One Massive One!
Interestingly, Production works even with groups of people accessing the same Production folders. This workflow is designed for a flock of editors and post-pros working on the same project using shared storage.
The first person opening a project file within a Production folder causes Premiere to put a ‘locked’ icon on that specific project – indicating that the project is ‘owned’ by the person who first opened it.
The image below shows the warning that a project is locked and by whom. The little yellow informational triangle is a “change notification”. It indicates that the person working on that project right now has saved new changes that you can choose to accept – and update your files as you’re working. Or not … your choice.
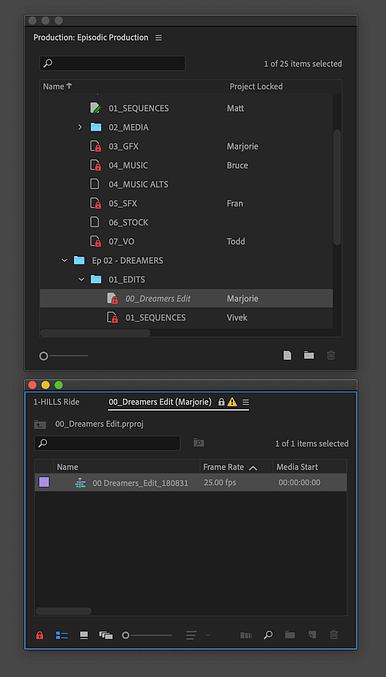
To accept the changes in that project, go to the Project icon line in the Productions folder, right-click “refresh project”. There is also a menu item for the Production’s folder three-bar menu by the Production Folder name, “refresh all projects”.
Do you need to grab an asset from a locked asset? Go ahead and just do it.
No one else besides the owner can change a locked project, but everyone can look at the project in read-only mode. Not only that, but they can also open a locked sequence, make a selection from it, and drag/drop that to a different sequence – without interrupting the other person. This behavior of grabbing media from a project that someone else has open (and is locked) is not only possible, but it is also encouraged behavior because that’s how Productions is designed.
Where Do You Save Your Production Folders?
If you’re running on a shared network, Adobe recommends creating the project on shared storage – NAS or SAN – and to use standard protocols like SMB. Films like Terminator: Dark Fate and Dolemite Is My Name and several other recent movies and TV show used productions on shared storage so that a team could work faster and more efficiently.
Also, keep in mind that with shared storage scratch files (the folders for captured video, video and audio previews, auto-saves, CC Library and Motion Graphics downloads) should be in the same folder tree as the Production folder.
BUT it’s important to note that cache files for each individual workstation should be stored on the local machine NOT the shared storage, for optimal performance.
Finally, one big gotcha, DO NOT place any assets of any kind in the Production folder itself, except subfolders. Save what you want in the subfolders only and leave the top-level Production folder only for those things that Premiere automatically puts in it.
Working On Client-Delivered Projects
Do you get Premiere projects from clients? The new Production option can work very well. Load the project and media onto your Production folder on your local drive. This has several major advantages:
- First, you’re not messing with the client’s project file … with their color labeling, or naming, or anything else. If you’re color correcting or finishing, it is often very helpful to start with the client’s labels and names. You can then change that metadata as necessary, leaving their original project file untouched.
- Second, much of the complex work done in Premiere takes stacking and layering of clips and effects. As Premiere Pro Expert Jarle Leirpoll suggests, why do that every time? Build your favorite stacks and layers once, then copy to other projects. Quickly replace the media involved and save a ton of time on the minutiae of that process (without worrying about project file bloat or memory problems). Doing this involves creating template projects and asset projects.
Helper Projects Speed Work!
With Production, you build all your ‘helper’ projects as individual named projects in a named folder/sub-folder structure, with sequences, graphics, whatever it is you’ve created within each named project. Then as you need to use something you’ve built before, go to the other project and grab it. Replace the media … and never worry about needing to eliminate the dupes! There are several steps that I’ll be teaching in the next few Premiere Insights here at MixingLight that will use saved bits of sequences in a Production file system.
But what happens if you’ve used some of your template assets in your client project? What if you access your audio library for some sound effects? Sure, you feel like you have a Digital Asset Management capability but how do you get that footage back to your client when you deliver the final file?
After you’ve completed your work and are ready to copy it back to the client’s drive, you can generate Master Clips in that project file. Copy it across and send it back to the client.
Productions Are Helpful For Solo Shops Too!
Beyond the use of large shops and productions, this new workflow is a massive helper for those of us with small shops. First, it’s a very good tool for just keeping your video post work organized on your computer.
Second, it means all your helper files, audio library, b-roll, etc is available for quick and easy reuse.
Third, I always hate doing all the organizational stuff I need to do to keep created assets available. Now, they’re organized for me by Premiere. For example, I don’t have to remember where on my drive I have my tech testing files. They’re in folders I can see without leaving Premiere!
Here’s what the workflow looks like with client-delivered Premiere projects in the new Productions workflow:
- You ‘add’ your client’s projects into your Productions project.
- Do your work.
- Then, generate the Master Clips to make sure the project file is complete for stand-alone use.
- Finally, you duplicate the project, copy and return to the sender.
Slick.
A Few Final Key Points
First, deleting anything from a Productions folder use is a two-step process. The first part is to move it to Trash in the Production folder. The second part is using Finder/Explorer to go to the Trash folder in the Productions folder and manually delete the contents. In other words, Premiere will add items to your hard drive but it won’t actually delete them. You need to do that, on purpose from outside Premiere.
Second, you do need to think through the settings for things like ‘color labels’. If the clip is stored in a project with the option ‘use color labels for all uses’ that color will appear in any other project it is used in. If you change that color in any project, that action will change the color of that clip in every other project it is used in. Remember, clip metadata is now centrally located for each clip. With this particular option, you probably want to consider turning off ‘use color for all uses’ (unless you want this behavior).
Third, the Master Clip options are crucial, as I mentioned earlier. Yes, the ‘sharing’ of Master Clip properties is an exciting by-product of this workflow. But it’s the proverbial two-edged sword.
You may well wish to change the Master Clip settings say of a RED or ArriRAW clip in one sequence but not another. By default, changing the Master Clip settings for a clip will ripple into in all sequences using that clip within a Productions folder. But there’s a work-around if this a problem.
Use the ‘Generate Master Clip’ command for any clip you want to change locally but not globally. Then you can change the Master Clip properties for that clip in that project only.
And Yes! Stand-alone & Team projects still work
You can of course still work in Premiere using stand-alone projects if you wish. There’s nothing forcing you to use the Productions capabilities. Nor is Productions capable of remote collaboration as is Teams. But since anyone with a standard Adobe CC license can upgrade and use Productions, give it a shot. It may revolutionize your Premiere organizational practices – and solve one of your biggest problems when using Premiere Pro.
Adobe resources
- YouTube: Adobe’s Karl Soule and Jason Levine livestream discussion of the new Productions workflow
- Adobe Help page: Using Productions in Premiere Pro
- Adobe’s downloadable PDF file: Using Productions (direct download)
– Neil

