Update
Hi everyone – Just a quick update to this Insight – Recently, Ubiquiti’s latest software update changed the look and feel of the new settings menu. All of the instructions below still apply – but a few things may be in a slightly different location. The bulk of the work is done in the ‘Classic Setttings’ menu – which remains unchanged in the latest firmware.
-joey
Building A Robust Facility Network
Whether you are working at a small facility, or even working at home – In the current world of computer driven post production, online review and approval, and tapeless file based workflow – IT and networking has never been more important.
If you are at a large facility or network – you probably haven’t had to think about networking, but for those running their own shops, working at small shops or even setting up a home system for remote work – having your networking and IT infrastructure in good order can make a huge difference.
Over the years I’ve managed the IT networks of post houses both small and large – but these days, I’m working almost exclusively from home. This means my network here has evolved from “just plug everything into the router that came with my internet connection” – to a hodgepodge of various equipment I bought as needed, and now finally to a tightly managed and setup professional network.
In this article I’ll walk you through how I’ve got my network configured – and along the way explain a lot of networking concepts important for post-production.
The Requirements
Before getting into any kind of networking – it’s best to sit down and think about what you actually need, so you can plan for everything. Take some time thinking about this stuff – because trust me, you will always forget something along the way. For my setup, the goals were:
- Integrate all networking components into the same ecosystem of products – so management would be easy and in a single place
- Move my shared storage from a series of direct connections to the NAS servers, to a switched high speed 10G network
- Have reliable, full WiFi coverage everywhere
- Separate my home network from the production network, both for management and security
- Guest WiFi – separate from everything so clients stay sandboxed
- Add security cameras to monitor outside and my machine room
- Add additional separate networks for some other specific needs (In my case – a dedicated network for lighting control of my house)
Thinking about it, its a big list! So I had to make sure the equipment I was buying was expandable and robust enough to handle all of that – plus anything I forgot along the way.
The Gear

So what did I buy? Well if you’ve talked to me about networking any time in the past year you won’t be surprised – I decided to replace everything with gear from Ubiquiti Networks. They are a relative newcomer to the networking world having been founded in 2005, but they have built an impressive portfolio of networking products. The biggest draw for me was that everything they make integrates tightly into a single management console – with all configuration, settings, deployment, and even firmware updates coming from one easy to use web-based management console.
I think you’ll see why I love the Ubiquiti ecosystem of products, and I feel having my network set up in such a robust way has helped me work faster and smarter. That said – these concepts apply to just about any managed switches/infrastructure – so don’t assume you need to re-buy everything you already own, or lock yourself into a single vendor!
Most managed switches will let you easily configure VLANs and link aggregation – you’ll just need to do it from that switch’s management page. VLANS, link aggregation, jumbo frames are all cross-platform concepts, they aren’t vendor-specific – so you don’t need to be locked into a single company or product line.
I also want to mention that I have absolutely zero relationship with Ubiquiti except as a happy customer. All of this gear was bought retail, with my own money.
Network Structure
When it comes to the actual structure of your network – where things are plugged into what – you may find that this is limited by factors like where you can run cable, where your internet connection comes in, etc. For me, that was definitely the case. In my house I have:
- A basement color suite, with an adjacent equipment room. The equipment room is where the internet connection comes in,
- A closet on the other side of the suite
- Cat5E home runs in every room of the house, that end in the closet in the basement
This meant a few things – I had to put switches both in my equipment room, and in the closet (which I now consider a networking closet) – to distribute network around the house – and I had to run cables between them. Luckily – my suite has drop ceilings so those runs weren’t very difficult.
Breaking It Down
So this is where I ended up. Keep in mind – I fully recognize this to be absolute, complete and total overkill. You likely won’t need this much gear. I just really enjoyed building out such a robust network – and I think it will be relatively future proof!

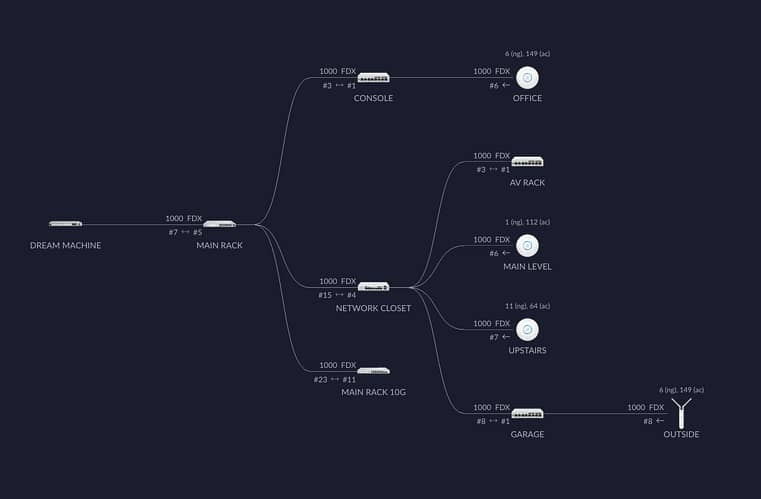
Going down the individual components, we have:
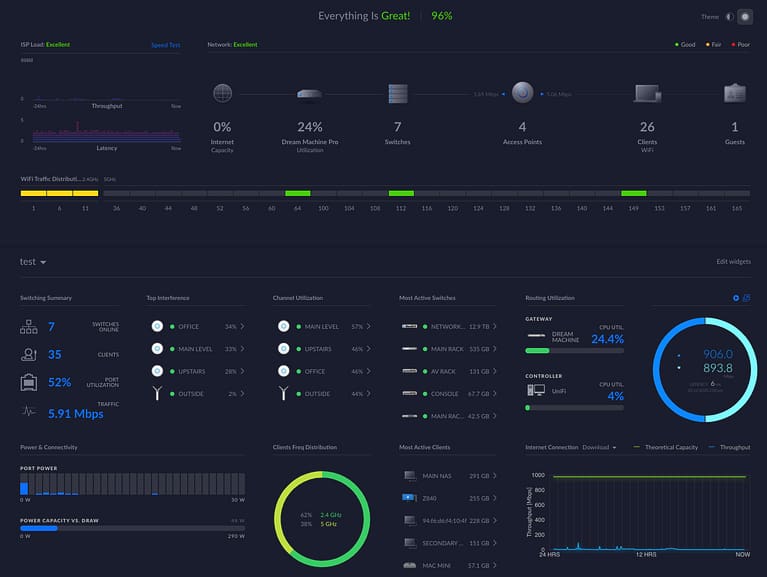
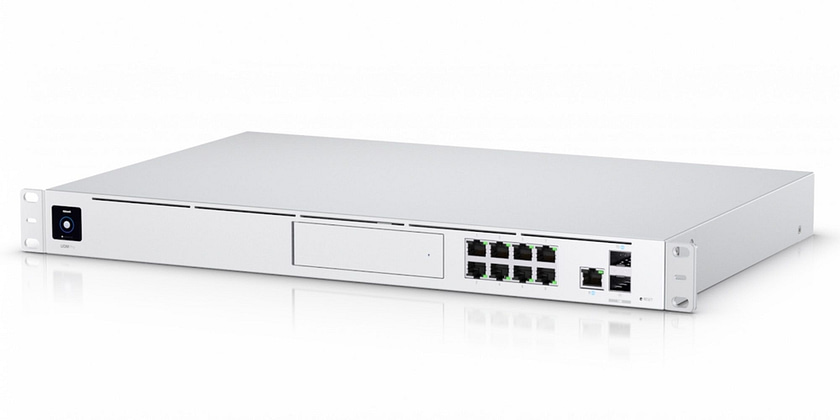
- The Unify Dream Machine Pro (or UDM). This is the main controller that manages the entire network, and where my ISP connection comes in. Everything starts here.
- The UDM then connects to a 24 port rack-mount switch in my equipment rack, where lots of other components are plugged into.
- A 10G switch connects to the 24 port switch, and then to all 10g capable components, like my 2 NAS servers, my VMWare server, and my 2 workstations and assist station. One important thing to know – this switch uses mostly SFP+ ports, which require transceivers to connect to RJ45 ports. These transceivers are manufacturer specific and won’t work in all types of switches, so make sure you buy the right ones! I used these from 10GTek, and they’ve been working well.
- From the 24 port switch, connections go out to a small PoE switch I have inside my desk, and to a bigger PoE switch in the network closet
- From the network closet – PoE lines go out throughout the house. These both power and feed the wireless access points.
- I also have 2 additional small switches – one in my garage, and one upstairs to connect consumer stuff like the TV, streaming boxes, etc
- 3 Nano APs, and one outdoor Mesh AP for wireless access.
The cool thing about PoE and Ubiquiti networking gear – is to add many of these components, it’s as simple as plugging them in! The UDM will recognize them, and ask you if you want to “adopt” them into your network. From there they are automatically updated and provisioned, and then usable quickly. One more cool thing? Since PoE ports are managed from the switch – they can be power cycled from the Ubiquiti interface!

I have a VoIP phone that has a bad habit of locking up every so often – so it’s nice to be able to power cycle it without having to unplug/replug.
Dream Machine? Router? DHCP? Firewall? Network Controller? What is all this stuff?

So let’s start at the very beginning of the network – the Dream Machine Pro. This is what most people would call the “router”. However people use “router” as a sort of catch-all term for network appliances/devices that do a lot of different functions. Most people have gotten so used to these features being all on one box, but they are actually separate things. The Dream Machine handles the following roles:
- Network Controller – this is specific to the Ubiquiti ecosystem. The software running on the UDM is what controls all the other components on the network, and gives you a “single pane of glass” style of management and monitoring for all aspects of the network.
- Router – The router controls all traffic in, out and between networks. This means your main internet connection plugs into the UDM’s WAN port, and in most cases will get a single IP address via DHCP from your ISP. From there, the router will route all traffic in and out of your internal networks to and from the internet.
- DHCP Server – The UDM has a built-in DHCP server, which assigns addresses automatically to devices joining the network.
- Firewall – The firewall controls access in and out, and between networks in the system.
- Camera DVR – The Dream Machine actually has a cool little bonus feature. You can add a SATA hard drive, and it will also work as a DVR for networked security cameras.
The Dream Machine packs a ton of functionality into one device, and has enough power to scale up to some pretty large networks. The UDM can totally replace the router/modem that comes with your ISP.
One important thing to remember especially if you are setting this up for home office use – many residential cable/fiber ISPs that also provide TV service actually run all the networking for set-top boxes through legacy cable wiring over MoCa. This means removing their router may break your TV set-top boxes! Thankfully this is easily remedied by adding in a cheap MoCa bridge – to restore that capability if needed.
Member Content
Sorry... the rest of this content is for members only. You'll need to login or Join Now to continue (we hope you do!).
Need more information about our memberships? Click to learn more.
Membership optionsMember Login


