The Color Page Is Full Of A Bunch Of Hidden Gems
Two weeks ago I was giving an online virtual class to a bunch of seasoned Resolve colorists and a few of their assistants at a major sports network here in the U.S.
This group had a ton of Resolve and DaVinci (8:8:8, 2k, 2k+) knowledge and while the class was about color management pipelines in HDR, at the end of the second day we had a few spare hours left and had already covered everything I had planned to cover. That’s when someone just said ‘show us some cool stuff!’
Geez! How the roles had reversed! Colorists now sounding like demanding commercial clients!
Over the next few hours there were lots of comments like ‘oh, I had forgotten about that!‘ or ‘wow, I didn’t know that was there.’
In our day-to-day use of Resolve, each of us tends to get into a groove – using the tools we use and are most comfortable with. However, Resolve is a VERY deep application, and these days, it’s virtually impossible to remember every right-click, or where every button is just on the Color page not to mention the rest of the application – there is a reason the Resolve User Manual is now over 3000 pages!
In this Insight, I’d like to share a bunch of cool Color Page features that in talking to colorists are easy to forget about, or maybe just hard to discover. Of course, this is not an exhaustive list of these types of features, and furthermore, for some of you, everything listed here might just be a reminder – that’s ok, you can refresh yourself on some of these things if it’s been a while since you’ve used them.
Viewer: Split Screens
One of the things I love most about coloring projects is the comparative aspect of it – before/after, shot matching, etc. Our brains are actually designed to work comparatively. Put two monitors side by side and it’s easy to see if they match. However, put those two monitors in different rooms, the task becomes much harder.
Comparison is one of the reasons I LOVE split screens and I’m always surprised by how many Resolve colorists don’t know about them or don’t use them.
Essentially, split screens let you compare side-by-side clips on your timeline and in the gallery in different ways.
You can activate spit screens by clicking on the split screen button in the upper left of the Viewer or by going to View > Split Screen > On, or by using the default keyboard short cut Option(ALT) + Cmd(Ctrl) + W. Once you enable split screens you can choose from a variety of flavors from a pull-down in the upper right of the Viewer or again from View > Split Screen > Split Screen Mode.
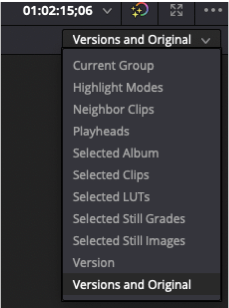
Here are the available modes:
- Current Group
- Highlight Modes
- Neighbor Clips
- Playheads
- Selected Album
- Selected Clips
- Selected Luts
- Selected Still Grades
- Selected Still Images
- Version
- Versions and Original
That’s a lot of options and over the years BMD has added more and more options to this list. All of them have good uses but here are my favorites:
- Current Group – I work on a lot of factual non-fiction. You know the genre – talking head, a few b-roll shots, talking head – rinse and repeat. As such, I make heavy use of groups. When I filter a timeline to show a group I can of course quickly flip through all the shots in that group one by one but using the Current Group split screen I can easily see all the shots in the group at the same time both in the Viewer and more importantly – out to my reference monitor where I can quickly see if everything is lining up.
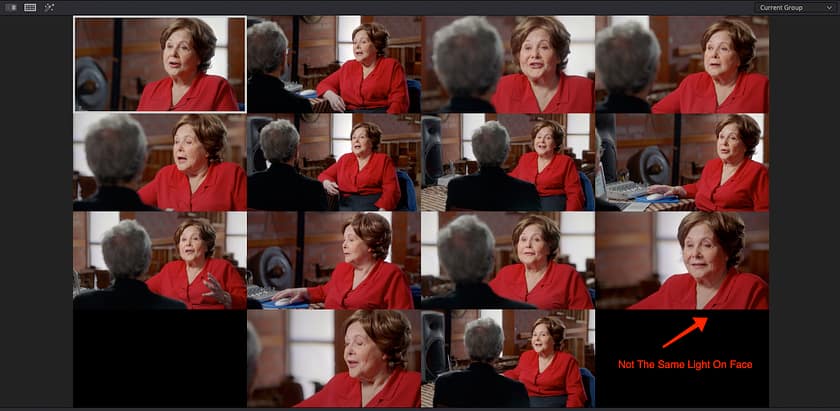
- Neighbor Clips – Using this option in a tricky shot matching situation is awesome. Like every colorist I rely on playback to check shot matching but to quickly pull up the shot I’m matching to and the shots around it to check for things like skin tone and other continuity items is a huge help.
- Playheads – (more on these later) but I utilize playheads all the time scattered around a long timeline. For example, I might have a B-Roll shot that’s used in ACT 1, Act 3 and ACT 4 and I want to make sure they’re all the same, I’ll drop some playheads and then use this split-screen mode to view them all at once.
- Version – Ever had a client walk in a room and say ‘ok! show me something’. Especially in short-form, I use versions all the time where I’ll have widely different looks that are just easier to manage as different versions vs. different nodes. Using this option you can quickly pull up all those versions, and again because split screens output to your reference monitor that can make the discussion about which direction to take shot interactive with a client.

One nice little extra feature with split screens is to use an outline (found in View > Split Screens). This lets you know what shot your main playhead is actually only. Also depending on the power of your system you can even play things down with split screens enabled so you’re not just looking at freeze frame.
Viewer: Gang Viewer Zoom With Video Output
The older I get, and the higher resolution UI monitors I use, I find myself doing more squinting at the UI! Using a panel, much of what I do is controllable there but I still find myself spending a lot of time in Resolve’s viewer doing various things – like drawing masks, massaging keys, etc.
To get a better look at the Viewer you can zoom in to the Viewer itself with keyboard shortcuts or mouse controls, and you can of course also increase the size of the Viewer window by going into the enhanced Viewer or full screen – but none of those methods change what’s being seen on your reference monitor.
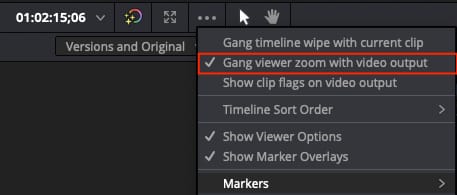
A few versions ago BMD introduced a feature that I love and I don’t see many people using – Gang Viewer Zoom with Video Output.
This option is found in the three-dot menu in the upper left of the Viewer. Once enabled, as you manipulate the Viewer, the image on your reference monitor will mimic what you’re doing in the Viewer. Besides the obvious benefits of this, I find it also helps with things like:
- Edge inspection for things like chromatic aberration
- Compression/macroblock inspection
- Catching on-set mistakes – mic in the frame, etc.
In general, this magnifying glass feature is super helpful for a lot of stuff. One thing in particular? I love using it with split screens! You can quickly pan through a lineup of interview shots in a group, or similar b-roll and inspect them close up as needed.
Gallery: Automatically Label Stills
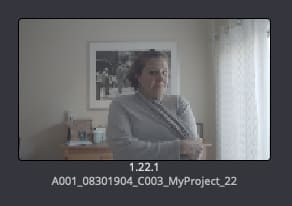
Take a look at one of your stills folders from a recent project. What you’ll likely find is a whole bunch of stills labeled 1.1.1 or 1.238.2, etc. This default still naming indicates track number, clip number on that track, and version of that clip. This info is helpful, but if you’re even a bit disorganized you can quickly get into a situation where it’s hard to figure out what still is which, what’s the current version of the still, etc.
Wouldn’t it be better to control the naming of a still when you grab it in the first place? Of course, it would be and luckily doing so is just a preference.
Open up Project Settings > General Options > Color.
At the top of the color section, you’ll see a check box for ‘Automatically label gallery stills using’. The corresponding pull-down has a lot of options:

- Clip name
- Clip version name
- Source Timecode
- Timeline timecode
- Timeline name
- Display LUT name
- Custom label using tags
To me, the two most useful options are timeline timecode and custom label using tags.
Timeline timecode allows you to quickly find and navigate to where the still was taken from without having to use shot numbers (which may change over the course of a project. Custom labels utilize the variable tag %.
Here’s how that works:
- In the Automatically label gallery stills using pull-down choose Custom label using tags
- A blank box will appear below the pull-down
- In the blank box type %. When you do that you’ll get a laundry list of metadata items you can choose. Of course, what you choose here is up to you but I find Source Name, Timeline Name, and Timeline Index useful. If you leverage Resolve’s metadata abilities the sky is pretty much the limit.
Custom naming using the variable % is a great way to keep stills organized. Here I utilized SourceName_TimelineName_TimelineIndex. Note I added the underscores between the variables.
What’s even cooler is that in addition to the variables (you can use as many as you want), you can use regular text/number characters here too. The obvious between variables would be underscores or dashes but you could insert anything that you find useful – I’ve been using the client and project name in saved stills quite a bit so that when I export stills for review for example I don’t have to insert that info.

This actually brings up one last important point! This custom naming is great for organizational purposes within your project but how do you get that custom naming to stick with still on export? Easy – in a stills folder right click and but sure to check the option ‘Use Labels On Still Export’.
Member Content
Sorry... the rest of this content is for members only. You'll need to login or Join Now to continue (we hope you do!).
Need more information about our memberships? Click to learn more.
Membership optionsMember Login

