| Series |
|---|
On-Set Color Correction with Silverstack
Yes – you read that right. You can absolutely perform color correction from inside of Silverstack while on-set. At our full disposal are the usual color tools – LGG wheels, RGB offsets, LUT and full ACES integration. But there isn’t any power windows, tracking, OFX support, or HSL qualifications. What gives? With Resolve Lite being absolutely free and demonstrably more powerful, why does Pomfort bother with allowing color correction inside of Silverstack to begin with?
Well, this all makes sense once you understand that the motivation for color in Silverstack is strictly for pre-visualization. Silverstack is not a finishing application. The color tools are designed to be used on-set, in an environment where adjustments to picture such as grain emulation and shape tracking are non-essential. In most instances, these type of granular decisions are better executed in a color suite. On-set color correction is an entirely different kind of problem solving than it is in the finishing room.
I should clarify that not all D.I.T. jobs require use of these color tools – you may never touch these controls at all, but it’s equally important that you understand how they work and fit in a production context.
Note: ‘Live Grading’ is not possible from inside Silverstack; it does not accept video signals coming in real-time. Color correction inside of Silverstack can be affectionately referred to as ‘Delayed Grading’, since picture adjustments can only happen after the D.I.T. ingested the media from camera at their station.
Silverstack works great with Pomfort’s LiveGrade as a one-two punch combo for the ultimate solution for data and color management in production. Typically, grades created with LiveGrade are matched to files held by Silverstack via timecode. LiveGrade is not covered in this series, and will be an entirely different set of Insights here at MixingLight.com.
EVALUATING COLOR
Continuing on in this Series, our media is securely downloaded to our local storage volumes. This material was shot on an Arri Alexa Classic, encoded in Apple ProRes with a LogC gamma. During production, picture was monitored using a custom show LUT. None of this was burned into the files – this color information is stored in the QuickTime header.
Upon ingest into Silverstack, the LUT is turned on by default. If you’re not using a custom look, the Alexa defaults to the standard LogC to Rec709 matrix. In our case, we used a bleach bypass look. There is a simple two-button interface to toggle between the LogC source and the Look. This arrangement is specific to camera formats which support logarithmic recording, otherwise the buttons simply behave just like a bypass color button.

Don’t forget that your image analysis tools are built inside of Silverstack helping you evaluate picture in a few different ways. You can send out an SDI signal to a calibrated display if you’re running Silverstack XT or higher, with the right combination of hardware. It’s recommended you supplement your image analysis needs with 3rd party scopes such as Blackmagic’s UltraStudio or a Leader Unit for added features. Running scopes separately from the picture monitor is how most D.I.T.s prefer to work.

MODIFYING COLOR
It’s possible to override the color settings in your clips. In both the drop down menu in the viewer and the metadata field on the right tab, you can change your clips’ color profile to:
- None: Ignore all color adjustments, transforms, and matrices.
- File: Inherent color profile from embedded metadata.
- Preset: Select a camera manufactured LUT supplied.
- User-Defined LUT: Load in your own cube.
- Custom Look: Custom Look Built Inside of Silverstack

These color profiles are pretty self-explanatory, except for ‘Custom Look’. Custom Look is where the magic happens, and you’ll quickly notice that it is actually an umbrella color profile that offers several different grading modes:
- CDL and LUT
- CDL Advanced
- Alexa Looks
- Freestyle
- ACES CDL
- ACES CDL Advanced
- ACES Freestyle
- Varicam Compatible
- Amira Compatible
- etc..
Each of these grading modes are structured differently, but they are all function similarly. All of the grading modes process data from top to bottom. If you’ve stacked several color effects together inside of Premiere Pro or After Effects in the Effects Panel, you’ll feel right at home here. Each ‘layer’ is referred to as a ‘node’, and can be turned on or off.
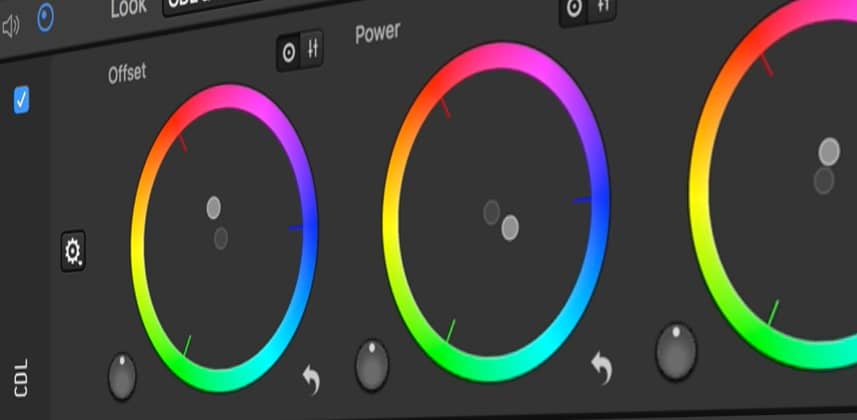
Most commonly used is the CDL and LUT grading mode; you can load a custom or preset LUT onto the picture and apply RBG offsets to the picture. The CDL node, despite behaving like LGG wheels, follows the strict format designations and definitions stipulated by the ASC. There is Power, Offset, and Slope. The Saturation value is expressed separately, and is stored as a discrete node.
NOT ALL COLOR PROFILES ARE EQUAL
Certain other modes, such as ‘Amira Compatible’, allows you to correct your picture using parameters present inside the format itself – in this case, we are not using CDLs to adjust the image, we are grading in Arri’s own format. This gives us the advantage to soft-load the grade directly into the Amira camera – and Silverstack handles this conversion automatically for you.
Member Content
Sorry... the rest of this content is for members only. You'll need to login or Join Now to continue (we hope you do!).
Need more information about our memberships? Click to learn more.
Membership optionsMember Login
