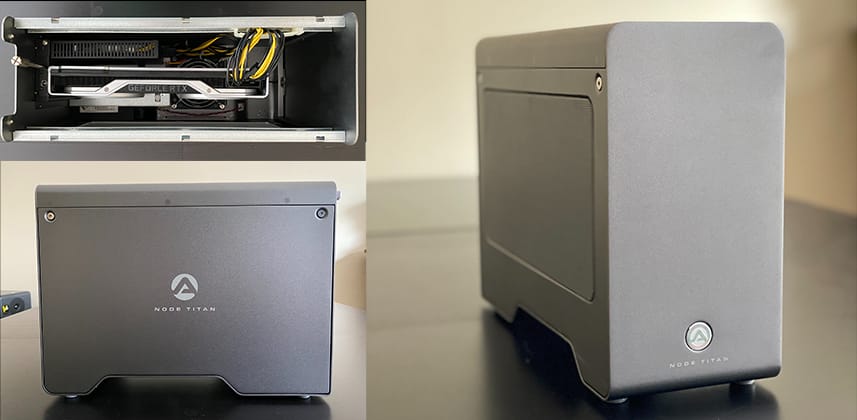
Adding An eGPU To Your Setup
It’s probably no surprise to most of you that when it comes to processing power for color, editorial, and transcoding applications, the GPU plays a critical role.
Over the past decade or so, we’ve seen a huge shift from CPU bound processing to a lot of processing being handled by GPUs – and that’s a good thing. CPUs (the brain of your system) have a lot to do, and offloading tasks to a GPU can speed things up immensely.
For example, RED’s recent SDK updates have allowed NVIDIA (CUDA) and AMD (Metal) GPUs to handle both debayering tasks and decompression as well, which has typically been handled by the CPU. The results? Mindblowing! Think, 8k Premium with a decently complicated node tree – in real-time without using the most top-end GPU.
What’s more? The speed of GPU development is a technology arms race – what 2 years ago might have been the Rolls Royce of GPUs, is pedestrian just a few years later. For people like myself who are obsessed with even minute performance gains – the ability to pop in a new GPU (or two or four!) when the next big thing in GPUs hits the market is very appealing.
Said slightly differently: Getting a new GPU can make your system feel brand new.
I know what you’re thinking ‘Robbie, that’s cool for ‘workstations’ but I work off a laptop’ or ‘I’m saving up for a modular workstation but right now I’m working off an iMac (or Mac Mini or Intel NUC)’
Laptops and all-in-ones, like iMacs or small form factor computers like a Mac Mini or Intel Nuc, might have dedicated built-in GPUs, oftentimes they don’t – instead, relying on integrated graphics. In either situation, upgrading the GPU is a no-go without buying a whole new machine. And let’s be honest – performance with integrated graphics, or many mobile GPUs, isn’t great.
Enter Thunderbolt3 and eGPUs.
Are you thinking – ‘Yeah Robbie, eGPUs have been around for a while!’
I know! But what’s totally surprising is that in nearly 1000 Insights we’ve never really discussed them besides a passing mention in a From The Mailbag episode or Color Correction Gear Head article.
Synopsis
Yes! This is a long article – but for those of you who know me, or have been Mixing Light members for a while you know that I like to be detailed.
In this Insight, we’ll first explore some essentials on eGPUs and Thunderbolt 3 and then take a close look at the premium eGPU chassis from AKiTiO/OWC called the Node Titan. Our friends at OWC recently acquired AKiTiO and offered to send one over for me to test – which as you’ll read in a moment, was great timing for my home setup.
You’ll learn three workflows of where I think an eGPU can really help speed things up:
- Using an eGPU to help power an assist station
- Mobile coloring & rendering on a laptop
- A dedicated render box for common tasks
In all of the workflows, we’ll discuss how an eGPU helps boost performance a little bit – and sometimes a lot. I’m gauging performance by the metric that matters most to creative video professionals: real-time playback with effects. This article is not really about benchmarks – although I will provide results of several quick frames-per-seconds (FPS) tests. There are some great resources on the web for detailed tests of different GPUs, in different boxes, connected to different systems.
Using an eGPU is not the same as using a native dedicated GPU. While an eGPU might speed up under- or mid-powered systems with integrated graphics or lackluster dedicated GPUs, it is important that we frame our performance expectations accordingly.
Let’s dive in.
FCC Disclosure: Mixing Light is an affiliate of OWC and affiliate links appear throughout this article (which help support Mixing Light, at no cost to our members). OWC provided Mixing Light and me, Robbie Carman, an AKiTiO Node Titan for the purposes of review, testing, and writing this article. After writing this article, I purchased two Node Titan’s for my home studio.
eGPU & Thunderbolt 3
Thunderbolt 3 is really what makes eGPUs possible.
Thunderbolt 3 is a 40 Gbit/s (5 GB/s) interconnect, which supports up to 4-lane PCIe 3.0 bandwidth, 8-lane DisplayPort 1.2 bandwidth, and USB 3.1 (usually in USB-C form that is the same connector as Thunderbolt 3) up to 10 Gbit/s.

The important part, for this discussion, is the 4-lane PCIe 3 bandwidth.
While GPUs are usually put in x16 Gen3 (and now Gen 4 slots) and often x8 slots on a CPU’s motherboard, Thunderbolt 3’s x4 bandwidth (x16 electrically in most eGPU boxes) is as good as eGPUs are going to get currently.
That’s enough to give a good punch in GPU performance, but it’s important to understand that because eGPUs currently only support x4 bandwidth, to a certain degree their potential performance is going to be limited compared to a GPU’s raw specifications.
In other words, an AMD or NVIDIA GPU in eGPU vs the same card in an x16/x8 slot on a computer motherboard is going to be bandwidth limited. You can expect about a 20%-30% reduction in performance of the same card in an eGPU vs on a machine’s motherboard. This is partly because of bandwidth (x16/8 vs x4) but also there is some overhead involved with a Thunderbolt 3 connection itself.
What kind of operations you’re trying to carry out are also a factor in eGPU performance. For example, heavy compute tasks like 3D modeling where data is sent to the GPU and hangs around a while for processing often see increased performance over heavy I/O workloads like real-time color correction where data is constantly being fed in and out of the GPU. Lighter I/O workloads like HD (compared to UHD) will perform better.
Why is all that important?
GPUs are expensive. An NVIDIA RTX Titan or AMD Radeon Pro VII in an eGPU might be overkill in terms of leveraging the full potential of the card.
In general, I think mid-level GPUs like the NVIDIA 2070 Super, 2080 Super, AMD 5700XT, or Radeon VII make a lot of sense for an eGPU. While you might see minor improvements in super fast cards (and yes, I’m guilty of using these) the returns often aren’t worth the cost.
Our friends at OWC actually have a cool little guide to compatible GPUs (and what versions of Mac OS or Windows you’ll need) at the bottom of the product page for the Node Titan eGPU chassis or for an even more complete list check out this PDF.
Speaking of the Node Titan…
The AKiTiO Node Titan
When you start looking into eGPU chassis you quickly realize it’s a crowded field. Over the past year or two, I’ve tried the many of them, and recently ran into a problem with the Razer Core X that I had been using in my home setup – the power supply died!
When OWC offered to send over an AKiTiO Node Titan (remember OWC recently acquired AkiTiO) I was thankful for the timing as I was sick of the lack of an eGPU decidedly slowing down my 2018 Mac Mini that I use in my home studio as an assist station. And that was a big problem – as I do a lot of things in that box!
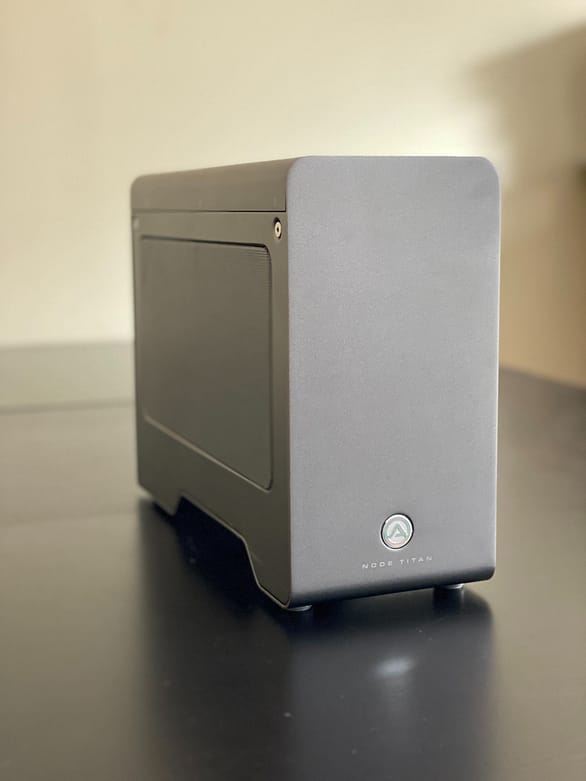
I’m not new to AKiTiO. I’ve been using their PCIe expansion chassis for a long time – in both Thunderbolt 2 and Thunderbolt 3 flavors. In fact, I have a Blackmagic 4k Pro I/O card in an AKiTiO Node Lite that I also have attached to my Mac Mini to get input for Scopebox, Streambox, and to pipe video out to another input on my FSI XM551U that’s my main reference monitor at home.
From the moment I took the Node Titan out of the box, I was struck with the premium build quality and its tool-less design for accessing the inside of the unit. Put simply – the Node Titan is the créme de la créme of eGPU chassis.
Technical Features
The Node Titan features a 650-watt power supply that is capable of supporting a monster GPU like the NVIDIA 2080TI or Titan or the AMD W5700. Inside the box, you’ll find 2x 6+2 (8pin) power connectors, which can come in handy for power-hungry cards.
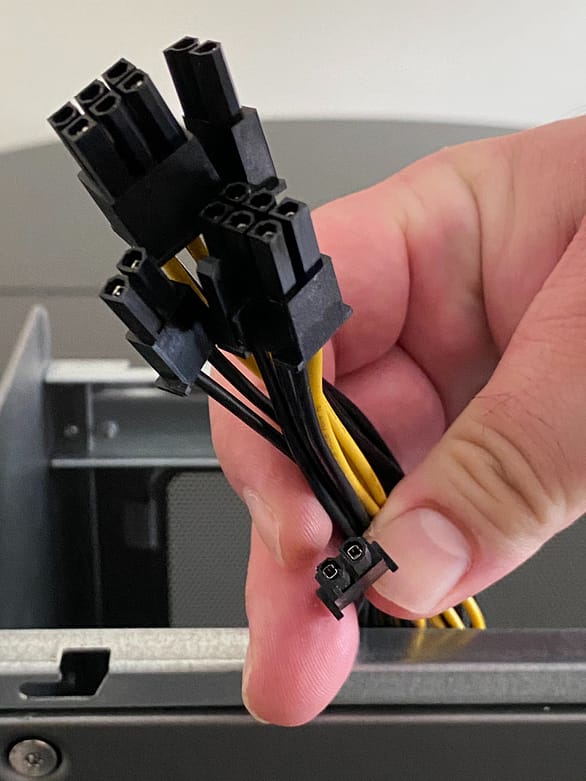
The inside of the Node Titan can accommodate a full-length double-wide GPU (pretty much standard these days), but if you have a GPU with a crazy cool design, you’ll want to make sure that the entire card is a max of 32cm (12.6in) long x 6cm (2.4in) wide x 17cm (6.7in) tall.
There is one Thunderbolt 3 port on the Node Titan, which is a little bit of a bummer from a daisy-chaining point of view, but then again, not crowding the Thunderbolt 3 bus may lead to slightly increased performance. The Thunderbolt 3 port also offers up to 85 watts of power delivery for charging when connecting a compatible laptop like a Mac Book Pro.
Case Design
Maybe it’s because I’m an industrial design nerd, but I think the Node Titan case is pretty sexy.
It’s dark gray aluminum case is less wide and shorter in length than other popular eGPU chassis like the Razer Core X, which in my opinion makes it a little more desk-friendly if that’s how you want to roll.
The most unique feature of the case design is the top handle. I know, I know, how exciting can a top handle be? This one is pretty cool:
By default, the handle resides flush with the rest of the case, but pressing on the handle itself releases it from the case so you can grab the handle to move the unit.
But if you don’t want to have the handle always visible – simply press the handle down again it will lock the handle back into place. In my opinion, even though it’s just a handle – this is a thoughtful design feature.
The Node Titan features two thumbscrews on the back of the unit above the PCIe slots to open the top of the case. After loosening the screws just slide the top cover (handle included) back to reveal the inside of the unit.
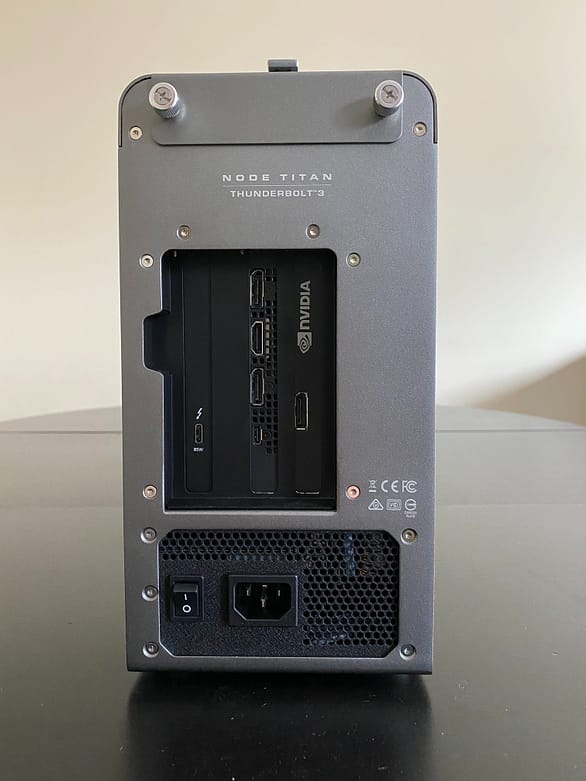
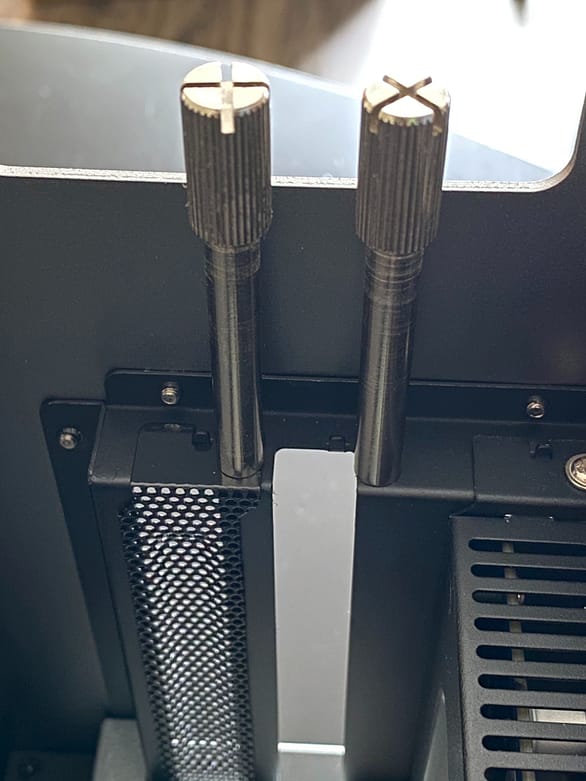
Once inside, you’re greeted with two very tall thumbscrews that lock down a card (and the already present Thunderbolt 3 I/O). Tool-less design is pretty common for expansion boxes these days, but it’s appreciated in a premium product.
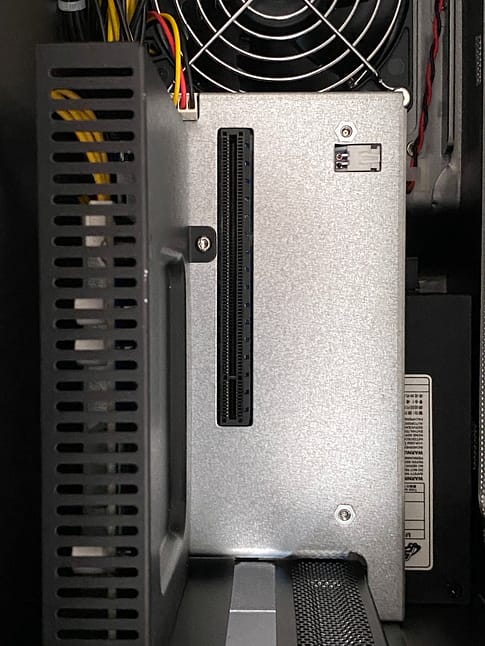
The x16 PCI slot sits on a metal ‘shelf’ that itself sits on top of the 650-watt power supply. This design is actually worth pointing out – many of the eGPU units available put the power supply next to the PCI slots essentially expanding the width of the chassis. In the Node Titan, the PSU is underneath – this not only helps to make the box a little less wide but should also help thermally – with the PSU fan not blowing into the main body of the case.
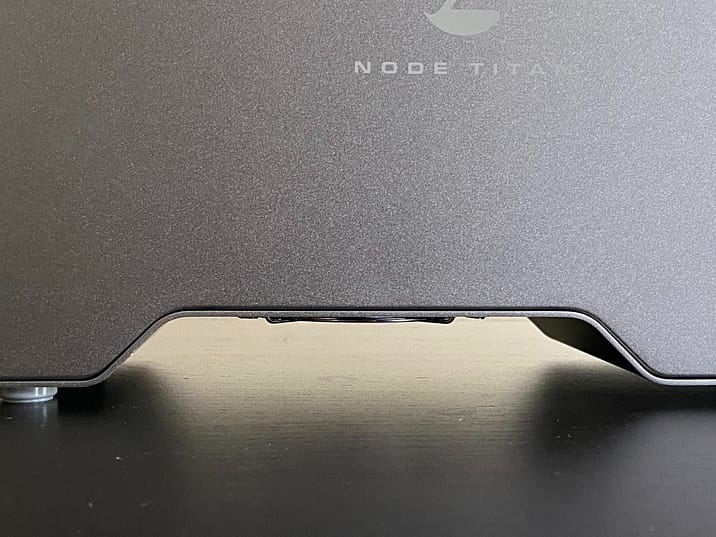
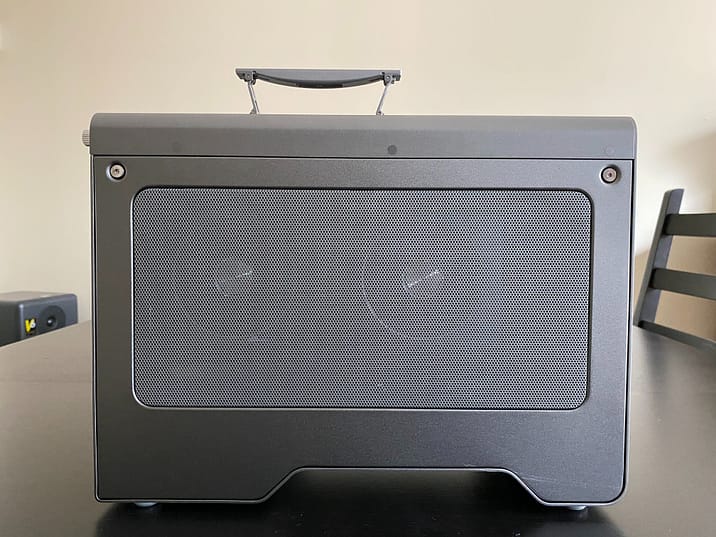
Next, at the bottom of the unit, there is an exhaust fan. It might seem weird to have an exhaust fan on the bottom of the case – but as you can see in the profile image below, the fan doesn’t sit at the bottom of the case at desk/ground level – it’s raised a bit to allow for airflow. Practically speaking, this design, I think, helps minimize fan noise. In general, I was quite pleased with the overall noise level of the unit both when located on a desk and in a mini rack behind my desk.
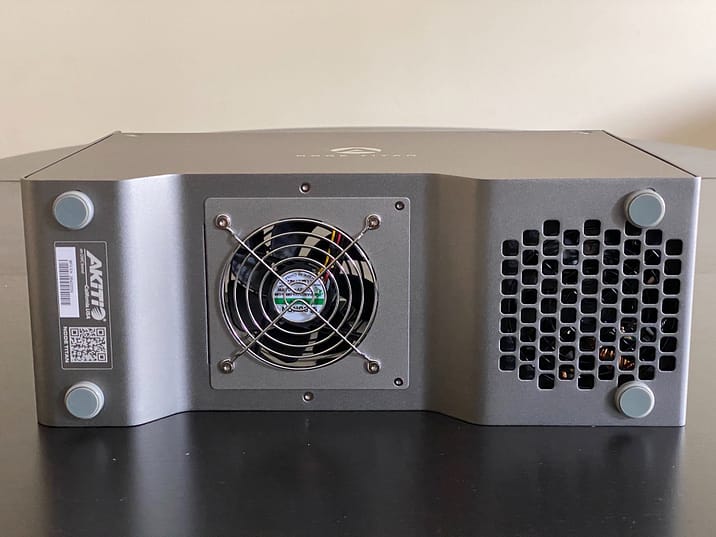
Speaking of cooling, one entire side of the unit is a tight metal mesh. This is also the side that is exposed to the GPU’s fans – helping the overall circulation of air within the case. Pro-tip: make sure you blow out this mesh from time to time with an air blower like this one (don’t use compressed air).
Now that we’ve discussed the eGPU landscape and the Node Titan, let’s dive into some practical eGPU workflows. As I said at the beginning of this article, this not a benchmarking exercise – of course, I’ll note speed improvements, but there is a lot of variability given different GPUs that one might use, and different systems one might connect to.
Workflow Booster #1: The Assist Station
I often get asked what’s an assist station and why do I advocate for them?
For me, the idea of the assist station originally was one of necessity – I was too busy grading to simultaneously be conforming a project, or rendering a DCP or H264 deliverables for a client on my main workstation.
However, it was Mixing Light contributor Joey D’Anna who, when we first started working together about 6 years ago, started convincing me about the ‘separation of church and state’.
Of course in tech terms, what Joey’s philosophy states is that your workstation should be your workstation – and that’s it! And trust me, Joey takes this seriously.
In his opinion, a Resolve workstation (or insert another app here) should be a hero system for that app and nothing else – no email, web browsing, or some silly app you’ve downloaded off the Internet. With exceptions for things like plugins, the system remains ‘clean’.
I can’t say that I’m as fastidious to this idea as Joey, but having an extra system to handle the ingest/delivery workload and keeping my main workstation focused on what it does best (real-time color grading) is an idea that I’ve bought into entirely.
At both my office and at my home studio, I’ve invested in the recent generation of Mac Mini’s ( i7, 32GB RAM, 2TB SSD, 10GBe Ethernet). I’ve coupled these small yet powerful machines with the awesome 34″ LG 34UC80-B Ultrawide. These setups are super-productive and let me easily do a ton of things simultaneously (including running Scopebox), but the one area where they are lacking is with their integrated Intel UHD Graphics 630 GPU.

For a lot of things, this integrated GPU is just fine, obviously, as Apple chose this GPU (and there is a similar approach on the Windows side with Intel NUCs). These GPUs can fit in a small case and don’t generate too much heat, but still perform adequately.
That’s perfect if you’re banging on Excel hard, or watching cat videos on YouTube, but if you need to render a feature to H264 for a client, make a 4k DCP or transcode a huge pile of files, the integrated GPU is a bottleneck.
As I mentioned earlier, the eGPU chassis I was using at my home studio (Razer CoreX) had its power supply die, so getting the Node TItan to test was awesome timing. I’m still on 10.14.6 at home (because of Streambox Software encoder compatibility) so I can’t use the latest generation of Navi cards from AMD, but I’m using a stalwart Vega VII with 16GB of VRAM.
At my office, since I’m on Catalina (10.15.1 or later supports new the 5700XT) I’m using the 7nm 5700XT also with 8GB of Ram. In this setup, I’m currently using a Sonnet eGPU box there – but I am now strongly considering the Node Titan.
In each setup, my monitor is connected to the eGPU forcing all apps to use the eGPU as the main system GPU for the system.
I have to say, using an eGPU makes the Mac Mini into a great compact workstation!
It’s not hyperbole to say that using an eGPU on a Mac Mini accelerates most GPU centric tasks by an impressive degree.
For example, using my standard node tree (shown below) on an HD clip, on an HD timeline, with noise reduction (TNR 2 frames) and a node with Resolve’s Grain OFX enabled – comparing the Mac Mini’s Intel UHD Graphics 630 GPU vs the Vega VII in the Node Titan the results are dramatic!

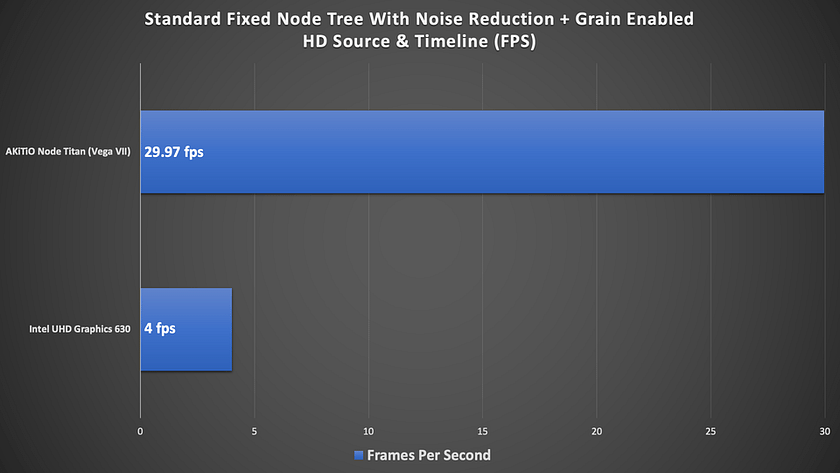
While my home and office setups are never going to best a new Mac Pro with dual Vega’s or a 3970x Threadripper workstation with a couple of RTX Titan cards – they’re a fraction of the price AND perform very well.
With an eGPU, I’m not afraid to leverage my assist stations for intensive tasks like:
- Resolve remote rendering (H264/265, DCP, ProRes, etc.)
- File encoding/transcoding (Adobe Media Encoder, Handbrake, and other tools)
- UHD + Resolution For Scopes (Scopebox)
I use my assist machine every day for conforming projects in Premiere Pro (and yes FCPx), for email, web browsing, Zoom sessions, etc. And as I mentioned, it’s also my Scopebox computer.
At home, my 2019 Mac Pro has DaVinci Resolve, Apple Logic, Video Village’s Screen (because I hate QuickTime Player), and also Video Village’s Lattice. That’s it, no email, games, etc.
All of those other things happen on the assist machine and with an eGPU (making it pretty darn fast and capable).
And now that I need a new eGPU chassis at home, I’ll be purchasing a Node Titan so my home assist station can continue to run at top speed.
Workflow Booster #2: Mobile Coloring
eGPUs and laptops are pretty much a match made in heaven.
While there are of course some very powerful laptops out there these days with top of the line NVIDIA RTX & AMD GPUs, an eGPU offers many advantages:
- Be more mobile – Get a thinner, lighter, less noisy laptop with Thunderbolt 3 giving you the ability to plug into an eGPU at any time.
- CPU pace of development trails GPU improvements – While faster CPUs are released yearly, newer and faster GPUs become available every few months. Instead of upgrading your entire machine yearly, a modular eGPU chassis like the Node Titan allows you to easily swap out an older GPU for a newer one – and perhaps skip a CPU upgrade cycle for a year or two.
- Work faster – Obviously, this is the whole reason for considering an eGPU setup in the first place.

For the past couple of years, I’ve been using a 2018 Razer Blade 15″ as my primary laptop.
While Razer is known for its gaming products, the Razer Blade 15 is an amazing laptop series – thin, lightweight, and powerful.
In many ways, its design is similar to that of a Mac Book Pro, but without the need for all the adapters! This machine features an Intel i7, an NVIDIA 1070 Max-Q design GPU, and of course a Thunderbolt 3 port.
The 1070 Max-Q is a good GPU with 8GB of VRAM and overall I would say it’s pretty speedy. But the nature of the Max-Q design is that it is a stripped-down version of a full-sized 1070 – and of course, this GPU is now currently a generation behind and soon to be two generations old given NVIDIA’s recent announcements with their new AMPRE cards.
While performance in DaVinci Resolve was pretty good with internal GPU, when OWC sent over the Node Titan, I decided to see what sort of performance gains I’d get popping a generation newer RTX 2080TI in the box.
Configuring The eGPU For A laptop
In a mobile setup, you’ll likely want to just use the eGPU as an accelerator, but it’s worth noting you can also plug-in and configure an external display and make it your primary monitor – doing so will force the OS (Mac or Windows) and all apps, to use the eGPU since the monitor is seen as the primary display. But as I said, in a mobile setup, you’re probably also not going to carry an external computer monitor unless you have a big setup like with a DIT cart.
To use your laptop screen and an eGPU as an accelerator, you’ll need to do some configuration.
On the Mac: Find the application you wish to use eGPU for acceleration for in your Applications folder then right-click and choose ‘Get Info’ or use CMD + I with the application selected. In the resulting dialog box, just check the box for ‘Prefer External GPU’.

On Windows: The concept is similar.
Right-click on the Desktop and choose ‘Display Settings’.
In the new window that appears, choose ‘Graphics Settings’ then click the Browse button to locate the app you want to accelerate with the eGPU from your Program Files folder.
Once you choose the Application, click the Options button on the application tile. In the new dialog that appears, choose the ‘High Performance’ option to use the eGPU connected to your system.
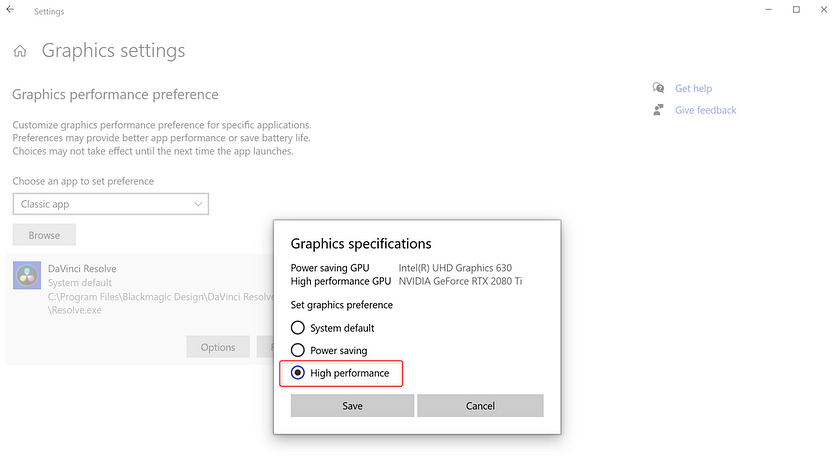
Keep in mind, you should configure your eGPU options with the app you want to use closed. If you have the app open, be sure to restart the app for the new settings to take effect.
Finally, it’s a good idea to verify that the application you’re using is utilizing the eGPU after you’ve changed these options.

Yep! It’s A Big Help With Mobile Grading
On my Razer, using the Node Titan with a 2080TI was a pretty big improvement in DaVinci Resolve – both in actual grading performance and rendering performance – specifically for H264/H265 hardware-accelerated encoding with NVIDIA NVENC.
To test, I decided to go with the nuclear option – I used both 4k & 8k R3D test clips and configured Windows Resolve (16.2.2) to utilize the GPU for both debayer and decompression. Obviously, lighter weight media provide improved results across the board, but I figured why not stress things by pushing more pixels?
A couple more points about these quick tests:
- I set the timeline resolution to 4k DCI (4096 x 2160) and input scaling to ‘scale entire image to fit’
- I did not test an 8k timeline. A UHD/4k timeline is a realistic use case – even if the source is 5k,6k,8k. If you need to work at and monitor 8k you’re probably not doing it with a laptop or with an eGPU! Plus I don’t have access to 8k monitoring
- Source clips were 4096 x 2160, and 8192 x 4320 with 8:1 Recode compression
- Both source clips had a frame rate of 23.98 fps
- Resolve’s performance mode was enabled
- I used the latest NVIDIA Studio driver as of this writing (442.92) and media files located on an internal 2TB Samsung 970 NVMe on the laptop
I started with playback only of the two clips set to full resolution & premium debayer with no grade.
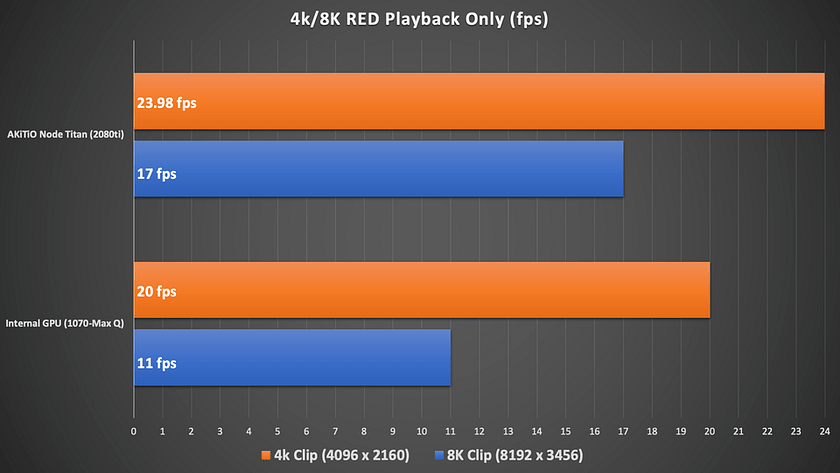
It’s interesting that the internal GPU performed so well! That’s probably due to the RED SDK & Nvidia integration. While neither clip was real-time with the internal GPU, 20 fps for the 4k clip isn’t terrible.
With the eGPU, I did get real-time for the 4k clip which is fantastic and although the 8k clip wasn’t real-time 17fps is still quite good
Next, I did a base grade with a simple Lift, Gamma, Gain correction, and a vignette.
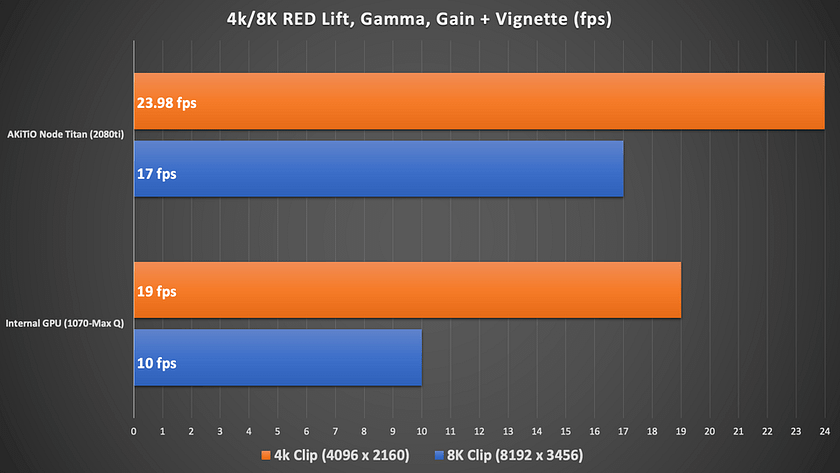
With a simple base grade on the clips, for some reason, the internal GPU dropped down a frame on each clip. The eGPU remained the same as the previous test.
Finally, I added a node with 2 frames of Temporal Noise Reduction (TNR) set to better.
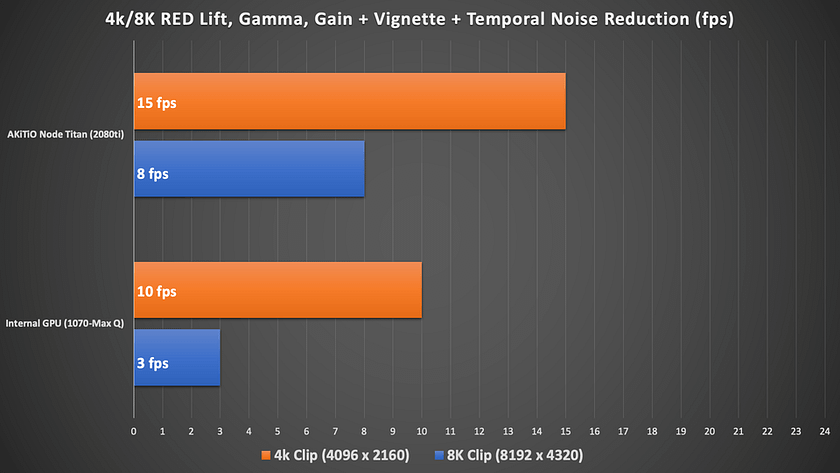
I knew this was going to be toughest of the tests – temporal noise reduction (TNR) can be a backbreaker – especially when you combine it with high-resolution, raw media – while asking the GPU to handle decompression, debayer, and overall image processing. I actually tried this test letting the CPU handle decompression and it was slower. With both the AKiTiO and internal GPU scenarios these frame rates still call for render caching, but the Node Titan will significantly cut the time you spend waiting for those red render bars to disappear. What was tedious without the Node Titan is much more manageable with it.
(Also surprising is that I didn’t get any GPU memory full errors on either clip – but that could be a factor of the simple grade.)
Overall I’m very impressed by how well the RED SDK works with CUDA and adding an eGPU to the mix really does give me confidence in a mobile grading setup especially with a simple grade on 4k raw material.
While I don’t have a Mac laptop these days, I would expect a similar helpful boost with top-end AMD GPUs.
Finally, it’s worth noting that some high-end laptops (especially on the Windows side) have become so powerful they can compete with desktop-class systems.
I have recently replaced my 2018 Razer Blade 15 (gave it to my daughter) with a new 2020 Razer Blade 15 and an RTX Quadro 5000 with 16GB of VRAM. This is an expensive setup, but one that bests what both the older laptop can do and an eGPU with a 2080TI in it. It performs nearly as well as a desktop system.
However, from my simple tests, I think I will see an improvement using the eGPU vs an under/mid powered internal GPU.
It’s also a big help rendering H264/H625
For a mobile setup, getting screeners out to clients is a typical requirement that cooks many laptops (I’m sure you can hear the whine of the laptop’s fans now!).
H264/265 acceleration via NVIDIA’s NVENC/NVDEC and AMD’s AMF/VCE and support in popular apps like DaVinci Resolve, Adobe Premiere Pro/Media Encoder, and others, offers a huge boost in productivity and allows one to get files rendered considerably faster than with software rendering.

In a typical HD timeline with a standard grade, using the eGPU (Node Titan + 2080TI) in my 2018 Razer I’m seeing H264 renders that are about 20-30% faster depending on the content compared to the built-in 1070 MaxQ.
I’m seeing even faster performance (in the case of using Resolve) with timelines that are render cached – I’ve seen peaks as high as 200fps on render when writing to an NVMe.
Here is an example of a 51min show (1121 shots) with a pretty standard grade and noise reduced throughout exporting to a 1920×1080 29.97 H264, and using NVIDIA acceleration. I chose to enable noise reduction because it’s going to put more stress on the GPU during the test, and I use a lot of noise reductions in my projects:
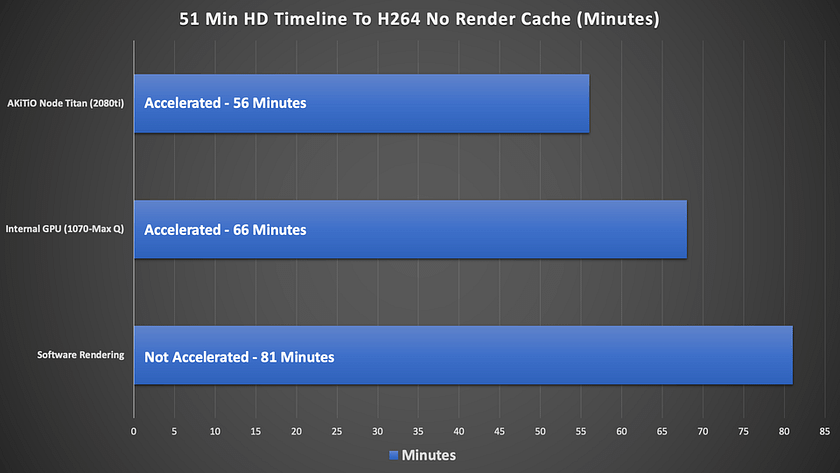
I’m actually surprised this isn’t a bit faster using the eGPU considering it’s an HD timeline. While basically rendering in real-time, the noise reduction on every shot is penalizing the render. Removing noise reduction from each of the shots dramatically improved these export speeds – by nearly 50-55%!
My suggestion is if your project is significantly noise reduced, or using other GPU heavy OFX, that you render cache no matter the setup and export from the render cache.
One last note for a mobile setup – I didn’t specifically test H265/HVEC mp4 performance – as you might use for delivering HDR10 content to YouTube or similar. But in my experience, in recent versions of Resolve using hardware acceleration encoding times are pretty similar with maybe a couple of percent penalty for rendering to H265.
As you can see accelerated processing with the eGPU is a significant time saving over software rendering and the internal GPU.
Workflow Booster #3: The Dedicated Render System (On A Budget)
As I mentioned, I use my assist station (a Mac Mini) with an eGPU for a lot of tasks including transcoding and remote renders. However, sometimes that machine and my main workstation are just doing too much.
While I’ve professed my love of the Mac Mini as an assist station – a nicely equipped one (6 core i7, 32GB of Ram, 2TB SSD, 10GBe Ethernet) lists for $2600 + tax.
A few months ago I started thinking about building a cheap dedicated render box that could handle some Resolve remote renders but also processing with Adobe Media Encoder (particularly handy with watch folders) and EasyDCP Creator that I use a lot for more sophisticated DCP authoring. A new Mac Mini was just a bit more than I wanted to spend.
Ultimately, I landed on an Intel NUC (NUC817HNK) with 32GB of Ram and 256GB SSD and when I purchased it, I found it for $1175 + tax. Still a splurge for what I’m doing, but not nearly as pricey as the Mac Mini.

This machine is pretty amazing in terms of connectivity including 2 Ethernet ports, 2 Thunderbolt 3 ports, multiple USB 3.1 ports, and multiple MiniDisplay ports. The only other thing I added to the stock setup was an OWC 10Gbe Thunderbolt adapter so I could connect the machine to the 10Gbe NAS I have at home. I already had one of these as’ its part of my travel kit, so I just repurposed it.
The NUC also includes an AMD Radeon RX Vega M GL GPU – which is an ok integrated GPU. My plan was to run this box as stock for a while I saved up for another eGPU chassis and GPU, but when OWC sent the Node Titan over, I had to connect it up using an NVIDIA 2080TI.
Let’s just say the results were good. The NUC coupled with the eGPU gave me about 35% faster J2000 encoding in EasyDCP Creator, and H264 encodes using Media encoder were at some resolutions 50% faster than stock!
I have some more tinkering to do with this box, but I’m convinced I need to get another Node Titan and repurpose a GPU from one of the computers at my office (not going there any way these days!) to help power this setup and use it as a dedicated encoding/render solution.
More Workflows
My three examples are only a few of the handful of workflows and tasks that can be accelerated by an eGPU setup. Here are some of the additional ones that come to mind:
- 3D – Tools like Autodesk Maya, Maxon’s Cinema 4D, and others can all be GPU accelerated and in mobile setups, an eGPU would greatly help these applications.
- VR – Tethered (connected to a PC) VR Headsets offer not only great gaming experiences but can be used for creative purposes making VR content – Adobe’s Premiere Pro’s VR toolset comes to mind.
- Gaming – Even colorists need a little downtime right? eGPUs can power GPU thirsty games to get higher frame rates and more details at higher resolutions.
If you don’t mind the additional box, an eGPU setup can aid in nearly any GPU intensive task with many Thunderbolt 3 capable machines.
Final Thoughts
In my mind, there is no doubt that in many workflows with under/medium powered machines utilizing an eGPU can be a big performance booster – including the ones that I’ve outlined.
From a laptop focused workstation to utilizing small computers like a Mac Mini or an Intel NUC, eGPUs can lift the considerable processing that many internal GPUs can’t handle to external processing.
The AKiTio Node Titan from OWC is a premium product that ticks all but one of the boxes in terms of design – a second TB 3 port would be useful.
Compared to eGPU solutions that have hard-wired GPUs and aren’t user-replaceable – with the Node Titan, when NVIDIA or AMD release new cards it’s an easy proposition to swap out GPUs to gain more performance and speed.
However, as I said at the start of this article, there is a balance point – is it worth putting a $5500 Quadro RTX 8000 in an eGPU box? Probably not. Middle ground GPUs like the NVIDIA RTX 2080 and the AMD 5700 XT feel like a sweet spot to me.
With that said, on many systems, even putting in last generation cards (NVIDIA 1080TI, Radeon VII or Vega 64) can offer a lot bang for the buck, especially if you can find them used.
For my workflows, eGPUs absolutely have a place and going forward, when it comes to eGPU chassis, I absolutely place the AKiTio Node Titan at the top of my list of eGPU chassis for consideration.
Questions, or something to add to the conversation? Please use the comments below.
-Robbie

