| Series |
|---|
Quick Summary
Colorist Tashi Trieu finished Avatar: Fire and Ash at Park Road Post Production in Wellington across 16 picture formats, including the first Barco 3D HDR high-frame-rate release, using DaVinci Resolve 20.2 with custom DCTLs for QC and AI coding tools, creating bespoke Resolve script automations.
Tashi Trieu discusses new challenges on Avatar: Fire and Ash, handy new Resolve features, coding custom tools, and the process of grading with different types of filmmakers

Two years ago, I had a great conversation with colorist Tashi Trieu about his finishing work on Avatar: The Way of Water. That turned into a two-part article here on Mixing Light detailing the complex workflow and remarkable number of distinct versions involved in delivering the huge blockbuster to audiences worldwide. Now that the third installment, Avatar: Fire and Ash, has completed its theatrical run and is making its way onto streaming platforms, I followed up to see what changed in his process and how the role of colorists is evolving.
I hope you enjoy this conversation!
– Peder
Revisiting Pandora: What’s Changed
Tashi, congratulations on finishing and delivering Avatar: Fire and Ash. The film has been another huge success for director/co-writer/producer/editor James Cameron and Disney/20th Century Studios. Let’s start with an update since we last spoke with you:
Two years ago here at Mixing Light, we covered your process on Avatar: The Way of Water. What was different this time around, and what stayed the same?
Avatar: Fire and Ash was, both on a story level and a technical level, a continuation of Avatar: The Way of Water. We had essentially the same VFX pipeline and finishing process, but now had the opportunity to make very surgical refinements to our day-to-day process.
Artistically, we’re returning to the same world of familiar forests and seas, but now with a lot more fire! It’s always a delicate balancing act getting bright scenes to feel bright in commodity 3D light levels common in standard exhibition.

We added HDR by Barco to our deliverable lineup, bringing us to 16 discrete picture formats (up from 11 in Avatar: The Way of Water). That’s 16 permutations of aspect ratio and light level that I’m responsible for grading and which we’re responsible for delivering to our distribution partners to build over 1,500 unique digital cinema packages (DCPs) for worldwide exhibition.
Barco supported us with the installation of projectors at Park Road in Wellington. We worked closely with them to support the stereo 3D exhibition. Avatar: Fire and Ash is the first HDR by Barco 3D presentation, and in high frame rate.
The film was again exhibited on Cinity Laser, but this time also on Cinity LED walls in China, which are massive and incredible to experience. Cinity supported us by building a 10-meter LED wall on one of our sound stages for us to review. I was particularly impressed by its color accuracy and shadow detail performance.
What were your biggest challenges on this show compared to Avatar: The Way of Water?
As with Avatar: The Way of Water, we found ourselves underwater with giant creatures. The Tulkun can be up to 300 feet long, which is three times the length of the Blue Whale. So we’re often grading darker and bluer to sell the murkier depths. Pandora is a humid place, and atmosphere, volume, and depth are key to bringing the world to life.
The end fight between Jake, Quaritch, and Spider inside the flux devil features constantly changing lighting conditions, strongly informed by the live-action plates. An incredible amount of work went into lighting and comp at WetaFX to bring these scenes to life, but it took a lot of massaging in the grade to help them flow seamlessly.
What was necessary in the grade in order to smooth the flow of the live-action and CGI elements?
A lot of character and skin-tone isolation. The live-action elements are majorly human characters in CGI environments. WetaFX and ILM provided character holdout mattes as part of their VFX deliveries, so it’s very easy for me to quickly isolate a character and apply grades only to them. This is really helpful when trying to hone the contrast or color match in a scene. The compositing artists have already done an incredible job with the integration, but they’re typically viewing their work on smaller screens, so some of the really subtle stuff is only noticeable once we have it in projection and in the full context of the scene.
Park Road Post: Team and Technical Setup
Give us a little background about your environment at Park Road Post Production in Wellington, New Zealand, where you did most of the work. What kind of support team did you have, and what was your equipment setup?
A movie of this scale certainly takes a village. From Lightstorm in Los Angeles, Mastering Supervisor Robbie Perrigo was my co-pilot in the DI. Tony Pratt and Dylan Patel from the New Zealand side of Lightstorm were back with us from Avatar: The Way of Water and were heavily involved in stereo reviews, with supportive roles in our day-to-day grading. Sam Huh and John Clisham supported us from Los Angeles and were responsible for much of our DCP QC. Mark Woods was our Post Production Manager on-site with us in New Zealand. Steve Barnett supervised the Los Angeles side of DCP QC logistics and coordinated the incredible efforts between Park Road, Disney, and our distribution mastering partners.
Park Road’s picture finishing team is helmed by Head of Production, Peter Carson. Our DI producers were Mat Fraser and Christina Hazard. Rob Gordon returned as our lead DI Editor this time, supported by Tim Willis, who was our lead on Avatar: The Way of Water, as well as Francisco Cubas. Ian Bidgood, James Marks, David Russell, Hamish Charleson, and André Tenera supported us on the engineering and technology side. Jon Newell, Matthew Wear, Gulliver Greig, Nel Barrington, Nick Seabright, and Tom Field were our mastering and QC team. Isabella Giommarelli, Ella Dove, and Greg Pawsey handled Media Ops. Wattana Moeung, Tyler Baikie, and Xavier Lignieres were our data wranglers. Adam Stonehouse was our production assistant.

We upgraded my hero grading system to an absolutely screaming Lenovo P8 powered by AMD Threadripper, and my previous SuperMicro system became Robbie’s workstation for running VFX reviews alongside me from the theater console.
- Primary system:
- Lenovo P8 with AMD Threadripper 7975wx
- 512GB memory
- 2x Nvidia A6000 Ada GPUs
- Dual 32Gb ATTO Gen 7 Fibre Channel HBA
- Rocky Linux OS 8.6
- Secondary system:
- SuperMicro SuperServer
- 2x Intel Xeon Gold 6346 CPU @ 3.10GHz
- 4x Nvidia A6000 Ampere GPUs
- 256GB RAM
- Dual 32Gb ATTO Gen 7 Fibre Channel HBA
- Rocky Linux OS 8.6

DaVinci Resolve 20.2 in Practice
DaVinci Resolve has continued to advance since we last talked. What release(s) did you use, and were there any new tools that really helped you?
We finished Avatar: Fire and Ash in Resolve Studio 20.2.
ColorSlice wasn’t yet available during the grading of Avatar: The Way of Water in 2022, but it was a welcome addition for quickly tuning hue and saturation of Na’vi skin tones and fire elements. I like having a native subtractive saturation tool, as it lets you quickly give a scene a boost of color without dramatically altering the tonality. When you want colors to be deeper and richer, it’s a great tool.
“Track Node Changes Using Color” and “Reset all node colors” are a really useful combination for tracking not only which shots are changed in a given session, but specifically which nodes.
Custom guide overlays were a long-overdue addition that makes it easy to align and justify subtitles and graphics consistently. We do all the famous Papyrus subtitles for Na’vi or Tulkun spoken language in the DI, and we have a lot of fun with the placement in 3D.
I employed a more strictly regimented node structure for this movie, which helped me group tasks between technical fixes, creative grades, and version-specific trims.
- Nodes 1-3 are dedicated to technical fixes like Dust Buster, Dead Pixel Fixer, Patch Replacer, or Stereo 3D geometry alignment
- Nodes 4-6 Primaries
- Nodes 7-11 Secondaries
- Nodes 12-16 Trims for alternate light levels
- 10 is the cut-off for “global” all-version grades, as that’s the limit we can preserve in ColorTrace

Having thought more about it, I would do it like this now:
1-10 can be omitted during a ColorTrace, which is useful. 11-13 (or more) could be trims. 14-16+ are at the start of the graph and can be expanded if more technical corrections are needed, such as Dust Buster, Dead Pixel Fixer, Frame Replacer, stereo correction, etc.

I wrote a Resolve GUI script a couple of years ago to quickly enable and disable nodes based on the tools used or the node numbers.
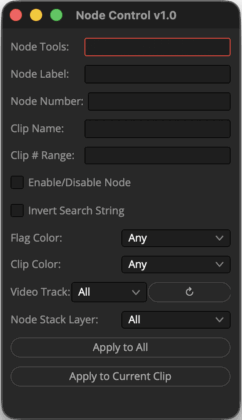
For diagnostics, I wrote a tool for providing a “Node Report.” It makes it really easy to quickly filter for specific color tools used, OFX, and filtering by node number. You can do some of that using the Clips filter in Resolve, but you can’t, for example, query whether any shots have grades in specific nodes, or whether a node with a certain label has any active tools.

This time around, I wrote a few custom DCTLs (Resolve’s native color and image transformation language) to aid in QC. We do a lot of reframes in the DI, and it’s really easy to overshoot by a pixel (or more) when you’re working on projectors with really deep shadows, like the Dolby Cinema projectors.
One stretches edge pixels and colors red if below a certain threshold value. This is important because we’ll occasionally have VFX shots with blanking necessitated by plate photography.

Another reorients the quadrants of the image so edges and corners converge, making another way to easily spot framing issues.

Traditionally, something like this could easily be done with a Fusion effect or even just with Resolve FX on the Color page. But our global framing alignment is done in Output Sizing, which happens after all of that. DCTLs and LUTs are processed after Output Sizing, so it’s the perfect place for it.
AI, Vibe Coding, and the Colorist’s Toolkit
You and I have discussed your custom tools in Resolve before, mainly custom scripting and DCTLs. That’s something you’re known for, and it has enabled you to deliver complex shows like the Avatar films with a relatively small crew. Now that the AI revolution and vibe coding have made it easier to create these solutions, I think it would be great to give people a more detailed idea of how you approach custom solutions in your workflow.
First off, what are the general types of custom solutions you’re creating?
Around 2013, I got my first taste of real “studio” workflows working at Technicolor on Iron Man 3 with colorist Steve Scott and DI editor Bob Schneider. I learned that a lot of the manual processes that I was doing at the boutique and independent level could be automated, often with very simple bash or python scripting. Nothing had to be battle-tested, commercial-grade software ready for public consumption; it just had to be functional within the environment and project you were working on.
That led me to write many custom data management and imaging science scripts for my own use on independent projects. That experience was critical during my work at Bad Robot on Star Wars: The Force Awakens, where I wrote custom automation scripts to search the file system for shots and build Mistika timelines (environments). “Bounty Hunter” and “Cargo Hold” (my script names) are the two I can remember.
Most of the heavy automation comes into play on visual effects projects like Star Wars, Avatar, or, at the time I’m answering this in New Zealand, James Cameron and Billie Eilish’s 3D concert film, Billie Eilish: Hit Me Hard and Soft.
How do you identify processes and roadblocks that could benefit from a custom solution?
Anything that costs you mental energy but does not result in creative output is something you should seek to automate or at least drill down into a methodical or rehearsed process. With enough repetition and training, something can become instinctual, so even when you are tired or frazzled by an unexpected situation, you still follow procedure. I try to identify common pitfalls and sources of human error and prioritize those. I figure that the less time I spend making stupid mistakes, the more time I can do something creatively worthwhile.
What are some specific examples you implemented on Avatar: Fire and Ash?
Even something as simple as merging stereo clips in Resolve is nested within a few menus and requires a few clicks. But I wrote a script that, with one key press, syncs all the shots in a bin and handles a variety of conditional naming we encounter from different vendors (like “Left/Right” vs. “le/re” or “L/R”). It’s a simple script, but over the course of a movie, the time saved by the team is probably significant.
I improved our shot indexing and timeline update methods, bypassing EDL-based updates entirely. The file system is regularly indexed as new shots arrive and in any given timeline, whether it’s a reel or a trailer or even a VFX review timeline, we can run a script from in Resolve that scans the timeline, searches out the newest versions on the file system, imports them, stereo merges them, cuts them into a new video track, applies grades and sizing, and applies the relevant color Group.
When all of your shots are organized by shot ID on the file system, you can hunt them down yourself pretty painlessly, but when you have to do it for hundreds of shots, that’s a lot of wasted time. Want the previous or next version? That can be a hotkey.
Want to update everything in a timeline, then propagate the new shots to other grade version timelines? Another hotkey.
On a project where your shots span multiple volumes and are delivered in packages from different vendors, you need something automated to “just give me the latest shots, now!”
I expanded on my real-time Resolve shot HUD script to also query a few databases to tell me:
- A bit of history on a shot
- What its source color space was
- If it was a VFX shot, what the VFX work was being done
- What package the VFX came in
- The VFX vendor

Simple stuff that makes it easy to figure out what’s going on with a shot, if I should be expecting an update to it soon, or if it’s been finalized. It makes it really easy, so if someone bumps on a shot, I can just look over to my scopes screen and see whether it’s pending VFX or a work in progress.
You’ve been creating these tools by hand for a long time. Have you started using AI and vibe coding to accelerate the process? How’s it going?
It’s a wild time right now. In 2022, ChatGPT just came out, and I played around with it a bit and found it fun, but not really reliable. By 2024, it was basically a replacement for StackExchange and my go-to for figuring out common Python or bash routines. I could do general things with it, and it supplemented hand-coded scripts, but something niche and not broadly documented, like the Resolve API, was tough. It would hallucinate API calls that didn’t exist. So I found it useful for small logic problems, but couldn’t rely on it for building something from the ground up.
Now, LLMs (large language models) are pretty incredible, and products like Codex and Claude Code are coding and project-oriented. So you can start from scratch, or import an existing codebase and say “what have I done wrong, make this better,” and it’ll clean up sloppy code, point out problems you didn’t know it had but were bound to run into eventually, and build and run a test suite to verify the code actually produces the result it says it will. The ability to run tests and catch its own errors is huge.
So now I’m spending less time staying up late writing scripts and more time watching old TV shows.
Can you share your prompting approach? How are you priming the AI to get the best results?
I don’t think I have a novel strategy there. Like anybody, I think LLMs respond best to clear direction and coherent goals. I think most people who work in film recognize the difference between a director who micromanages, but isn’t clear about what they want, and the director who gives you a clear picture of what they want, but leaves you to accomplish it your own way. The latter works; the former does not.
I’ve never had the goal of becoming a software engineer or computational scientist. I want to make movies and do it the best way I know how, and that involves a heavy reliance on other people’s software. But now, if I have a clear idea of what I want to accomplish, I can spend more time iterating on that process and evolving it into something really useful to me, rather than getting hung up on syntax or logic puzzles that give me a headache after an already long day in a dark grading theater.
From a philosophical standpoint, how do you think the relative accessibility of this process changes the role of colorists?
I think it only changes their role as much as they want it to. A lot of colorists just stick to color. Maybe they work on short-form projects that are relatively static from an editorial perspective and don’t involve thousands of VFX shots, versioning, or continuous data management. So most of what I automate isn’t relevant to them anyhow. None of what I’m doing replaces a colorist or an editor. We still had two fantastic DI editors, Tim Willis and Rob Gordon, on the Avatar sequels and the Billie Eilish film. It just means we can get more done and meet our ambitious deadlines.
I (perhaps controversially) think that a computer should be better at color matching than a human. There’s a lot of nuance to it, and the current “Auto Color” and color match functions in Resolve only sort of work. Nobody is selecting a whole scene, applying Auto, and hitting play. But I think that should be possible and that subtle lighting differences between takes, particularly in long dialogue coverage, should be something the grading software should quickly be able to match at a scene-referred level, and tee it up for the colorist to do the creative part.
Shot matching might be somebody else’s bread and butter, but it’s not elevating the material creatively, which is what I want to do. Every budget is too tight, every schedule is too short, so I’d rather spend the time I do have on a project making it the best I can creatively.
How can others benefit from the investment you’ve made in these custom tools?
Many of them are available as free web tools. I developed these years ago when I moved to EFILM and found that we had virtually no in-house software development resources available to end users (colorists, editors, producers), and that I needed easy-to-access, bespoke editorial tools. So I got a friend to help me get started with a Python Flask website where I could slowly port over some of my scripts into a mostly user-friendly website.
I’ve personally maintained that for years as a little gift to others working in post-production. I don’t actually know who is using it or for what, since I didn’t know how to do any sort of user credentials or login stuff. At best, Google Analytics shows around 1,400 users used it in 2025! That’s wild since I barely told anybody about it. Someone’s been making great use of my CDL Exporter tool, which I’ve hardly used myself.
Recently, with the help of Codex, I built my dream Framing Chart Composer tool, so I don’t have to toil in Photoshop any longer building out my trademark, overly elaborate, diagnostic-filled, stereo-3D, multi-format DI framing chart head leaders.
I was floored by how much can be done in the browser with no backend server. You can make OpenEXRs in JavaScript!?
For the episodically inclined, I also made a Slate Composer for batch-composing video slates with nicely aligned text, variable tokens, fonts, graphics, etc. It’s wild what you can do when the obstacles of your own limited programming expertise are lifted, and you’re freer to creatively iterate on something quickly.
I don’t think someone will vibe-code the next DaVinci Resolve overnight tomorrow, but maybe one day they will.
Working with Different Filmmakers
Your career so far has run the gamut from small indie films to the biggest blockbusters. I would imagine there’s a wide range of personalities and styles, with filmmakers at different stages of their careers. What are some of the differences you’ve seen, and how do those play out during the finishing process?
I think many people underestimate how important interpersonal dynamics are in this job. They assume it is mostly about technical skill or having a strong eye. Those things matter, of course, but I would argue that the way you build trust with the filmmakers you work with matters even more. The technical and creative aspects of the work are relatively portable from project to project. What changes dramatically is the range of personalities, communication styles, and expectations you encounter.
The most experienced directors I have worked with tend to be confident in both their taste and their understanding of the process. They can still change their minds, but it usually leads to clearer direction and less hesitation. Less experienced filmmakers often haven’t developed that confidence yet, and they may benefit more from a colorist who is willing to take the lead and present a range of options to help them clarify their vision.
To reiterate one of my earlier points, nobody benefits from micromanagement. In my experience, the most seasoned filmmakers are often the ones who trust their artists and craftspeople to approach the work in their own way, then refine from there. Nobody gets it exactly right on the first pass. That is not how collaborative art works.
I often find low-budget projects more challenging because of the expectation that a great deal can be accomplished in a very limited amount of time. I would even argue that, on a short film, one hour with the world’s most experienced colorist may be less valuable than a full day with someone far less experienced. Filmmakers, especially newer ones who are often working with the smallest budgets, need time to process what they are seeing and think creatively about what they want. When every minute is being billed, that natural part of the creative process can start to feel like an expensive inefficiency.
That is why, on low-budget projects, I usually recommend splitting the work into at least two sessions. If they can only afford one day, I would rather do two half-days than one full day. Let them leave with a Frame.io link or a file they can review on their own time. Give them space to digest the work, reflect on it, and come back with decisions that have had time to marinate.
MOSAIC and the Road Ahead
Finally, you made a big move between Avatar: The Way of Water & Avatar: Fire and Ash, co-founding your own finishing house, MOSAIC, in Burbank. How do these kinds of custom tools affect your strategy and how you’re positioning MOSAIC in this shifting market? (Author’s note: I’m one of the colorists on the roster at MOSAIC)
We’re a small company right now, and it’s important to me that we’re artist-led. But it’s also really important to me that we excel in technology and engineering. I’ve worked at the biggest and best post-production facilities in the world and been spoiled by incredible technology. It only keeps working when you have incredible engineering and expertise behind it. We are really lucky to have that, and our clients benefit greatly from that, too. When you come and work with us, you’re getting a world-class creative experience backed by state-of-the-art technology and workflows. We’re a boutique with the horsepower of a facility, but without the overhead. That means more of your money is on screen, enhancing your creative work as a filmmaker rather than being wasted on background processes and minutiae.
Bespoke tools are the bedrock of how we can do what we do quickly and efficiently, which I believe ultimately frees us to be more creative. At the end of the day, that’s why we want to be here: to make Hollywood movie magic.
Conclusion
Many thanks to Tashi for again giving us a peek into the finishing process of one of the biggest films around, sharing the philosophies behind his custom tool development, and offering insights into the different strategies he employs on big- and small-budget films. And if you haven’t yet, I highly recommend checking out his tools website, tools.colorbymosaic.com, for some really useful free web-based tools.
Questions or comments? Leave a comment!
Is this Insight useful to you? Let us know! Mixing Light is all about community discussions, and we’re curious if you found this helpful, if you have something to add, or if you have more questions you need answered?
– Peder
