How to handle the ‘Show Me Something’ Client Request
Plus: Using Resolve’s ‘Layer Mixer’ as a ‘Look Switch’
Misdirection is the stock-and-trade of being a magician
I learned this first-hand in 8th grade when I performed my first card trick in public. I had been working on it for months, at home. Alone. Following the advice of about a half-dozen magic books, I developed a patter for this trick. I had also honed my card handling skills to the point I could shuffle a card 5 deep into a deck and keep track of it.
The trick itself? It’s one you’ve seen many times. You pick a card and the magician shuffles the deck, guesses wrongly a few times and then finds your card face-up in the deck.
Executing the trick is very easy – once you’ve got decent card-handling skills.
But the key to that trick: Getting the audience to look someplace else at a precise moment
Why does the audience need to be misdirected? Because the moment when I, as a magician, am flipping the card over… that moment is in full sight of the audience. And even if you know what I’m doing and looking for it, I only need to grab your attention for a split second—and you’ve missed the moment.
Keyframing color correction moves is best executed like a magician’s misdirection
If you hide your keyframes during an on-screen action, even if your audience (in our case: the director, producer or DP) knows you’re making a move—they still can’t see that the move is artificial. It looks natural and persuasive. It’s magic.
In my previous Insight on Scarlett’s Revenge, I showed you a long tracking shot where I used multiple elements to help hide my keyframing misdirection. I call this misdirection: Motivated Key Framing
This Insight continues with the notion of Motivated Key Framing but layers a creative artist’s worst nightmare
In fact, you’ll know you’ve matured as an Editor, Colorist or Visual Effects pro when this ‘worst nightmare’ stops haunting you. It’s the inevitable moment when your client says:
“I’m not sure what I want here. Show me something.”
When you’re new to your craft and early in your skill development, you might as well be a deer looking at a tractor-trailer barreling towards you at midnight. You’re locked in place, unable to move, unable to talk—except you’re not a deer; you understand what’s happening, that you have to DO something or you will be plowed over and destroyed.
What do you do when your client is out of ideas?
Don’t say: Pull out the plug-ins!
Or if you’re a colorist: Buy a LUT!
The truth is, if you don’t know what you want to do, LUTs and plug-ins are a treadmill. Without a clear intent of the end-goal, you just step through them all and end up nowhere.
But you’ve got to start somewhere! Right? So where do you start?
Before I tell you where to start, let me suggest you find out as early in your client session as possible about this client request. In the best scenario, you’ll realize very quickly that there’s a problem you’re being asked to overcome. If you find out early, this gives you time to find an answer.
As you work through the job, you know in the back of your mind there’s a problem needing solving and you can turn it over in your head—looking for inspiration.
Answering the ‘Show Me Something’ request is about working with what’s right in front of you
And that’s what I’ll be showing you in this Insight, how what was in front of me was the solution to the problem. And that’s the case 95% of the time. If your client is talented, if they hired a talented crew – the answer is almost always buried within the project in front of you. You’ll just need to work with it, around it, and under it—once you understand the general nature of the footage you’re working with, the answer will be sitting right in front of you leaving you gobsmacked.
Yes, I did end up reaching for a plug-in – but only after I was 85% of the way to the finished image. By knowing I had to do *something* for the last shot of the short film, and because I discovered this was a problem early in the project when it came time for me to ‘Show Something’, I found the answer quickly. And the answer made total sense within the context of the overall narrative.
But at first, I had no idea what to do. So I moved on, let my the back of my brain work the problem. Eventually, the client loved the final result.
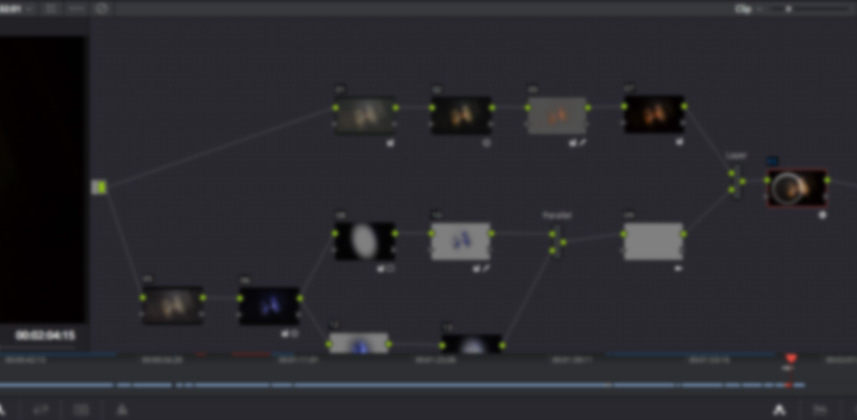
Notice the Motivated Key Frame misdirection of my final result in this Insight
Using Resolve’s Layer Mixer node, I was able to ‘turn on’ the final look of the closing shots using motivated keyframing; hiding them within onscreen actions.
And in case you’re wondering – my magic trick at my 8th-grade dance class (I was attending Minneapolis’ Children’s Theater Company during the afternoons) was a huge success (but also a failure). In fact, I was amazed beyond belief since I did the trick with 10 kids completely surrounding me. I had nowhere to hide. But I followed the plan, I stuck to my patter, and my trick was never exposed.
The failure? I was so stunned that no one saw my obvious sleight-of-hand, I stopped doing magic the very next day
It scared me how easy it was to fool people. 30+ years later I’m still fooling people, only I don’t have to see their faces as I do it—so maybe that’s why I’m still in post-production 🙂
Enjoy this video Insight!
-pat
Member Content
Sorry... the rest of this content is for members only. You'll need to login or Join Now to continue (we hope you do!).
Need more information about our memberships? Click to learn more.
Membership optionsMember Login
