Moving Looks from Resolve to SpeedGrade
Mathieu Marano C.S.I.
Editors Note: This is a guest blog post from Colorist Mathieu Marano. MixingLight has edited and adapted it to conform with our style. The original is here. You can visit Mathiue on his website, interact with him on Twitter. He also helps run a User Group in Montreal.
Moving Looks from DaVinci Resolve to Adobe SpeedGrade CC
I’ve been working as a Resolve colorist for the past couple of years, but last summer I was asked to sub for a veteran SpeedGrade colorist on a drama to be broadcasted on Radio-Canada. I did the first two shows on Resolve and finished the remaining shows on SpeedGrade. I was amazed at the speed and responsiveness of the Adobe app.
Color Correcting with both Resolve and SpeedGrade
Soon I was regularly jumping between Resolve and SpeedGrade depending on the project and the DP. I find Resolve to be a much more effective tool for creative work with a DP who wants to try very precise variations at the beginning of a project. On the other hand, SpeedGrade is much faster grading through long episodes, applying vignetttes and doing modifications on whole scenes during approval sessions.
The Need for Sharing Looks
Since I was changing software so often, I needed to find a way to move grades or Looks across platforms—and I found out I’m not the only one doing this. This is why I’m writing this article on exchanging Looks between apps.
This blog post is about building a grade or Look in Resolve and moving it to SpeedGrade to use it in another project.
Keys to the Kingdom: Look-Up Tables
The key to moving Looks between SpeedGrade and Resolve is using Look-Up Tables (LUTs). SpeedGrade can import, use and convert various kinds of LUTs AND Resolve can create Look-Up Table color corrections you apply to a shot.
What is a Look-Up Table?
Look-Up Tables (LUTs) are a set of transforms. They can recreate color modifications applied to a digital image: saturation, luma, hue. It takes the original unmodified RGB value of the source image, creates a file (LUT) and you can apply those same modifications to another image.
[editor’s note: MixingLight has a full series of video tutorials about LUTs in our Insights Library]
LUTs are very powerful but they have their limitations of the type of grading operations they can perform. For instance: Vignettes, gradient windows or isolations / windows / masks (where the same values in one part of the image are manipulated differently than those same values in another part of the image) are all operations that will break a LUT, rendering it useless and likely destroy your image.
Other things that a LUT won’t retain: Blur and shrink tools used to tighten key selections in the HSL Qualifier; no modification that relates to space, movement and position will be kept in the LUT; Blurs, noise reduction or OpenFX plug-ins – none of these carry across either. So refrain from using any of these tools for any grade you want to translate correctly using Look-Up Tables.
Step 1: Creating the grade in Resolve
Here, I’ve created a look in Resolve 10 and want to move this grade into SpeedGrade:

I’m using 4 nodes in Resolve and in the image below you can see the result after enabling each node:

- Node 1: I applied Resolve’s default Arri Log C to Rec 709 LUT
- Node 2: I changed the color of the big yellow shoe to orange with the Hue vs Hue curve
- Node 3: I warmed up the scene with the Primaries
- Node 4: I changed the color of the bag from blue to purple with the Qualifier and a Hue shift
Step 2: Exporting the LUT from Resolve
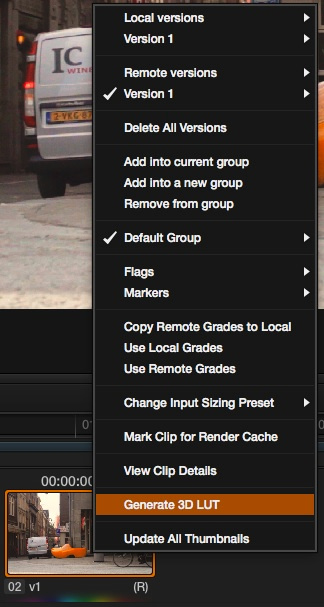
Once I’m done building the grade in Resolve, I need to create a LUT of this grade to be able to pass it on to SpeedGrade. To do so, right-click the thumbnail of the shot in the Thumbnail timeline of the Color page and choose Generate 3D LUT.
A pop-up menu will then appear to let you select the right folder to save your LUT. I suggest that you create a new folder with your project name. You can also name your LUT accordingly with the episode, scene and shot number.
To make sure that the LUT you just created truly reflects the grade you worked on, create a new grading version, reset the grade back to default and apply this new LUT to the shot. It should look like the grade you built with the nodes.
We can now copy this LUT to a disk or send it by email to the SpeedGrade station.
Step 3: Importing the LUT into SpeedGrade
Unlike DaVinci Resolve, which has a specific folder you must place your LUTs, SpeedGrade can open LUTs anywhere on your hard drive using its LUT Look Layer.
And if this were a LUT I always want instant access to (and since I’m on a Mac), I could copy it to this location, within the SpeedGrade app itself:
Macintosh HD->Applications-> Adobe SpeedGrade CC ->[right-click the App to Show Package Content]->Contents-> MacOS->Lumetri-> LUTs
[editor’s note: Always keep a backup of this LUT if you copy to this location… it may get overwritten when updating SpeedGrade to a new version]
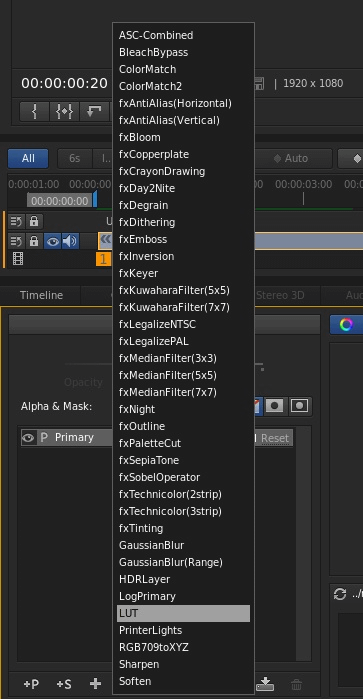
So, once you’ve opened your new SpeedGrade project, jog to the desired shot, and go to your Layer stack to add a new Look Layer (using the “+” menu). In the pop-up menu, select the ‘LUT’ look layer.
In the Layer stack with the LUT layer selected, if you didn’t place the LUT in the SpeedGrade LUT folder you can browse your Mac and load it by clicking the “…” button next the drop down menu.
If – as happened on in this example – your look doesn’t look exactly the same in SpeedGrade as it did in Resolve, it’s may be because you have a gamma shift or interpretation difference on your footage, based on how SpeedGrade and Resolve may interpolate the image slightly differently.
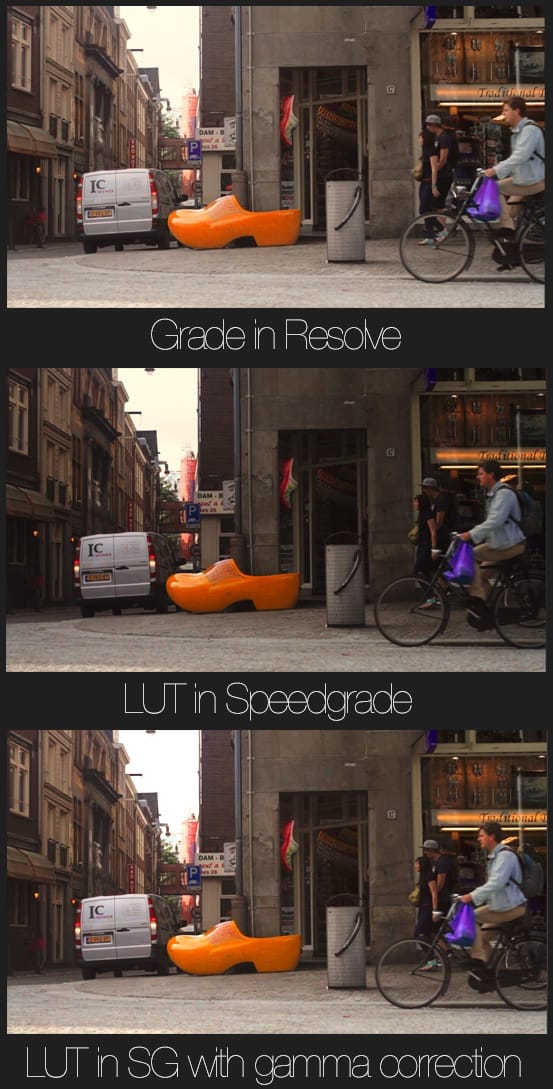
To fix this: Add a Primary Layer in your stack and adjust the gamma to match the desired final Look.
Bonus: Moving Looks from SpeedGrade to Premiere Pro
So, we’ve moved a grade from Resolve to Speedgrade using the LUT tools of SpeedGrade. With the new integration of SpeedGrade and Premiere Pro, if we save our final SpeedGrade correction as a .Look file, you can now open that LUT-turned-Look file inside Premiere using the Lumetri Effect… and now we’re moving Looks from Resolve to Adobe’s Premiere Pro CC!
Comments
1 thought on “Moving Looks from Resolve to SpeedGrade”
Leave a Reply
You must be logged in to post a comment.

Thanks for the tutorial! Unfortunately the skin tones doesn’t match up – you know the reason for this?